
Share


“RADIUS server is not responding” means that a router sent a login request to a RADIUS server and got no reply in time. RADIUS is the protocol internet providers use to check who may connect to their network, so the message appears when a device tries to sign in and the provider’s check doesn’t come back.
Seeing this on your phone or laptop? Reconnect, check that you typed your login or voucher code correctly, and contact your internet provider if the message keeps coming back. The fix is on the provider’s side, not on your device.
Running the network for a broadband business? The rest of this guide is for you.
Splynx provides a robust RADIUS suite for centralized network access administration and delivery of central AAA-based services to customers. However, what happens if your NAS device cannot reach the Splynx RADIUS server or process AAA how you expect it to?
In this article, we will address common network connectivity problems between NAS and Splynx RADIUS service, and provide solutions to locate and troubleshoot them efficiently.
Examples in this article will use MikroTik as the NAS device because they are the most commonly used by our clients. Nevertheless, the network troubleshooting approaches discussed are applicable to other vendors as well.
First and foremost, it’s important to note that Splynx’s RADIUS server (FreeRADIUS, which ships with Splynx) utilizes port 1812/udp for user authentication and port 1813/udp for online session accounting.
You can also configure the incoming RADIUS protocol on your NAS (usually 3799/udp) to allow Splynx to change online user session parameters by sending a CoA or reconnect your users by sending a disconnect request to the router.
FreeRADIUS receives the requests from your routers and passes them to a Splynx service, splynx_radd, which checks the customer data in Splynx and decides whether the customer gets access. For what Splynx does over RADIUS beyond logins, see RADIUS server for ISPs in Splynx.
We will examine the most common and concerning problem – RADIUS timeout:

On MikroTik, a failed login of this kind shows up in the log as authentication failed - radius timeout, as in the screenshot above. Before you change any settings, look at the RADIUS client counters. 0 is the number of the RADIUS server entry in /radius print:
/radius/monitor 0
The output lists requests, accepts, rejects, resends, timeouts, bad-replies and last-request-rtt. Three of them tell you where to look:
For more detail, turn on RADIUS logging on the router. The log then shows each request and which RADIUS server entry the router used:
/system logging/add topics=radius
Most likely, RADIUS protocol packets originating from your router do not reach the server or the server replies fail to return to the router.
We suggest starting by checking basic network connectivity from the NAS side with ICMP-based utilities like Ping or Traceroute:
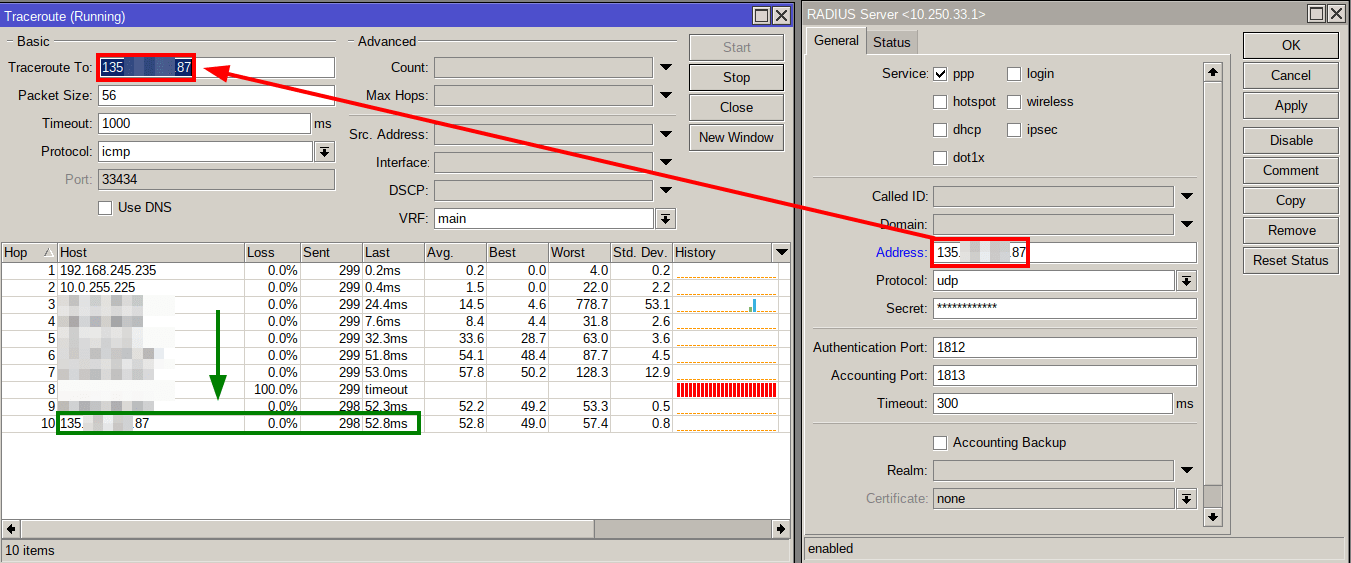
The traceroute utility can help you quickly identify potential problems along the entire route of packets traveling between the two hosts.
In Splynx, the router’s page (Networking → Routers, Information tab) has a Ping indicator next to the IP/Host field. It shows whether Splynx reaches the router over ICMP and the latency of the latest ping. Both checks rely on ICMP: if a firewall on the path filters ICMP echo, a failed ping doesn’t prove that RADIUS traffic is blocked.
However, the issue might be specifically with connecting to the UDP ports 1812 or 1813 that the RADIUS server uses. Unfortunately, many devices, including MikroTik, do not have tools like Nmap to scan UDP ports.
If there are no connectivity problems with ICMP and the server, there are most likely some firewalls that are preventing RADIUS packets from getting through at some point.
To review firewall rules on MikroTik devices, navigate to the “IP -> Firewall” menu. Ensure that there are no rules that reject or drop UDP packets on RADIUS ports, or any invalid NAT rules that may incorrectly translate the source or destination addresses in packets.
Then check that the router accepts incoming RADIUS requests on the port Splynx sends them to. MikroTik doesn’t accept them by default, and its default incoming port is 1700. In Splynx, the port is the Radius incoming port setting under Config → Networking → Radius (NAS config for the MikroTik NAS type). Use that value on the router:
/radius/incoming/set accept=yes port=3799
A wrong incoming port doesn’t cause “not responding” errors: customers still log in, but speed changes and disconnects sent from Splynx never reach the router.
From the Ubuntu Server side on which your Splynx instance is running, firewall rules that are active on the system can be checked by executing the following commands: sudo ufw status and sudo iptables -L.
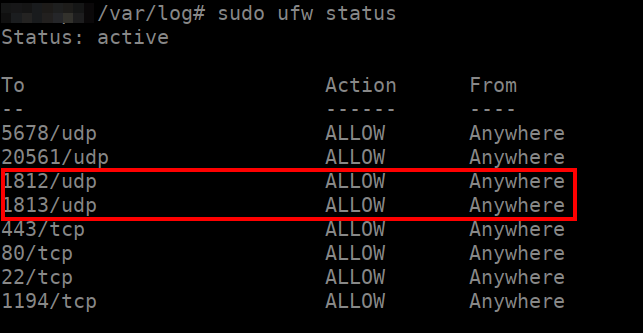
The article about the UFW (Uncomplicated Firewall) tool may be helpful if you’re new to Ubuntu/Linux firewalls.
It’s worth mentioning that in certain cases, network issues may arise that cannot be resolved by yourself when connecting to the RADIUS over the Internet. It is recommended to contact your upstream provider in such situations for assistance with troubleshooting network issues.
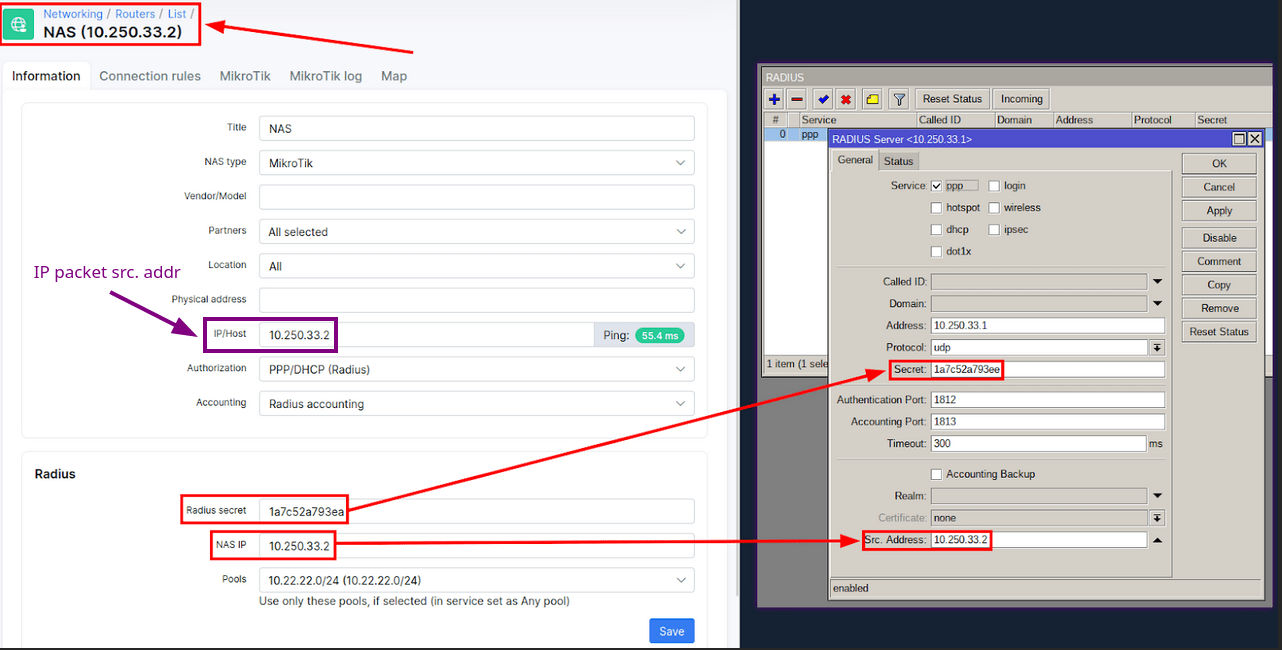
A possible reason for failed logins may be due to a mismatch between the RADIUS secret or Src. Address configured on your NAS and Splynx “Networking -> Routers” entry. To address this connectivity issue, go to the “Networking -> Routers” section on the Splynx admin portal and compare the connection password and NAS IP with the settings in the router’s RADIUS client configuration as displayed below:
A wrong secret doesn’t always look like a timeout. With CHAP, MS-CHAPv1 and MS-CHAPv2, the RADIUS server doesn’t use the secret to check the request: it accepts the request, and the router then refuses the reply. In /radius/monitor, the bad-replies counter grows with every login attempt.
It is important to note that a mismatch in the source address of IP packets sent by the router to the RADIUS server can cause a timeout error.
This may occur if there is NAT between your NAS and RADIUS server, which may translate the source address of IP packets to a different one than what is entered in the “Networking -> Routers -> IP/Host” field. In such cases, the RADIUS server will ignore the packet, resulting in a timeout.
If the router sits behind NAT, enter the public IP address its packets come from in the IP/Host field. If the router can send from more than one address, for example in a failover setup or behind certain load balancers, add the other addresses under Alternative IP addresses on the same page.
The most convenient way to check is to run FreeRADIUS in debug mode on the server where Splynx is located and watch whether the router’s packets arrive (see “Check whether packets reach FreeRADIUS” below).
To address NAT concerns and increase connection security, we highly recommend using the built-in WireGuard or OpenVPN feature provided by Splynx (Config → Tools → VPN).
By default, the timeout setting in the MikroTik RADIUS client is 1100 ms; for PPPoE with Splynx, our documentation recommends 300–500 ms. A short timeout like this could be too low if there are latency issues with the network connection between two hosts, or if RADIUS is struggling to process router requests in time.
To find out whether this is the case, compare last-request-rtt in /radius/monitor with the timeout. If it comes close, replies arrive too late: check the latency between the router and the server (see “Network connectivity problem between NAS and Splynx” above) and the Splynx RADIUS services (see “Failure of Splynx RADIUS services” below).
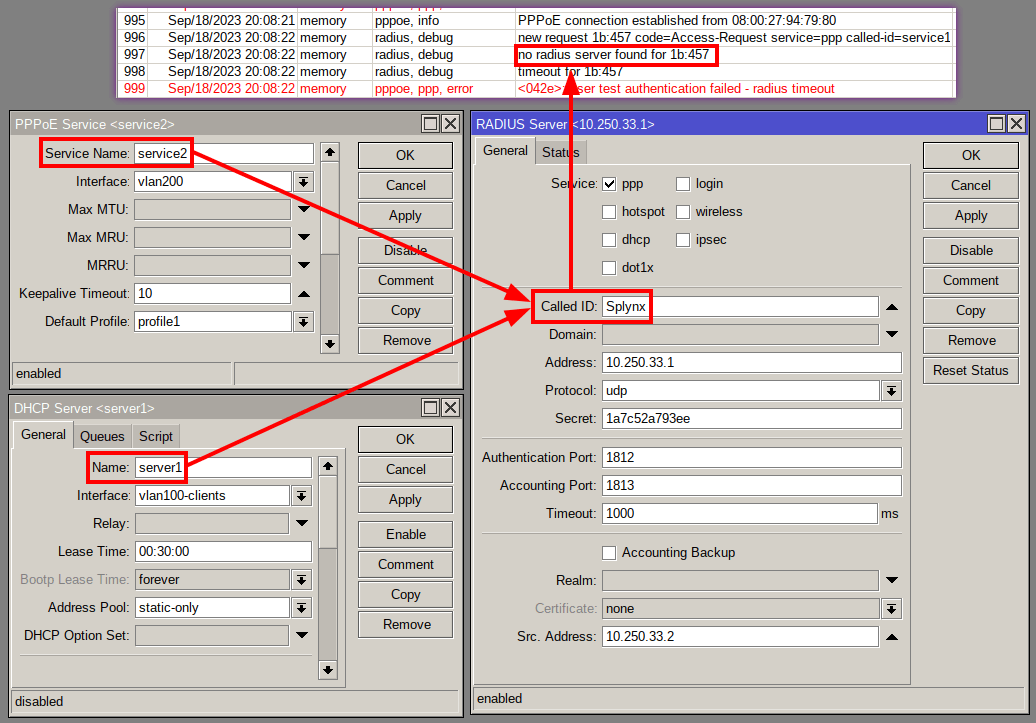
Using the “Called ID” setting in your MikroTik RADIUS configuration, you can designate certain services on your NAS to be processed by the RADIUS server entry that matches the service name, which is mainly used in multiple RADIUS server setups.
However, if there is a mismatch between the PPP/DHCP/Hotspot service names and the RADIUS server “Called ID” entry, the router will not be able to find a matching RADIUS server, resulting in a timeout error as displayed on the image below:
Also check that you don’t have several RADIUS server entries for the same service. You can use several RADIUS servers, but give each one its own services, for example server 1 for DHCP and server 2 for PPP. The exception is a failover server: the router uses the second entry for the same service only when the first one doesn’t respond.
Although unlikely to occur if your Ubuntu Server meets Splynx’s recommended hardware requirements and there are no critical hardware issues that could affect overall server operability, there is still a possibility that Splynx RADIUS services may not function correctly. For MikroTik setup and its typical problems, see our article on MikroTik RADIUS configuration and troubleshooting.
If the network path, the ports and the router settings are all correct, check the Splynx side. The full checklist is in our documentation: Troubleshooting Radius server.
Splynx writes RADIUS events to two files, short.log and coa.log, in /var/www/splynx/logs/radius. You can also open them in the web interface under Administration → Logs → File groups.
short.log records every login attempt and the reason for each disconnection:
Accept here even when the password is wrong.Log off shows the reason.You’ll also find the reasons in the customer’s statistics, under sessions (enable the “Termination cause” column). Disconnection reasons such as Admin-reset or Lost-carrier don’t come from Splynx: investigate them on the network.
coa.log lists the CoA and disconnect requests that Splynx sends, with the router’s address and port, for example radclient 10.250.32.3:3799 disconnect. Use it to check that Splynx sends to the incoming port your router listens on.
Go to Config → Networking → Radius, Advanced tab, section Debug / Logs: enable Debug and choose a Debug level from 0 to 10 (10 is the most detailed). Save and restart RADIUS with the Restart radius button at the bottom of the same page, or over SSH:
service splynx_radd restart
Then follow the debug log:
tail -f /var/www/splynx/logs/radius/debug.log
Debug mode switches itself off after 60 minutes. When you’re done, switch it off the same way, save and restart RADIUS again, so that large debug files don’t pile up.
If the splynx_radd debug doesn’t show what you need, run FreeRADIUS in debug mode and watch whether any packets arrive:
service freeradius stop && freeradius -Xxxx | tee Debugxxx.log
Let it collect data for 2–5 minutes while a customer tries to connect, stop it with Ctrl+C, and start FreeRADIUS in normal mode:
service freeradius start
If FreeRADIUS returns an error after that command, run:
killall freeradius; service freeradius restart
If no debug messages appear when a customer tries to connect, the router’s RADIUS packets don’t reach the Splynx server at all. Go back to the network, firewall and source address checks above.
Restarting the RADIUS services in Splynx usually takes up to 15 seconds. During that time, devices that try to log in can’t until RADIUS is back. Customers who are already connected normally stay online, so a restart while you debug rarely affects them.
If the server goes down or the network path to it breaks, new logins fail. Splynx gives you two ways to keep customers connecting anyway:
For everything else Splynx does for your routers and your network, see network management in Splynx.
Your subscribers see the error, not you. If they log in through a MikroTik hotspot, the error messages on the login page come from the errors.txt file in the HotSpot servlet directory on the router. You can change and translate every message there, for example to add your support phone number or to show the text in your customers’ language (MikroTik hotspot customization).

Reports in Splynx. Your guideline and operation record keeper
Here’s a detailed guideline to help you navigate and leverage Reports in Splynx effectively.

Introducing Receivables aging report. A new tool for tracking overdue payments
Today, we’re introducing the Receivable aging report, our new addition to financial statements, to quickly assess the ...

Splynx integration with Zapier empowers businesses to connect and automate workflows
Discover a new way to seamlessly connect third-party software with Splynx – no coding needed.

How to receive email notification about service plan changes in Splynx
Let’s imagine you want to receive an email in your inbox when the administrator makes some changes to a service plan.
With Splynx advanced internet plan settings, you can configure CAP for the Internet plan. It means that when a client re...

How to manage user roles, permissions, and access
To ensure account security, Splynx billing software supports multiple users that you can add, modify, or delete differen...
How to reset your Splynx admin password
Forgot your Splynx admin password? There are four ways back in, depending on who else can log in and where your Splynx r...
Two-factor authentication in Splynx
Two-factor authentication (2FA) adds a one-time code from an authenticator app to the Splynx admin login. Here is how to...

WinBox for Mac: how to install MikroTik’s native WinBox 4 on macOS
MikroTik's WinBox 4 runs natively on macOS, so you no longer need Wine: here's where to download it, what your Mac and r...
Find out how Splynx helps ISPs grow
Learn more


