New Introducing Splynx v.6.0: Run. Build. Scale. Learn more →
Splynx v.6.0

Introducing Splynx 6.0

Better Operations. More Automation. Greater Possibilities.

Redesigned Sign-Up Flow

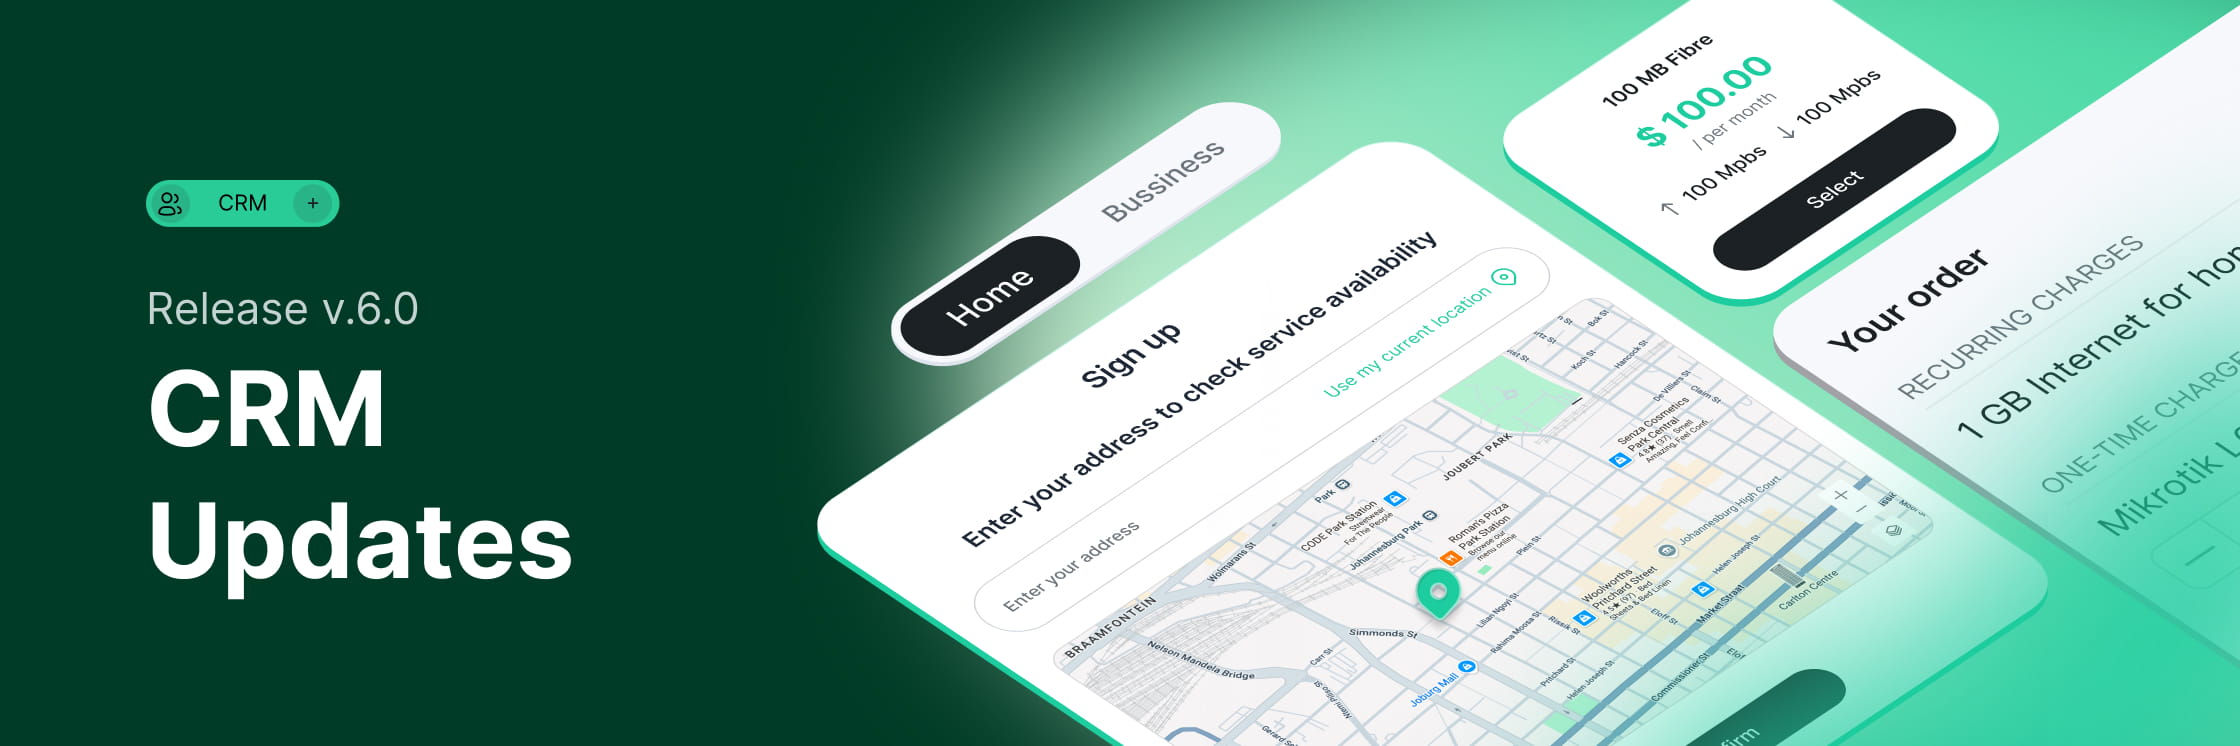
A public, self-service registration page: check coverage, choose a plan, add extras, and check out online - Splynx creates the lead or customer automatically and streamline new customer acquisition.

The new Sign-up flow is a standalone online registration page that lets a prospective customer subscribe to your services without an operator. On the public page the visitor checks service availability at their address, browses and selects a plan, submits their details, and completes checkout - optionally paying online, verifying their phone or email with a one-time password (OTP), and signing a contract. Splynx covers the entire route and creates a Lead or a Customer automatically, with the selected tariff plan and address already filled in, opens the registration ticket, and sends the configured emails.

What the prospect sees is a five-step flow, and every step is driven by your configuration:
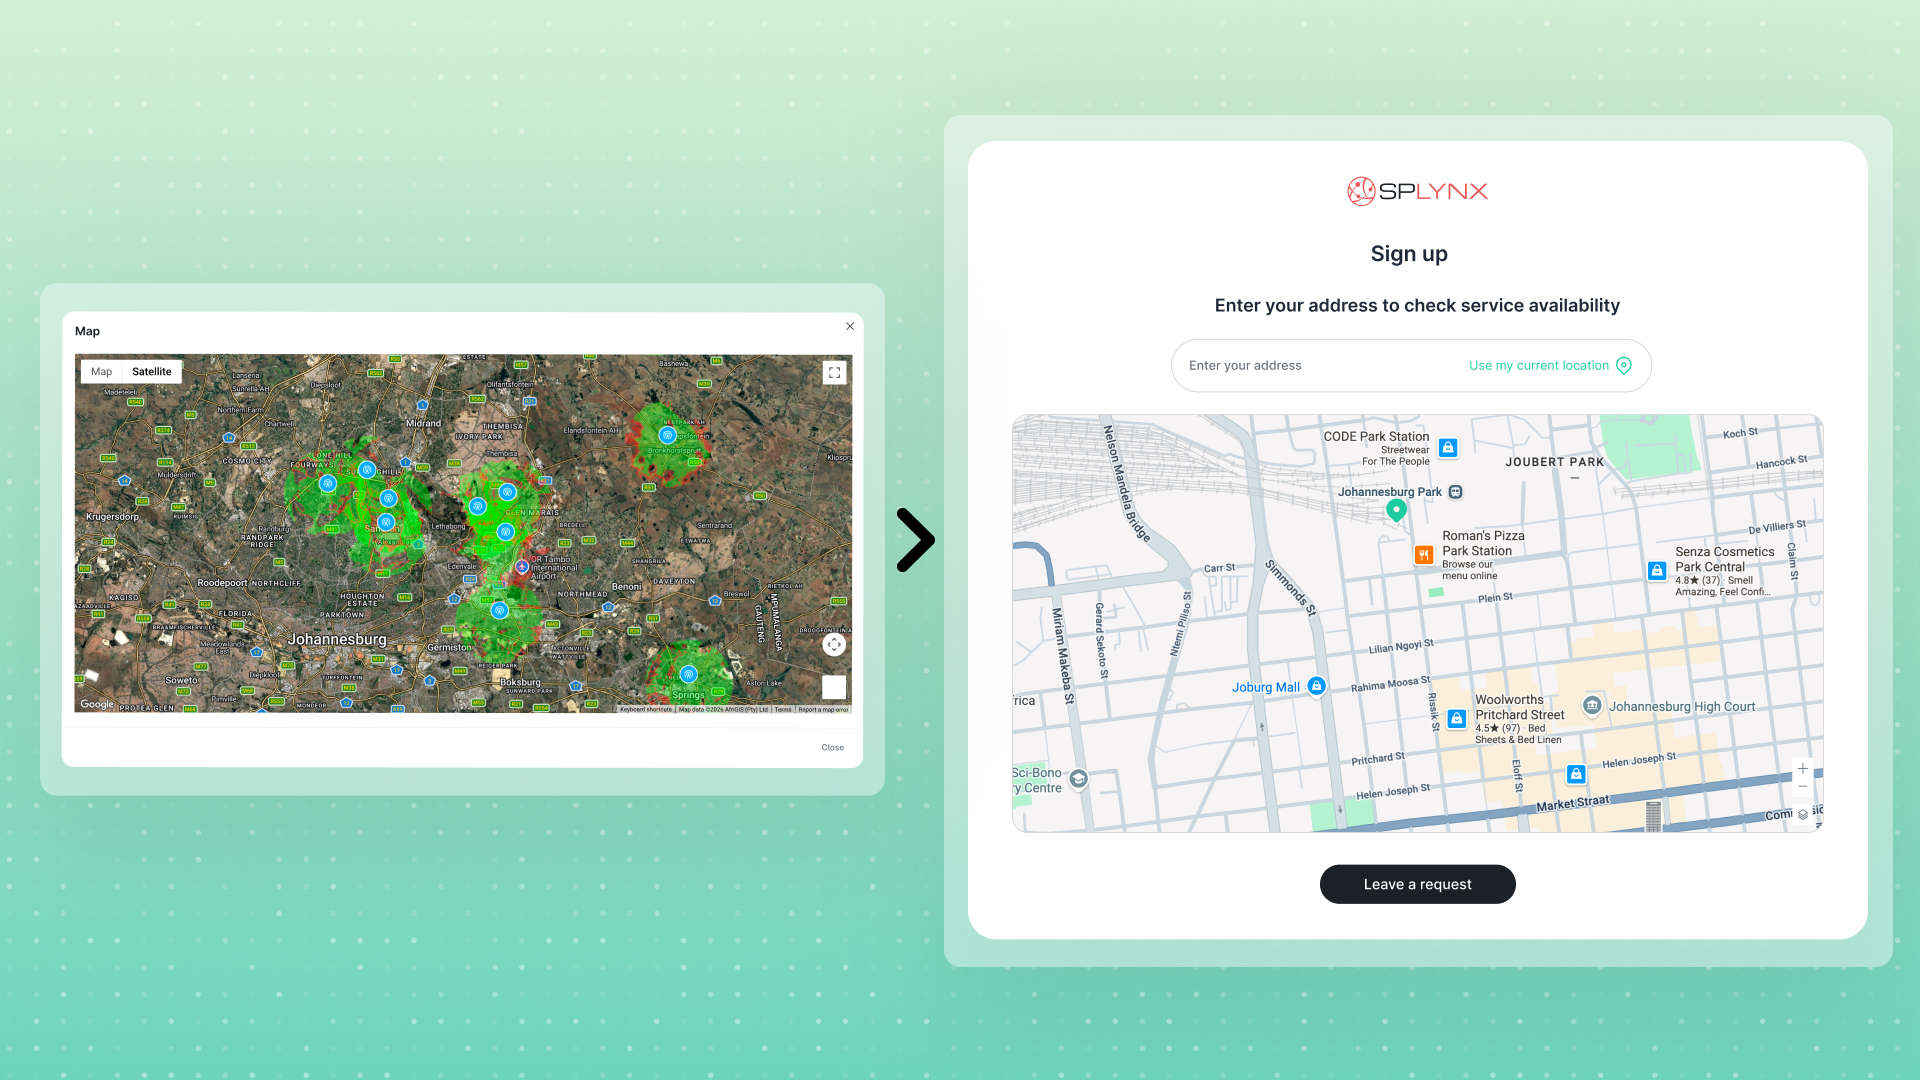
  • Check coverage - the customer enters an address (or uses their current location) and a map confirms it. Only appears when the coverage checker is enabled; the coverage areas come from your Coverage maps (see Networking).
  • Choose your plan - a Home/Business toggle plus plan cards showing type, monthly price, and speeds, with filters for connection types, network operators, and any custom filters you define.
  • Submit your information - the registration form, including any document-upload fields (for example, ID card or proof of address) that save straight to the customer's Documents.
  • Choose additional services - if you set up the Package builder, the customer can add hardware rentals or extra services, with a live order summary and Total due today.
  • Checkout - the customer reviews the order, picks a payment method, and pays.

You configure everything per Partner at Config → Main → Sign-up flow, across five tabs:
  • General settings - branding, colors, and SEO/Open Graph metadata, plus the coverage-checker toggle;
  • Plan selector - which tariffs appear, filter categories built from tariff labels, the Package builder, and Service auto-setup that can generate the login and provision the service automatically;
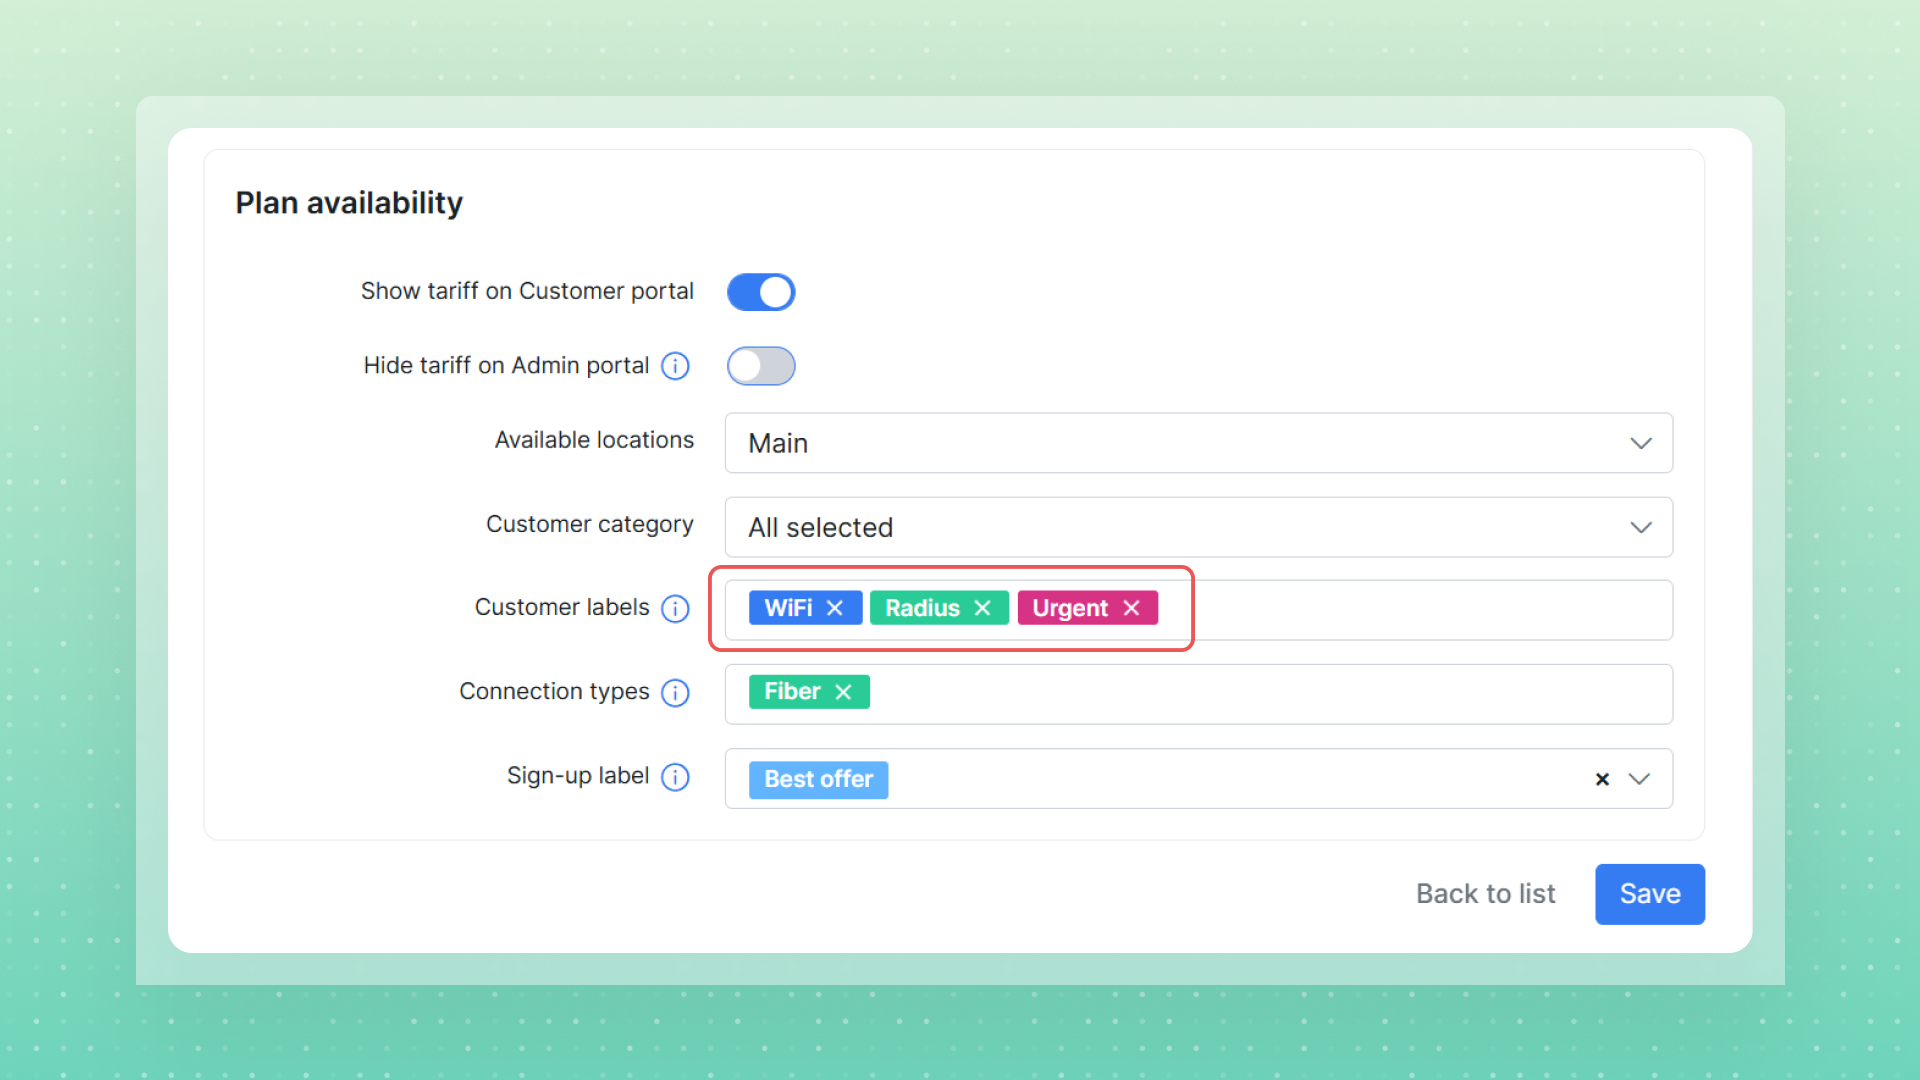
  • Sign-up - the form fields, their required status, and the customer/lead labels applied at registration;
  • Checkout - payment gateways, the service status after payment, OTP verification, a Terms & Conditions checkbox, and contract signing;
  • Notifications - the emails sent after registration.

Note that the Plan selector tab requires a specific partner - it can't be configured for the Default partner.

eSignature for Contracts and Quotes - Now with Real Digital Certificates

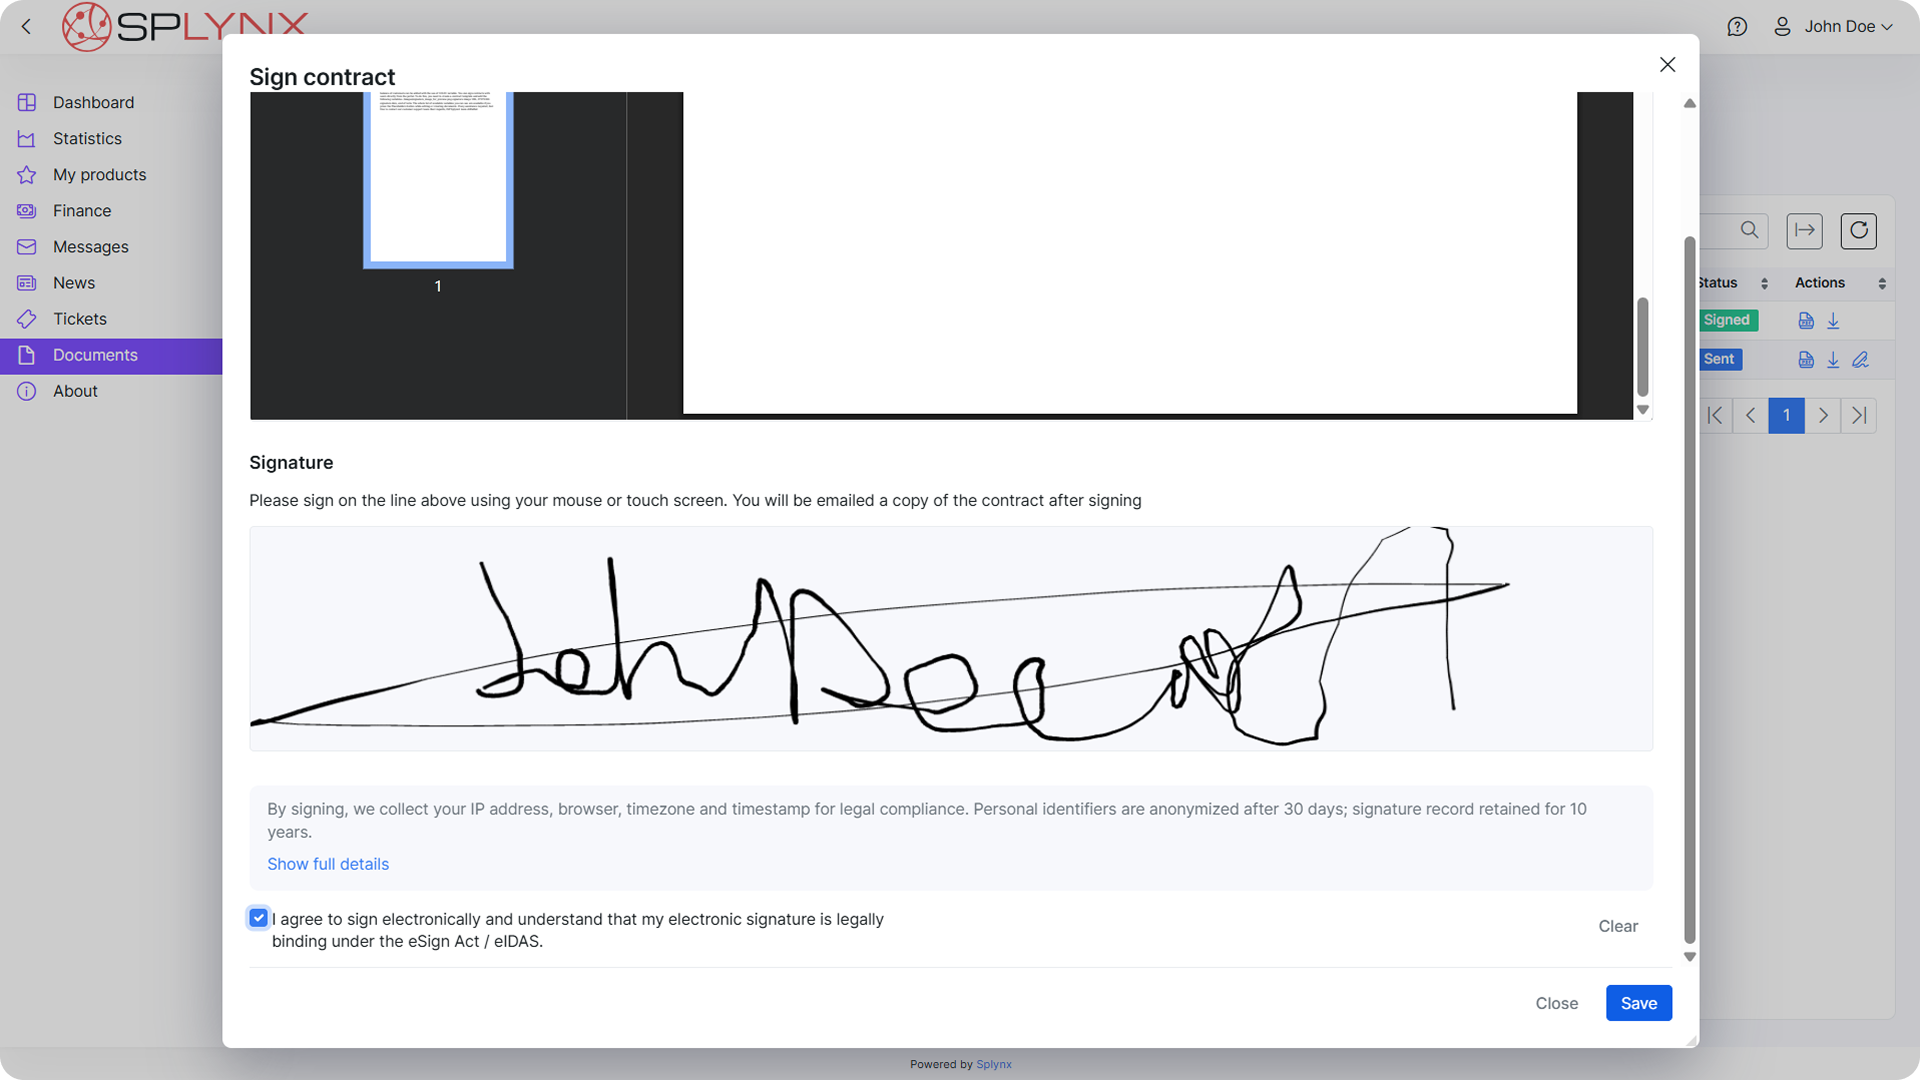
Every signed contract or quote now carries a real cryptographic digital signature, eSign Act and eIDAS compliant, tamper-evident, verifiable in any PDF reader - with no separate e-signature service to buy.

Online signing isn't new to Splynx — what's new in 6.0 is what the signature is worth. A signed contract or quote PDF now carries a real cryptographic digital signature, not just the signature image: any change after signing breaks the signature, and it verifies in any PDF reader that supports digital signatures, in line with the eSign Act and eIDAS.

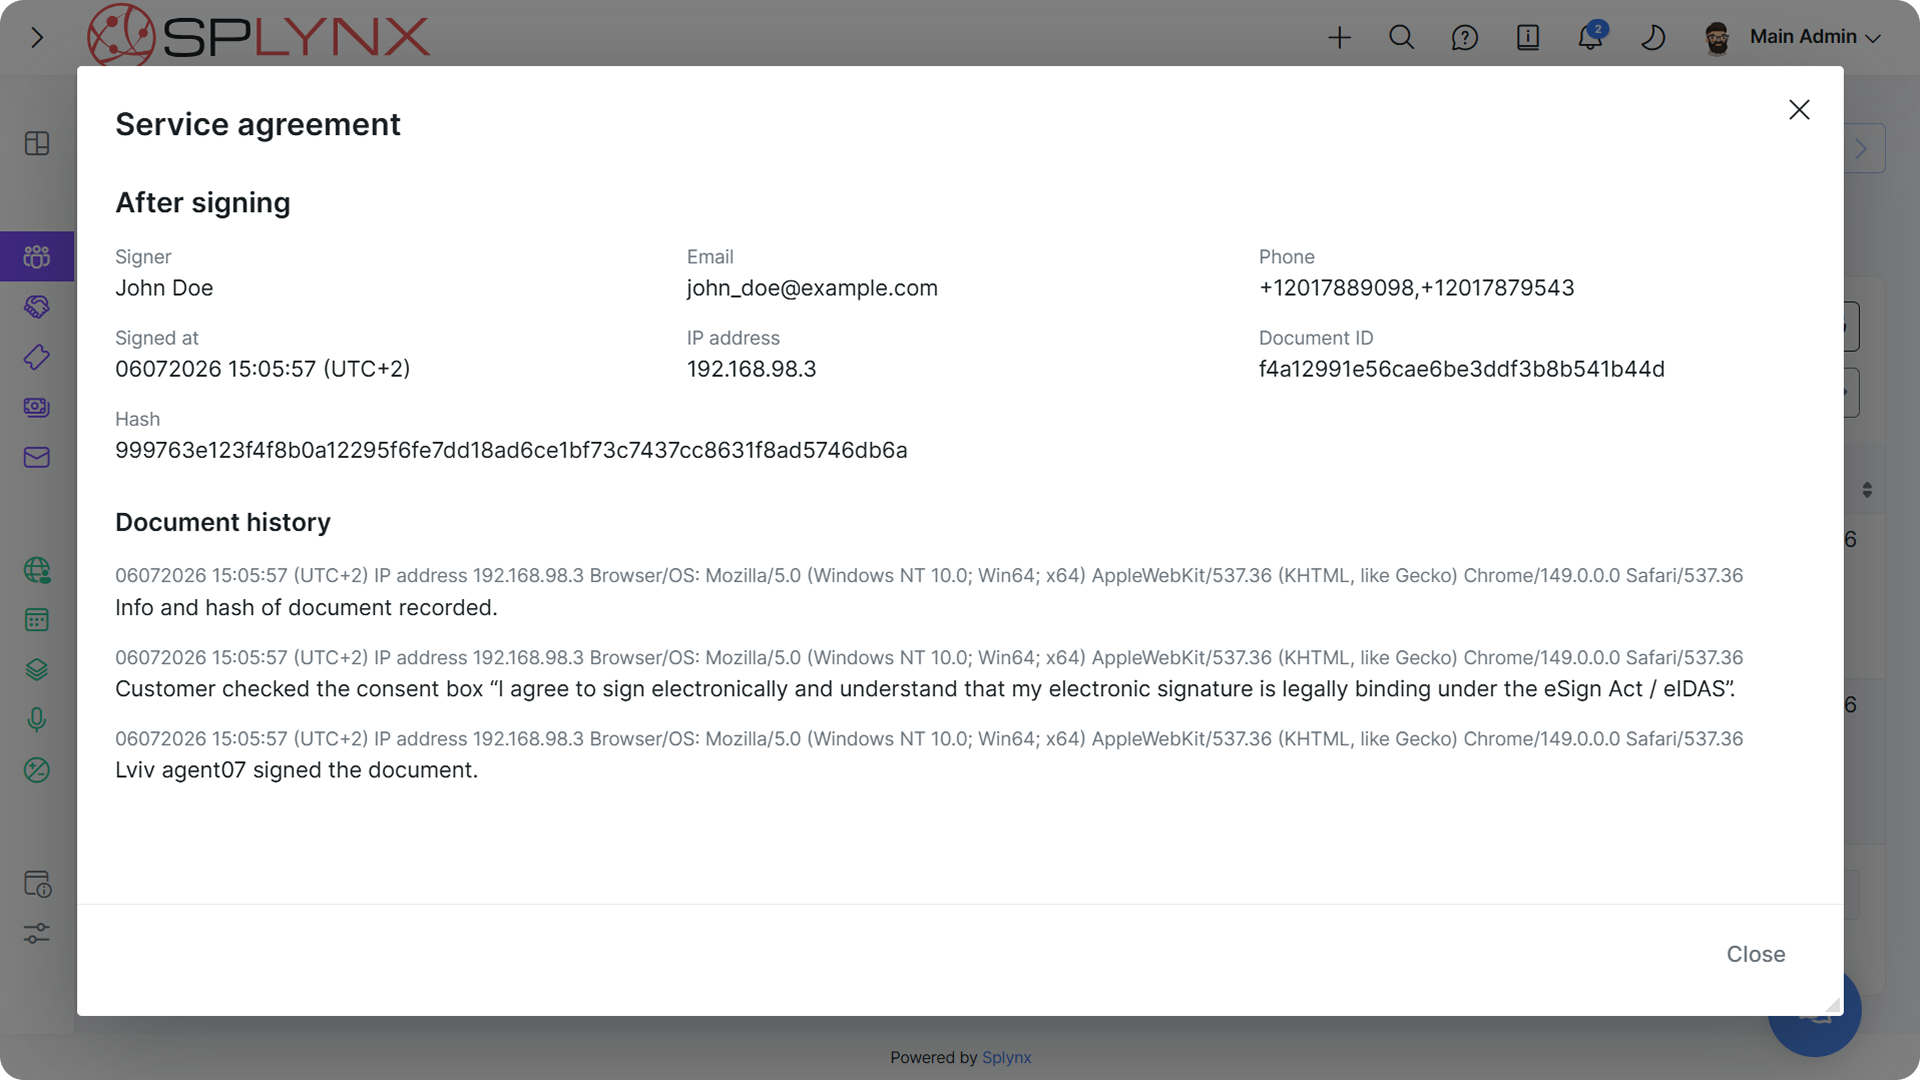
The signing certificates are created automatically during setup, with a separate certificate per partner - no configuration, and because the whole capability is built into Splynx, there's no third-party e-signing subscription to buy or integrate. Before signing, the customer must tick a consent checkbox acknowledging the electronic signature is legally binding, and every signed document keeps an audit trail (signer name, email, phone, signed-at time, IP address, document ID, and a SHA-256 hash of the PDF, plus a chronological document history).

A new Document signing page at Config → Main → Document signing centralizes the controls:
  • PDF signing - enter a Signing TSA URL (an RFC 3161 Time Stamping Authority) to embed a trusted timestamp into every signed PDF (a PAdES B-T signature); leave it empty for a basic signature (PAdES B-B). If the TSA is unreachable, signing still completes with a basic signature — an outage never blocks a customer.
  • Signing link validity - how many days contract and quote signing links stay active (default 7 days each) before the customer must request a new one.
  • Signing OTP - how long contract/quote OTP codes are valid (default 1 hour) and which email templates and SMS texts deliver them (the SMS supports {{ code }} and {{ code_valid_until }} variables).

  • Retention - two independent periods: PII retention (default 30 days), after which a cron job anonymizes personal fields on the audit records, and Signature retention (default 10 years) for the hash, consent log, and audit trail. Records under a legal hold are never purged.

Two-Column Customer & Lead View

Arrange customer and lead form fields in a configurable two-column, drag-and-drop layout.

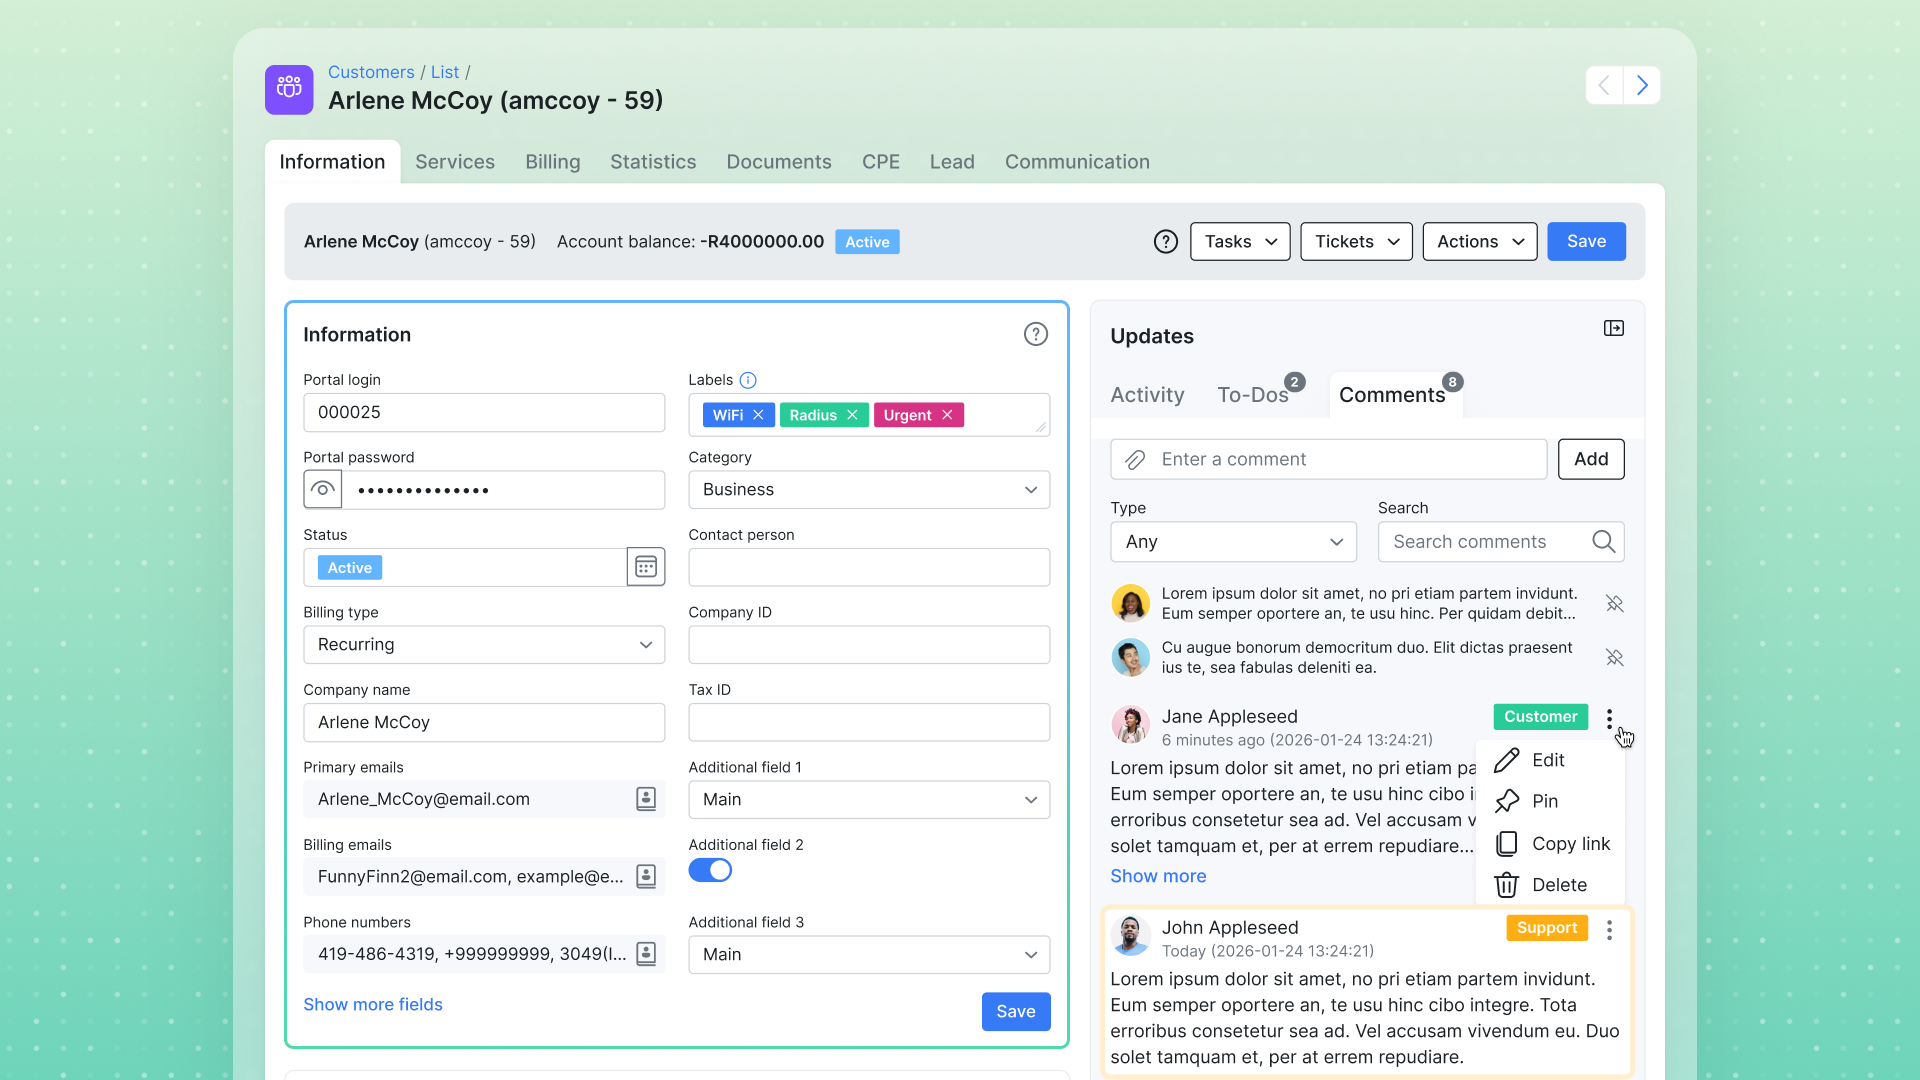
Key customer and lead details now sit in a compact two-column layout that you can reconfigure to suit your company.
Two-Column-Customer-View-ew
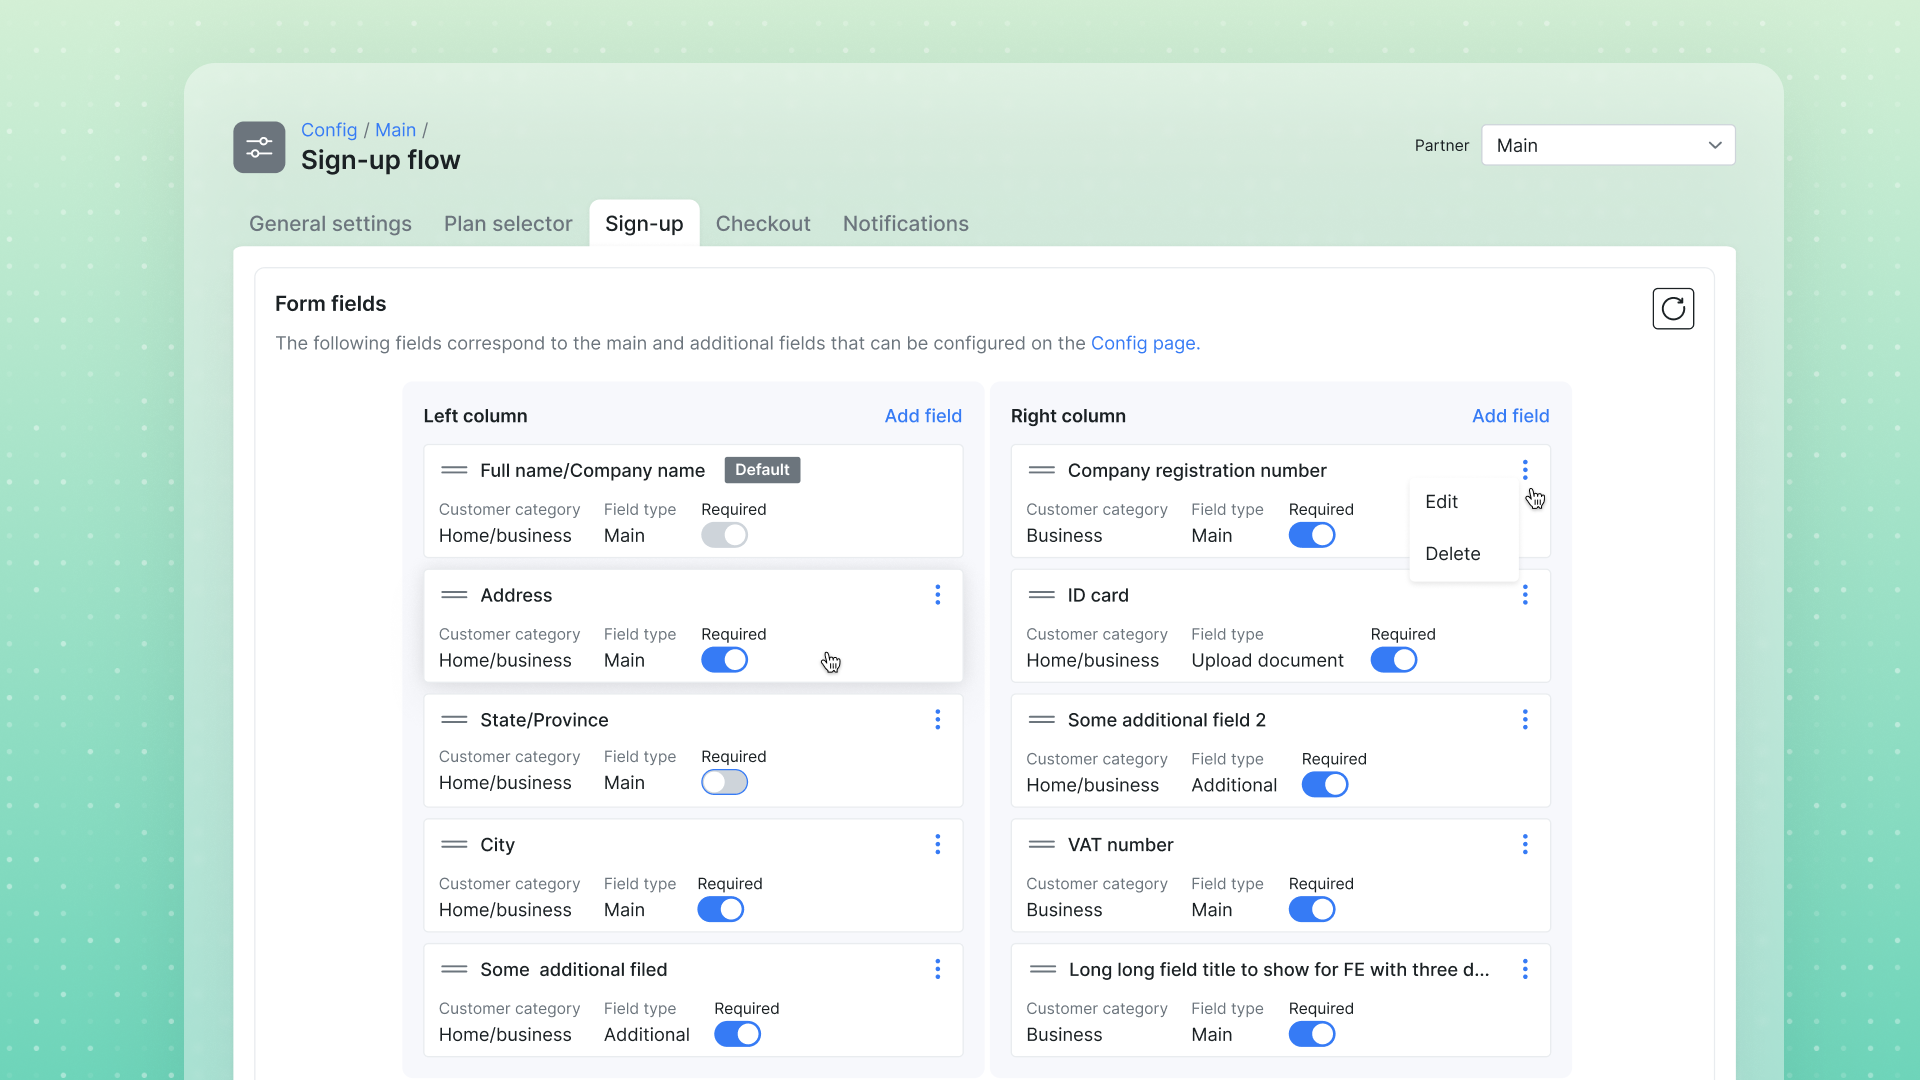
For Customers you configure it under Config → Main → Customers → Fields tab (or Config → Leads → Leads fields - for Leads), where the form is arranged as a Left column and a Right column. Each column has its own Add field button (choose the field type - Main or Additional - the field, the target column, and the customer category), and you can drag fields to reorder them within a column or move them between columns.
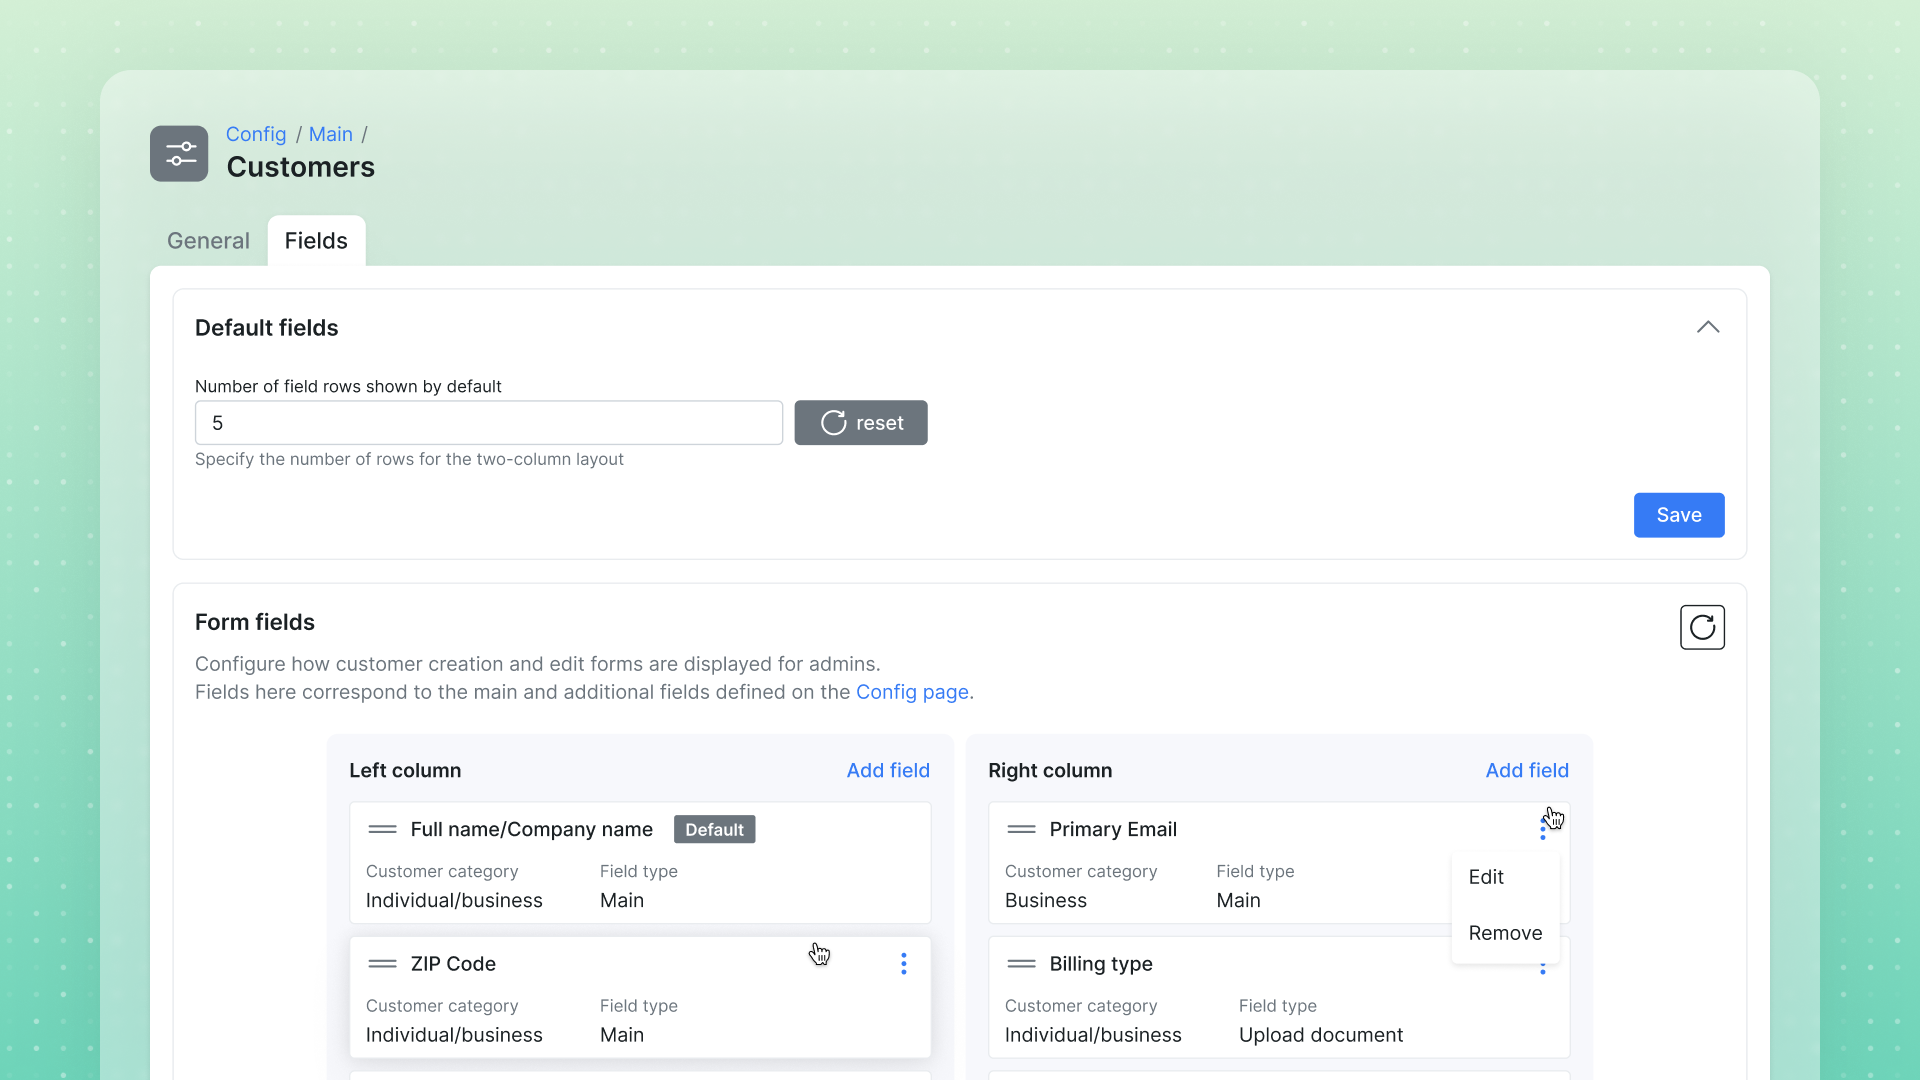
On upgrade to 6.0, existing Main fields move to the Left column and Additional fields to the Right column, with the number of field rows shown by default set to 20. All contact details now live in the Contact Book.

Contact Book

One place for every person tied to an account - customer or lead - each with their own contact details and their own say in how they're reached.

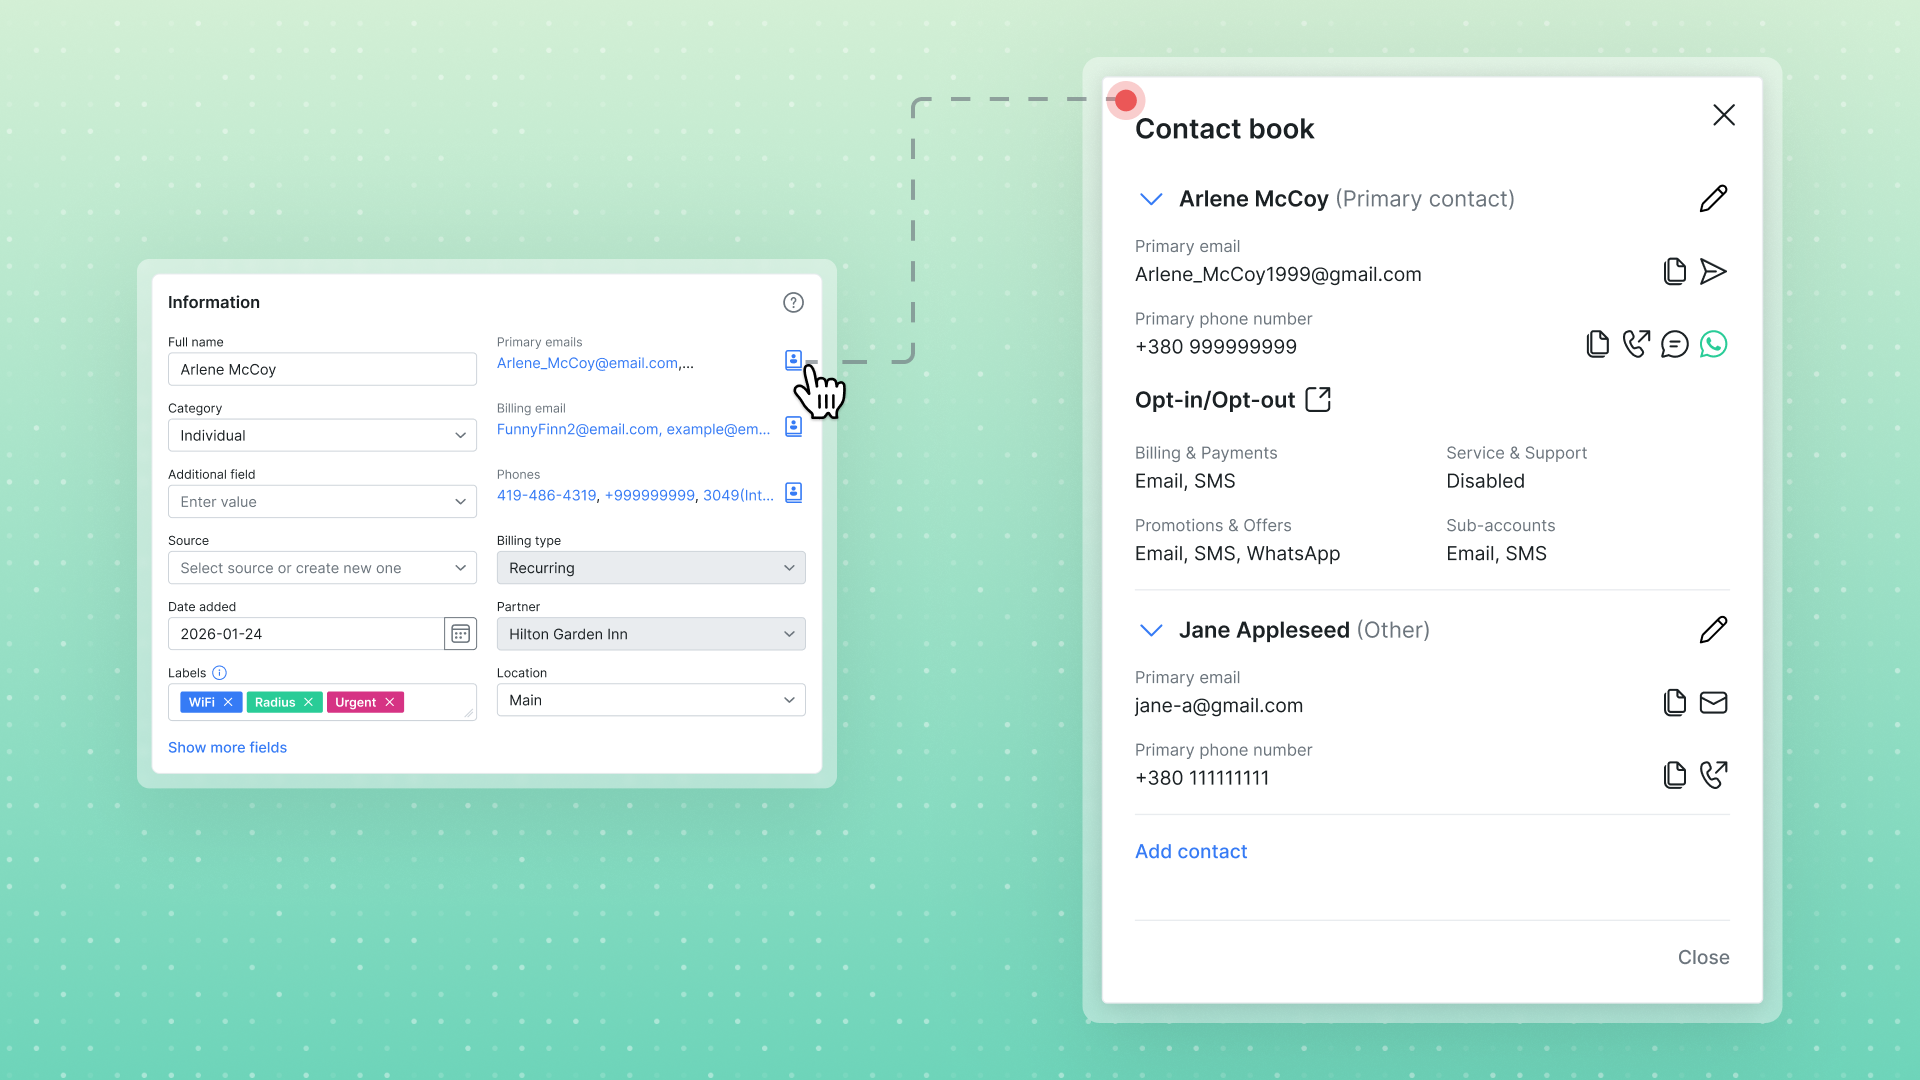
A customer's or lead's account often involves more than one person - the account holder, plus perhaps a technical contact, a billing contact, or a partner. The new Contact book stores all of them, on both customer and lead pages: the account's own Primary contact, plus as many additional contacts as you need. Icons next to Primary emails, Billing email (or, on a lead, Email/Phone), and Phones on the Information tab open the Contact book panel, which slides in and lists every contact saved for that account.

Every contact has a role - Primary contact (the account's main person; their primary email and phone populate the fields shown on the Information tab, and there's one per account) or Other (any additional contact, such as a partner, technical contact, or billing contact) - plus its own Primary email and Primary phone number, with quick actions beside each to copy the value or start an email or call (leads also get a message action).

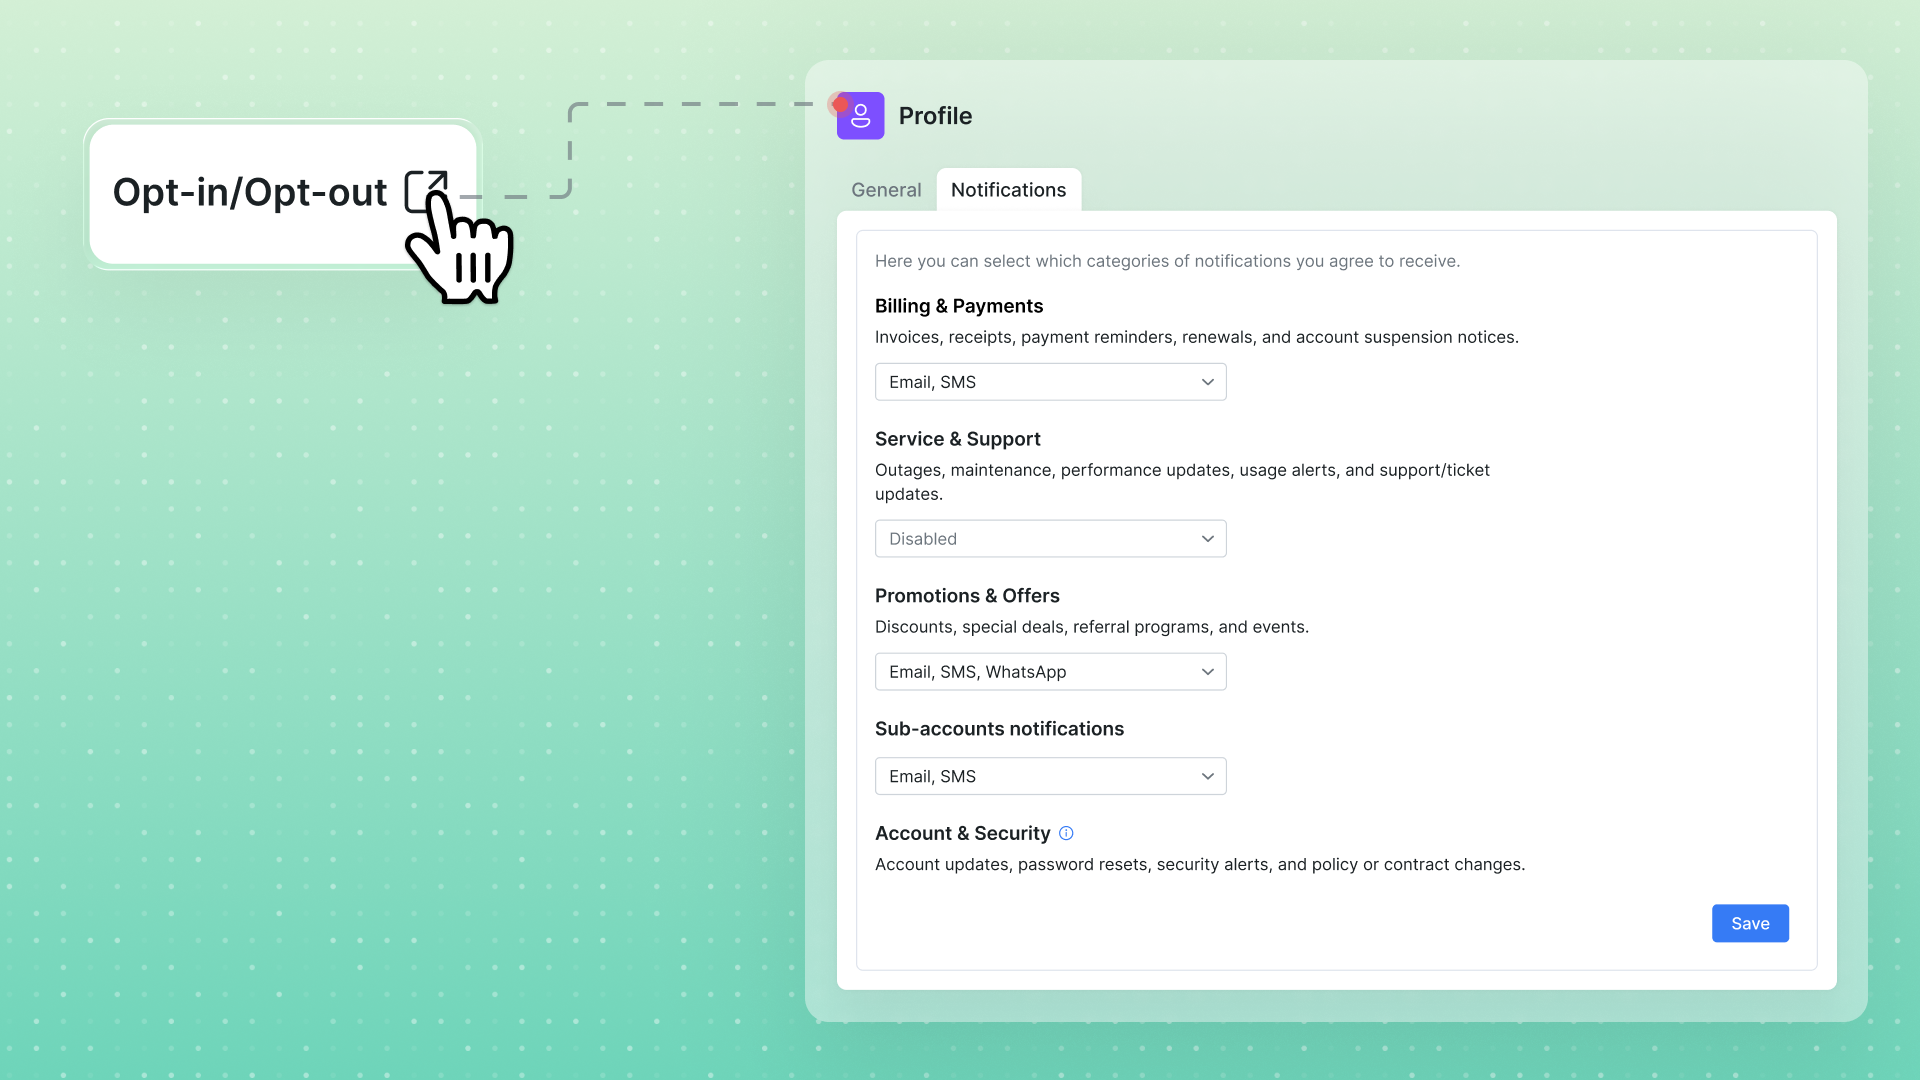
Under each contact, an Opt-in/Opt-out block shows which channels they've agreed to be reached on for each purpose - Billing & Payments, Service & Support, Promotions & Offers - with a link out to the full preferences.

Adding a contact takes one form: click Add contact, enter the full name, choose a role, then add one or more email addresses and phone numbers (with a country code), each with its own type. Use the trash icon to drop a row before saving, and the pencil icon to edit an existing contact afterward.

Labels for Leads

Tag, color-code, and filter leads across the entire CRM.

Customizable labels are now available for leads. You create them at Config → System → Labels (Customers/Leads module), then use them throughout the Leads list: the advanced Filter includes a Labels field (filter by one or more labels), and the Actions mass menu includes a Labels action that adds label(s) to every selected lead in bulk (alongside Assign to, Change, Send message, and Delete).
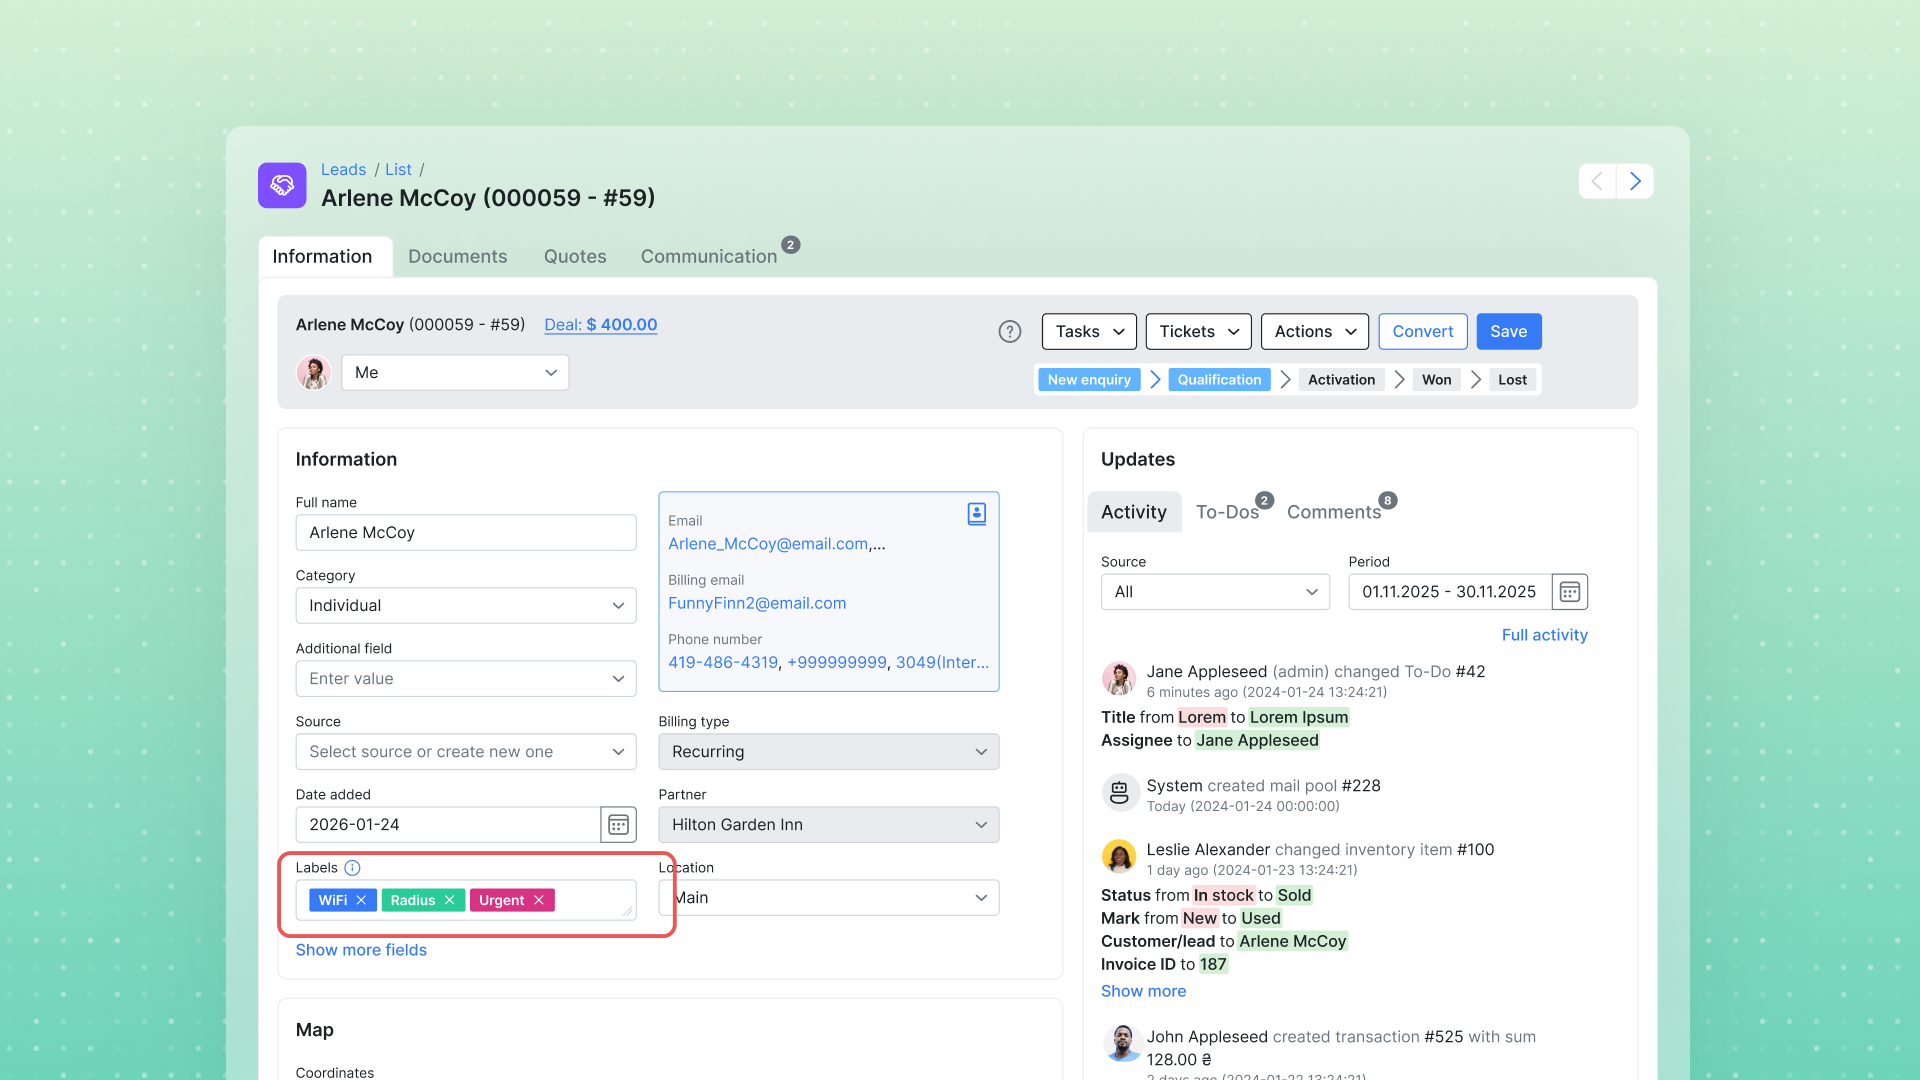
The list also supports Table and Workflow views, a Totals panel (statuses, counts, and summed deal value), colored rows (enable per status in Config → Leads → Leads Pipeline, then apply from the color-palette button), drag-and-drop column ordering, and export. The mass Send message action shows a Send from picker for the outgoing mailbox when sending email.
Labels for Tariff Plans

Tag, color-code, and filter your tariff plans.

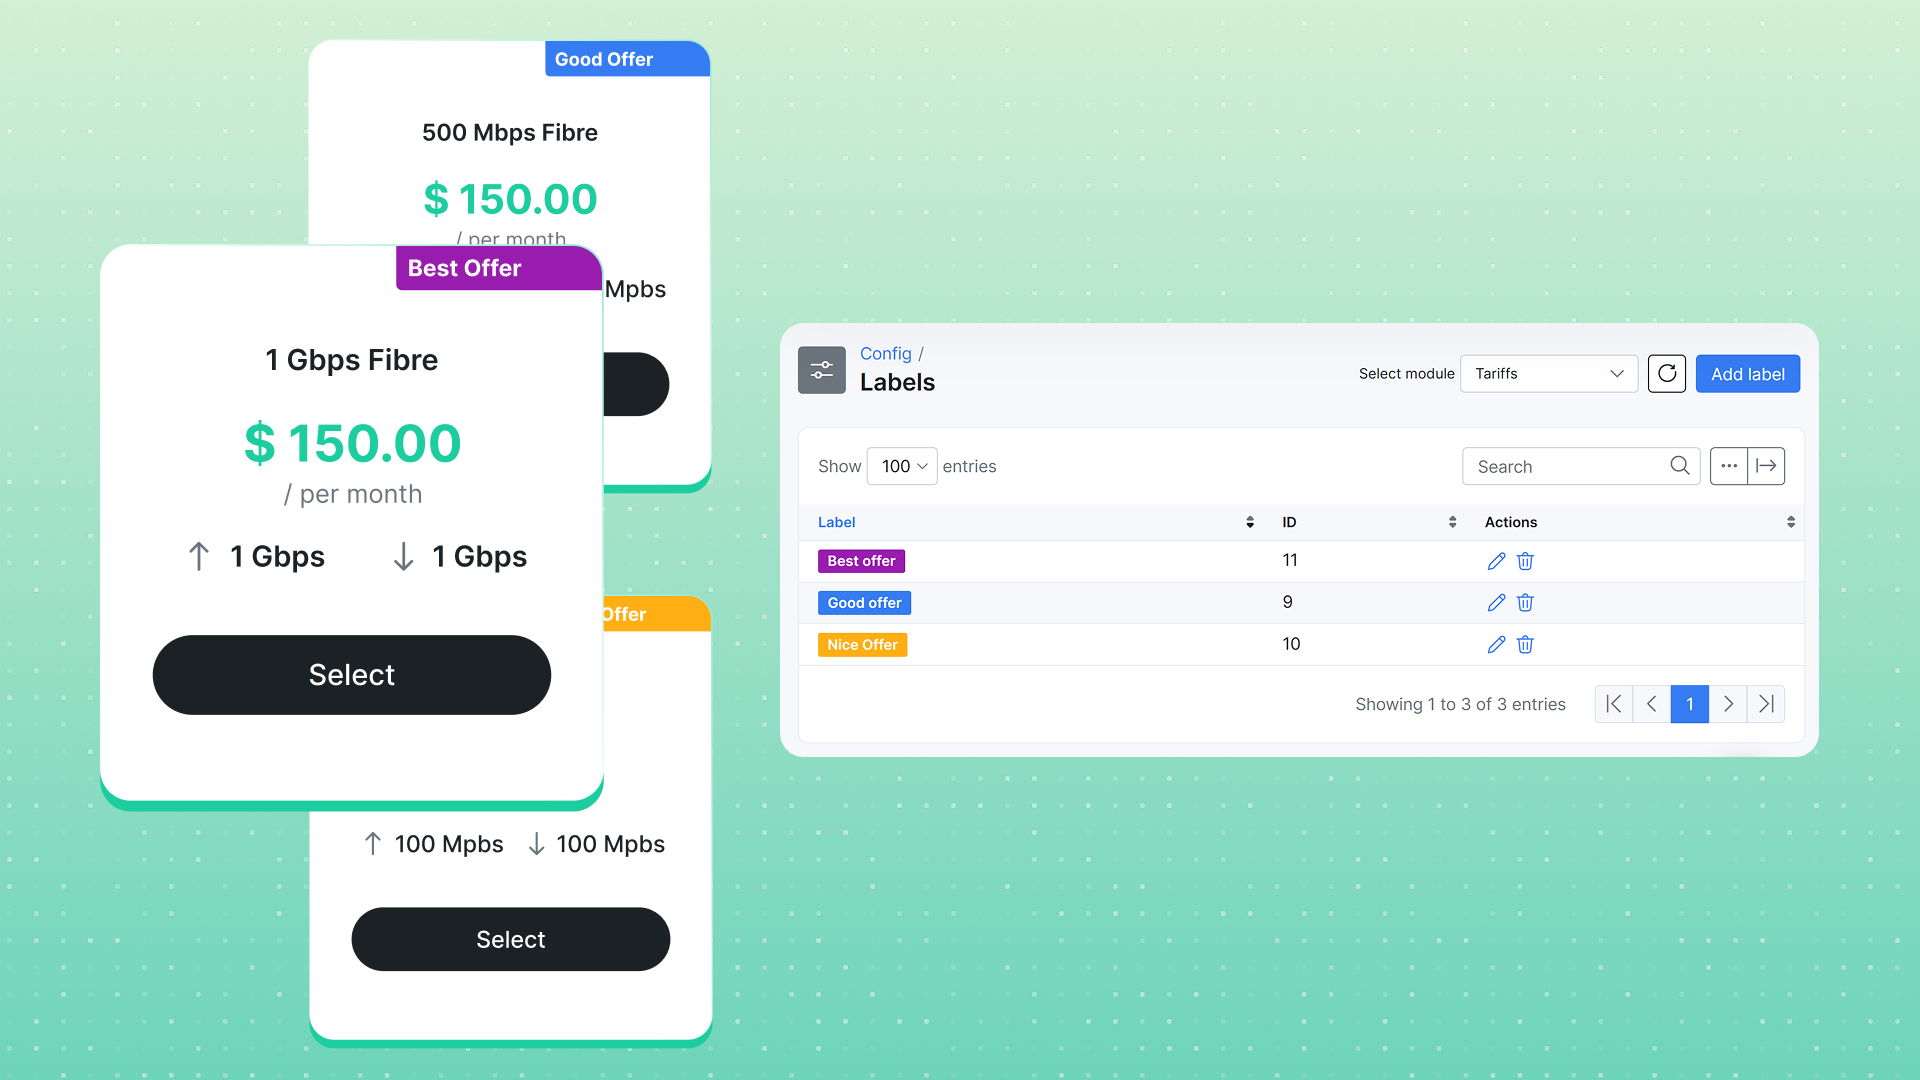
v6.0 adds customizable labels for tariff plans, so plans can be tagged, color-coded, and filtered - the same labeling approach used for leads, applied to your catalog of plans.

Labels work across all plan types: Internet, Voice, Recurring, One-Time, and Bundle. You create them at Config → System → Labels by selecting the Tariffs module and clicking Add label (set a title and a color), and a single tariff can carry more than one label. To narrow the plan list to one label, enable the Labels column from the breadcrumbs menu and click the label.
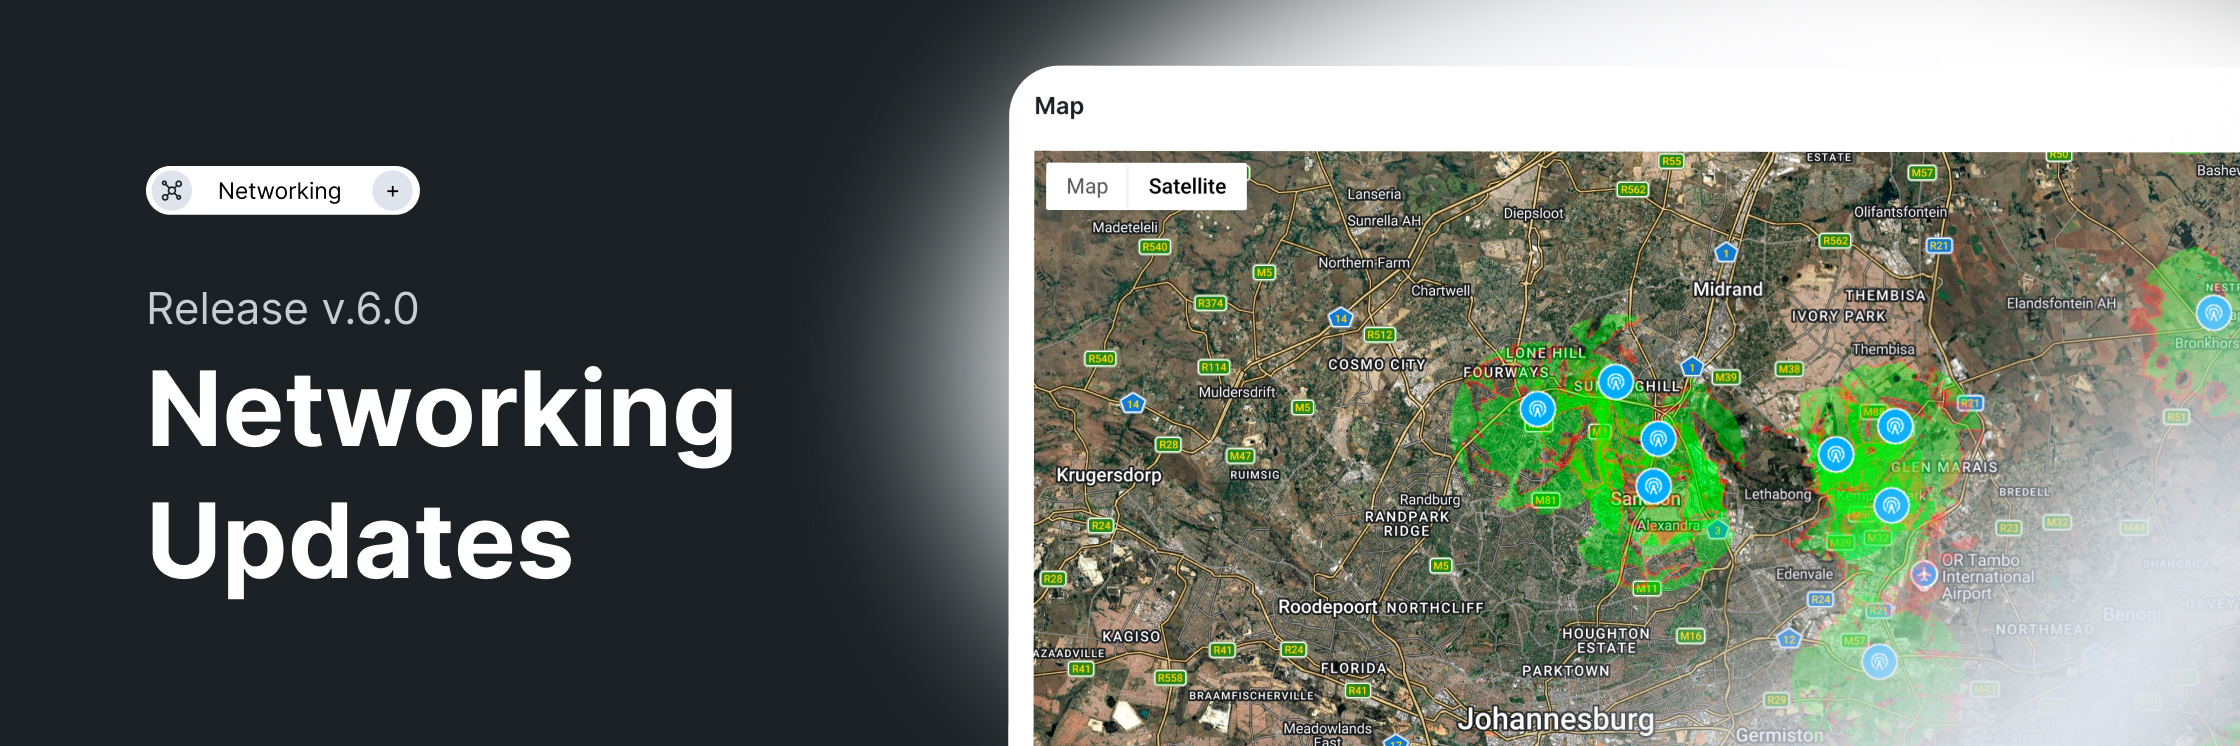
Coverage Maps

Visualize network coverage by connection type, link it to network sites, and drive tariff availability at sign-up.

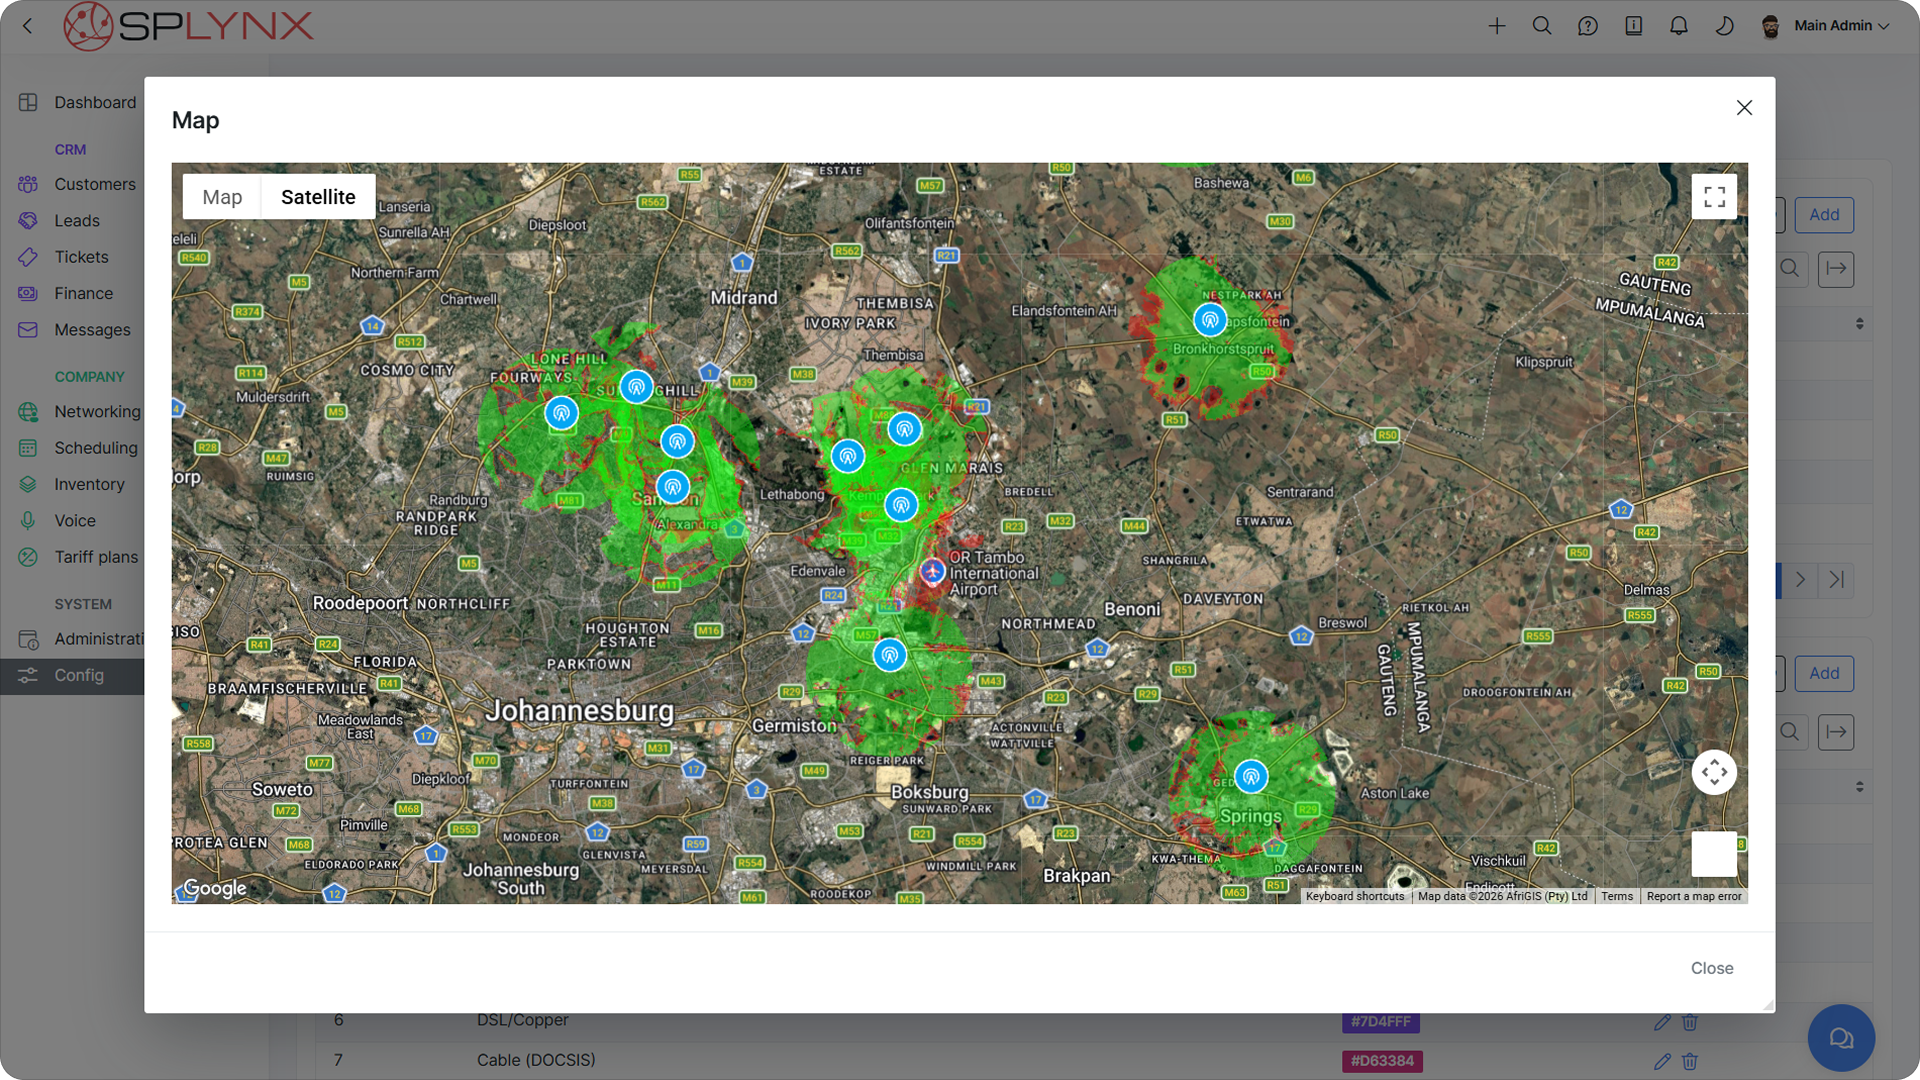
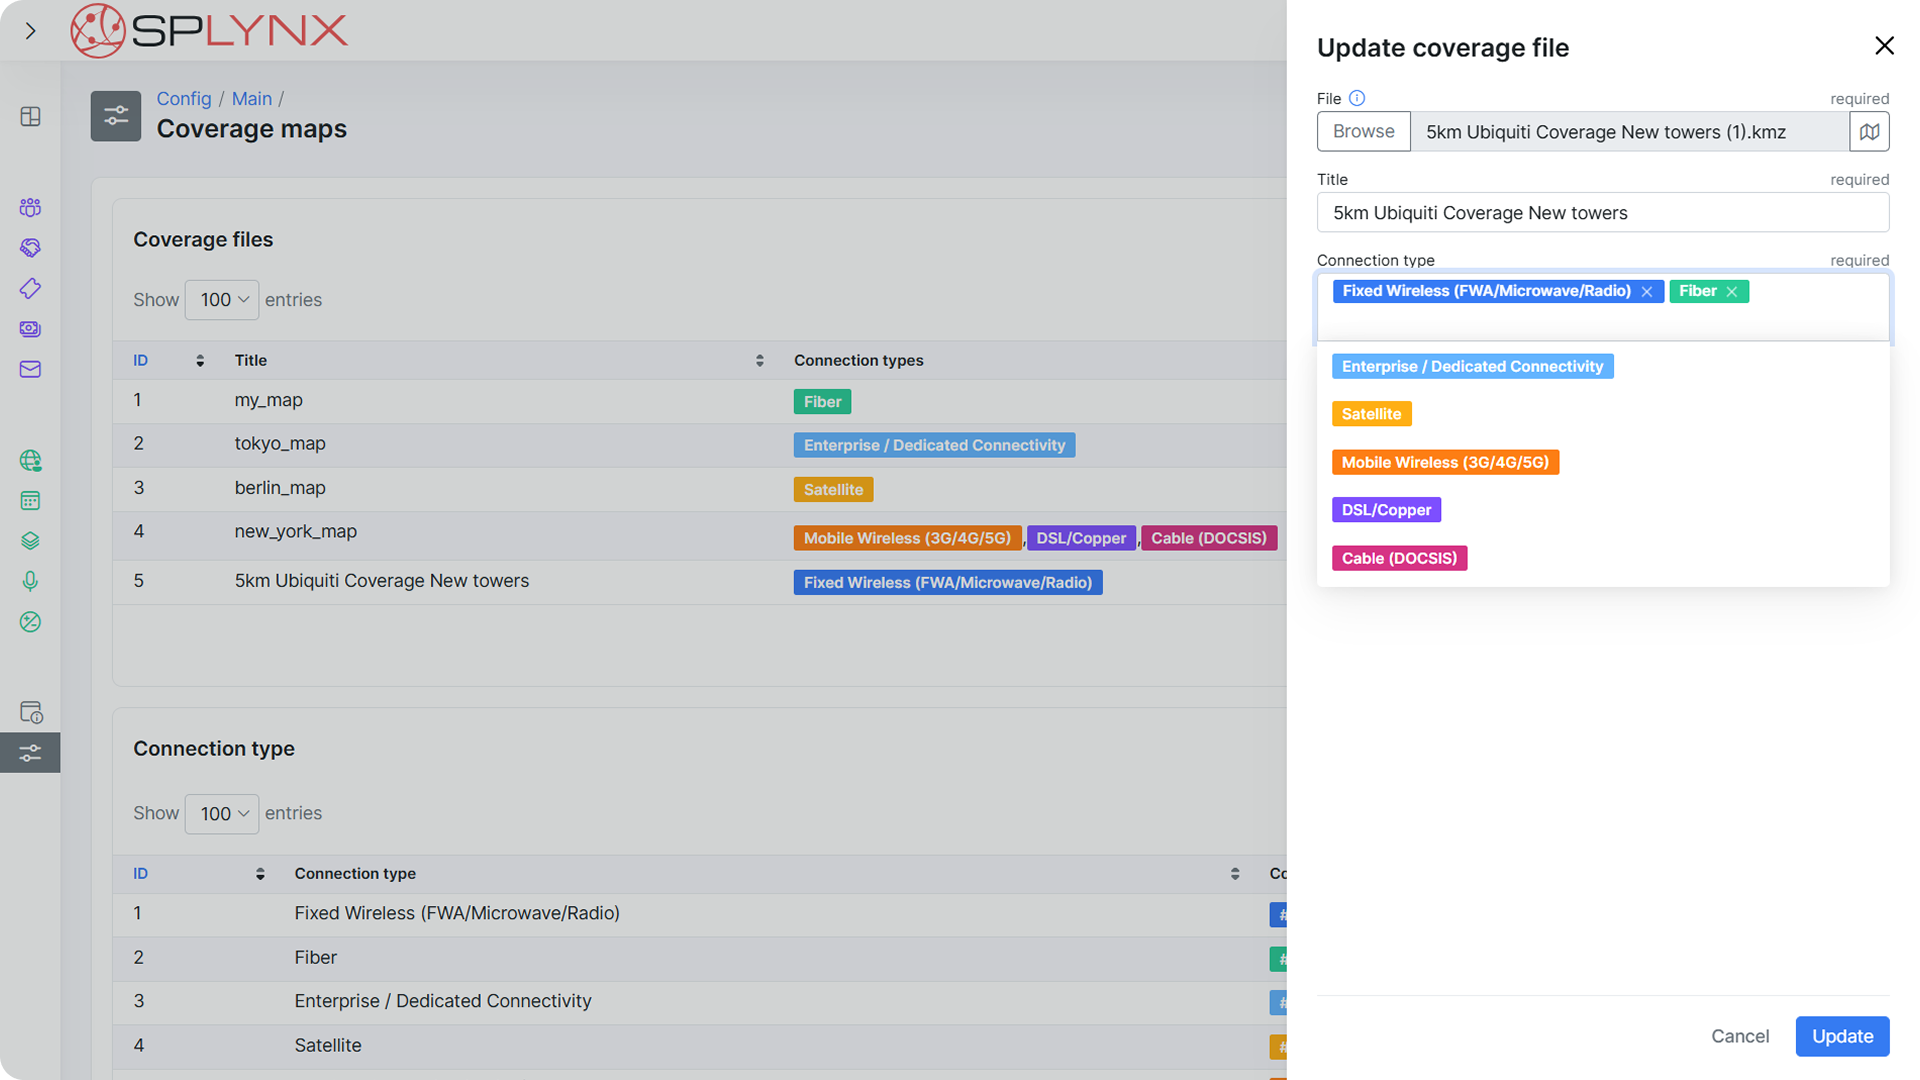
The new Coverage maps feature lets you visualize network coverage by connection type (Fiber, DSL, Wireless, etc.) across locations. Upload coverage files in KML or KMZ format (up to 5 MB), then group, filter, and color-code them with connection types - which you can link to specific Internet or Voice tariff plans and to Network sites, so a tower or POP on the map shows which technologies are available from that location.

Coverage maps are managed at Config → Networking → Coverage maps (Google Maps must be enabled under Config → Main → Maps). They also drive tariff availability in the new Sign-up flow: when a prospect enters their address, Splynx checks it against the configured coverage maps and shows only the tariffs available there.
Inventory Connected with Hardware Devices

One physical device, one linked record - stop maintaining the same box twice in Inventory and Networking.

Until now, the same physical device often lived as two unrelated records: a stock item in Inventory and a monitored hardware device in Networking - each created and updated separately. Splynx's new update links the two entities one-to-one, so the stock record and the network record stay connected through the device's life.

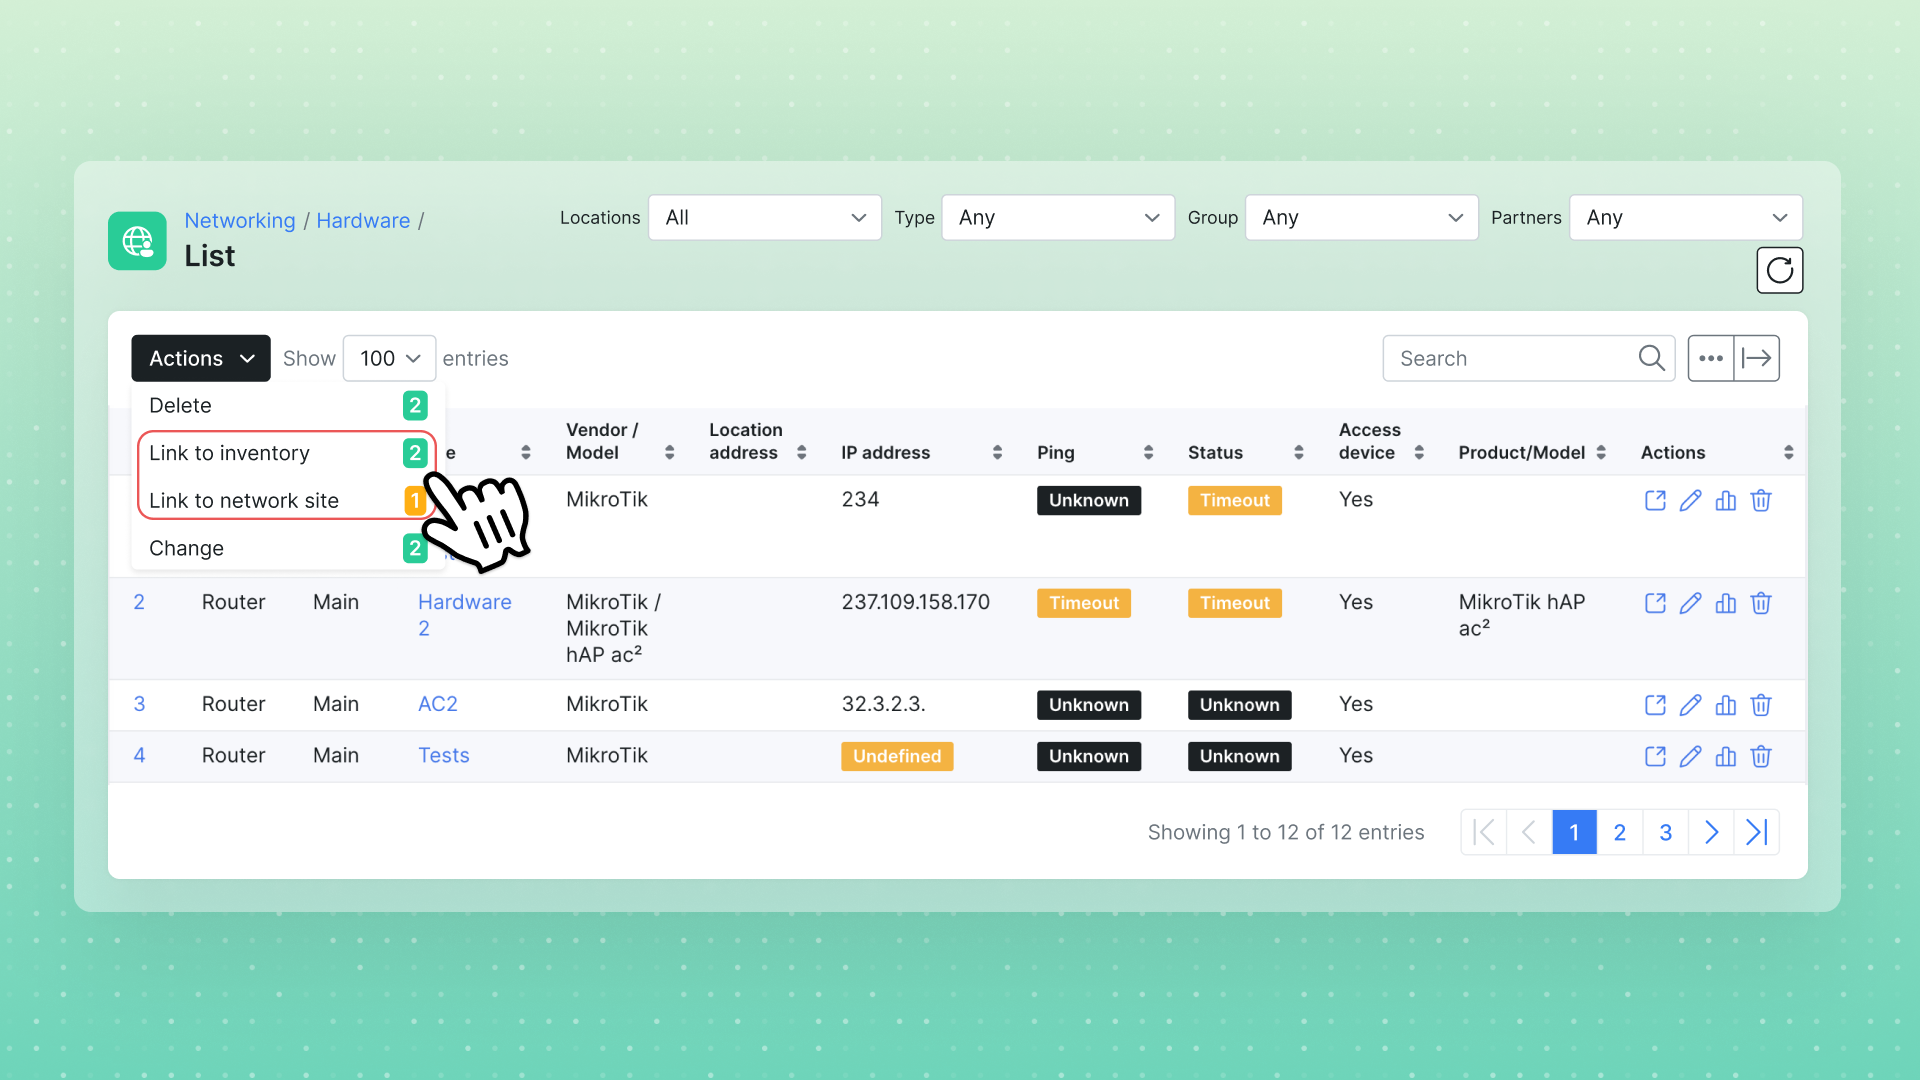
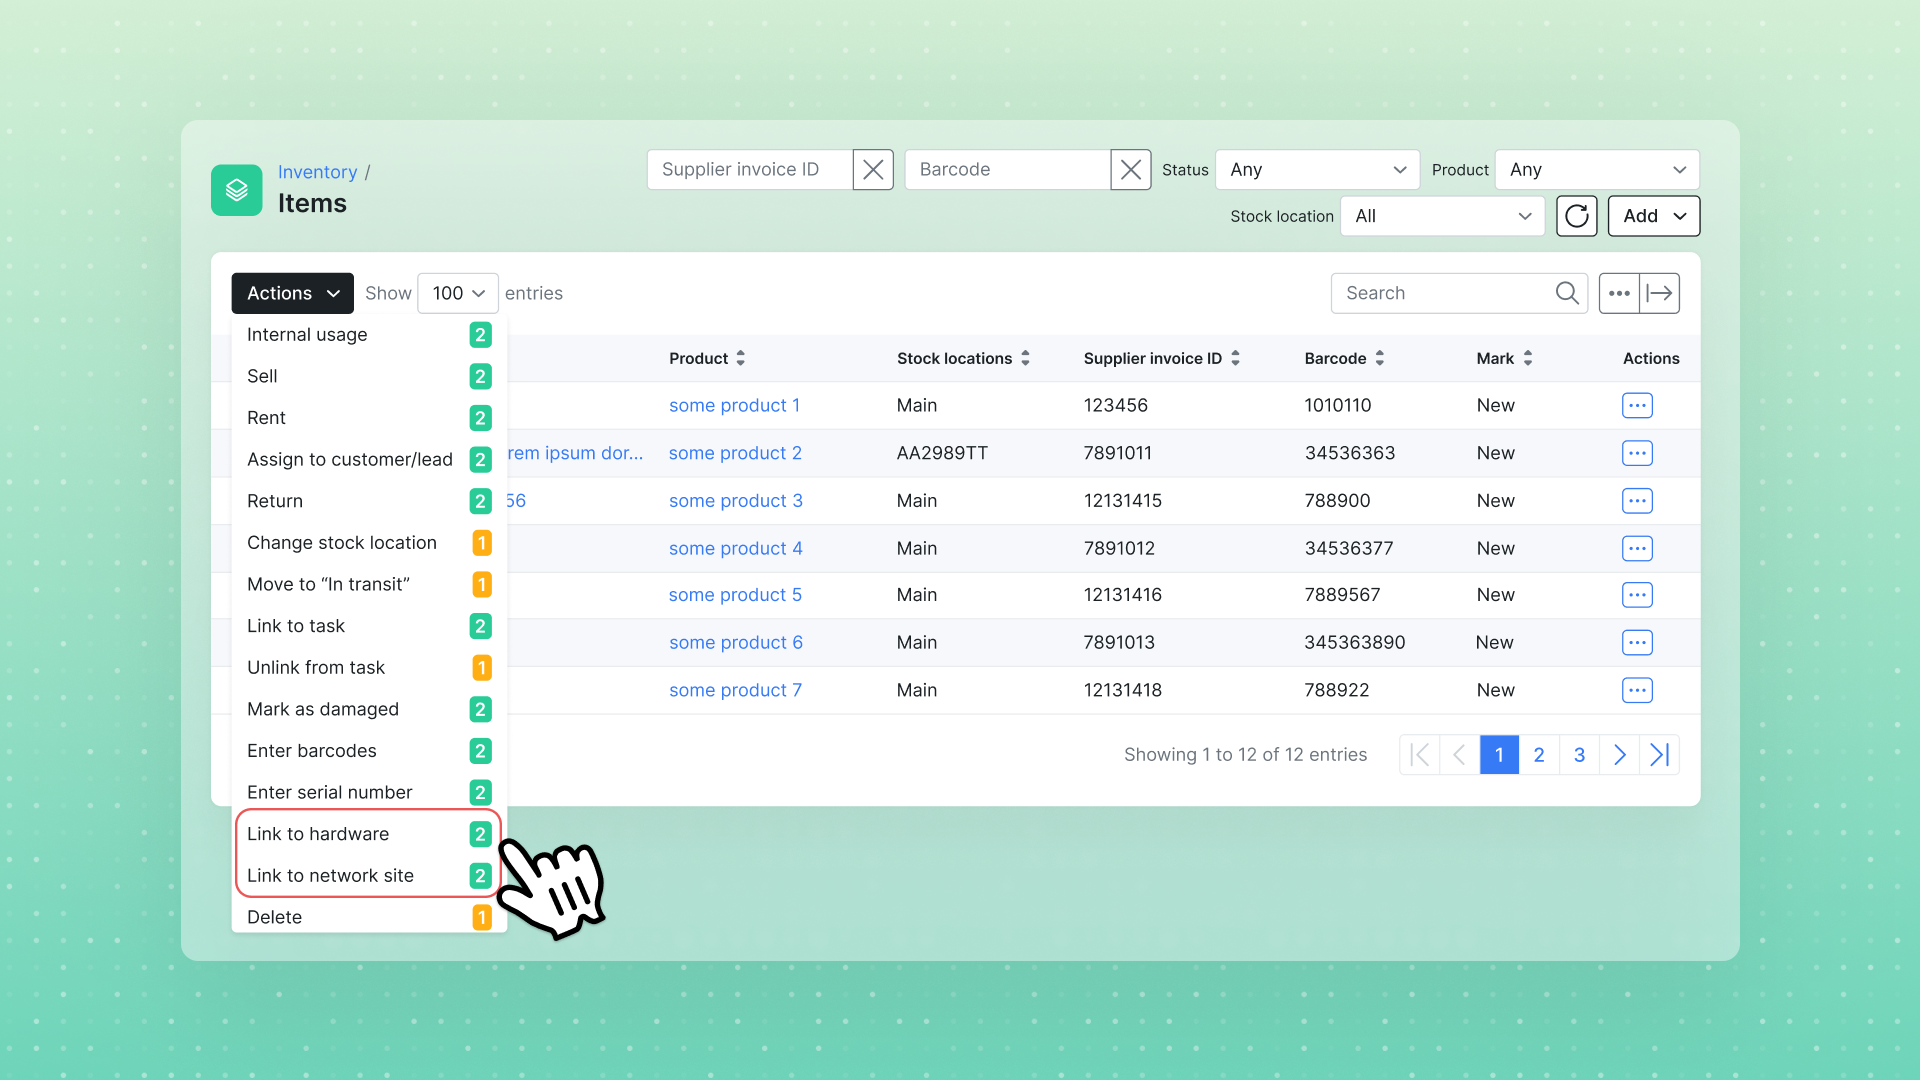
Linking is symmetric - each side can reach the other. On the inventory side, the items list carries Link to hardware and Link to network site actions with per-item pickers.

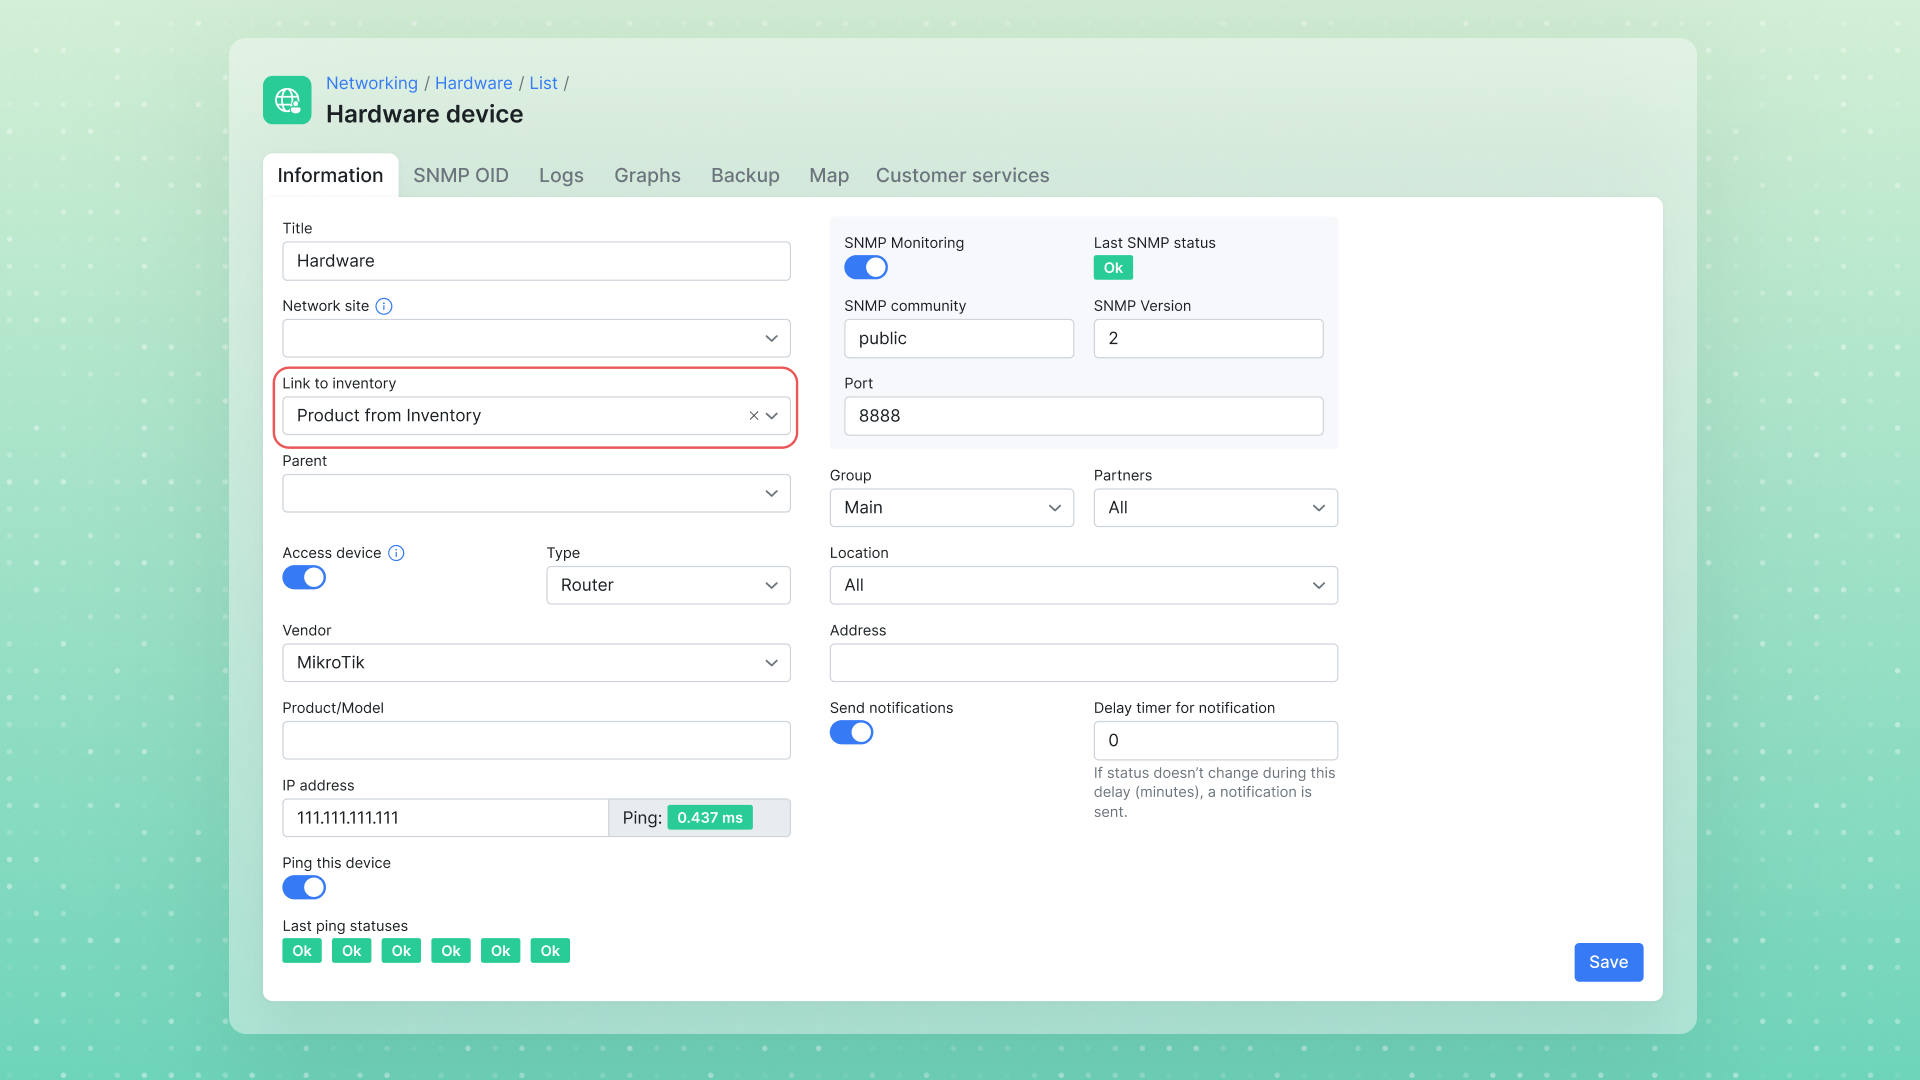
On the hardware side, the list has the mirror set - Link to inventory, Link to network site, bulk Change for fields like access device and port, and Delete - and the hardware Add/edit form includes a Link to inventory field right under Network site, so a device can point at its stock item from day one. Each inventory item links to a single hardware device, and each side shows its counterpart: the hardware list gains an Inventory item column linking straight to the stock record, and an item's details show its linked hardware.

Configuration is consolidated on the hardware side as well: the separate inventory Categories config is retired, and device types are now configured in Hardware settings (Config → Networking → Hardware) - the old Categories page under Config → Inventory now simply points there. Creating hardware is also less rigid: the IP address is no longer required upfront - the list flags devices that still need one.
Network Sites: Extended into Scheduling and Inventory

Network sites become the operational hub - link field tasks to them and track the stock deployed at each one.

Towers, POPs, and fiber huts generate their own field work and hold their own equipment — yet until now, tasks could only be linked to customers, and deployed stock had no home in the books. v6.0 extends Network sites in both directions.

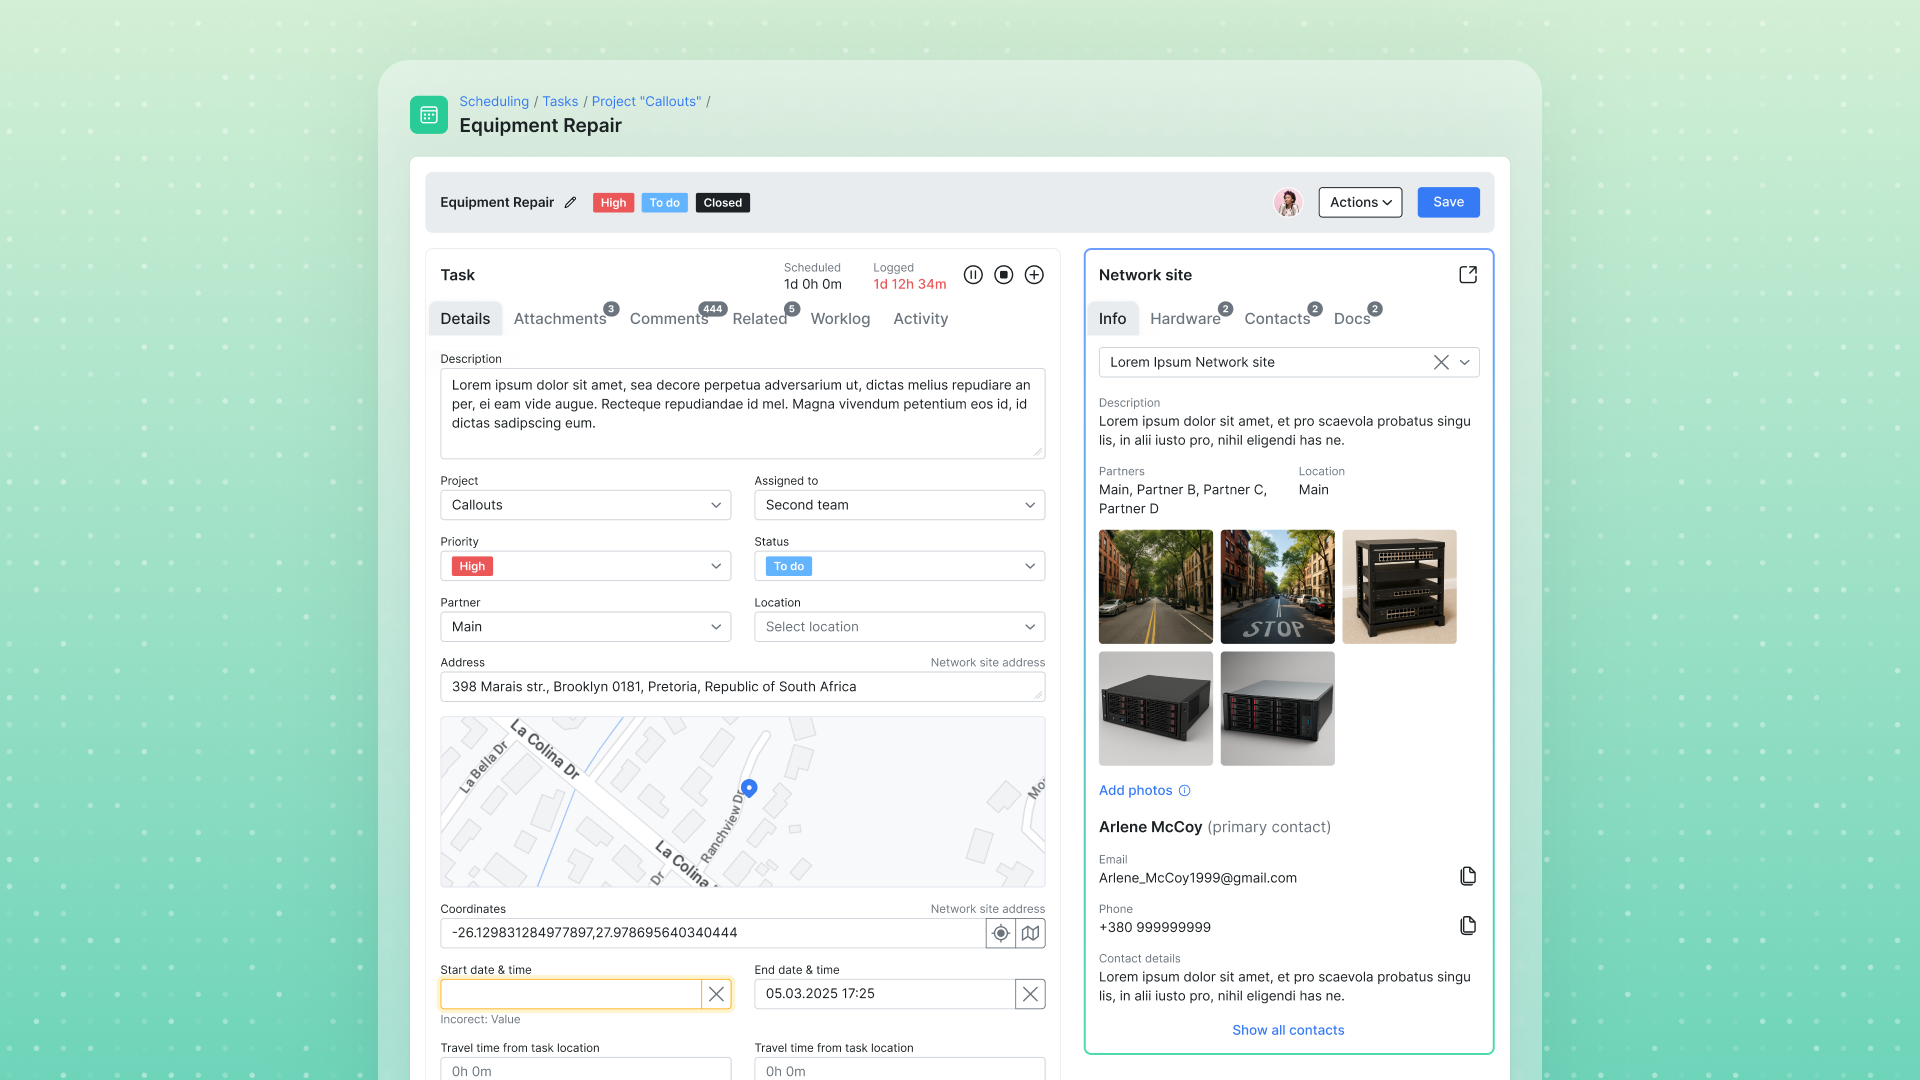
Scheduling. Tasks can now be linked to Network sites the same way they're linked to customers: the task's Link to field switches between Customer/Lead and Network site, the tasks table shows a Link to column in place of the old Customer column, and the advanced Filter gets the same toggle, so you can pull up every task for a given site in one view.

Site-linked tasks appear on the scheduling calendar and map like any other, and once a site is linked, its context lives inside the task: an Info tab (with photo uploads), a Hardware tab listing the equipment at that site, plus Contacts and Documents. Notifications keep up too - the on-change notification has been renamed to 'Link to added/changed' (Config → Scheduling → Notifications) and now fires when a linked customer, lead, or network site is added or changed on a task.
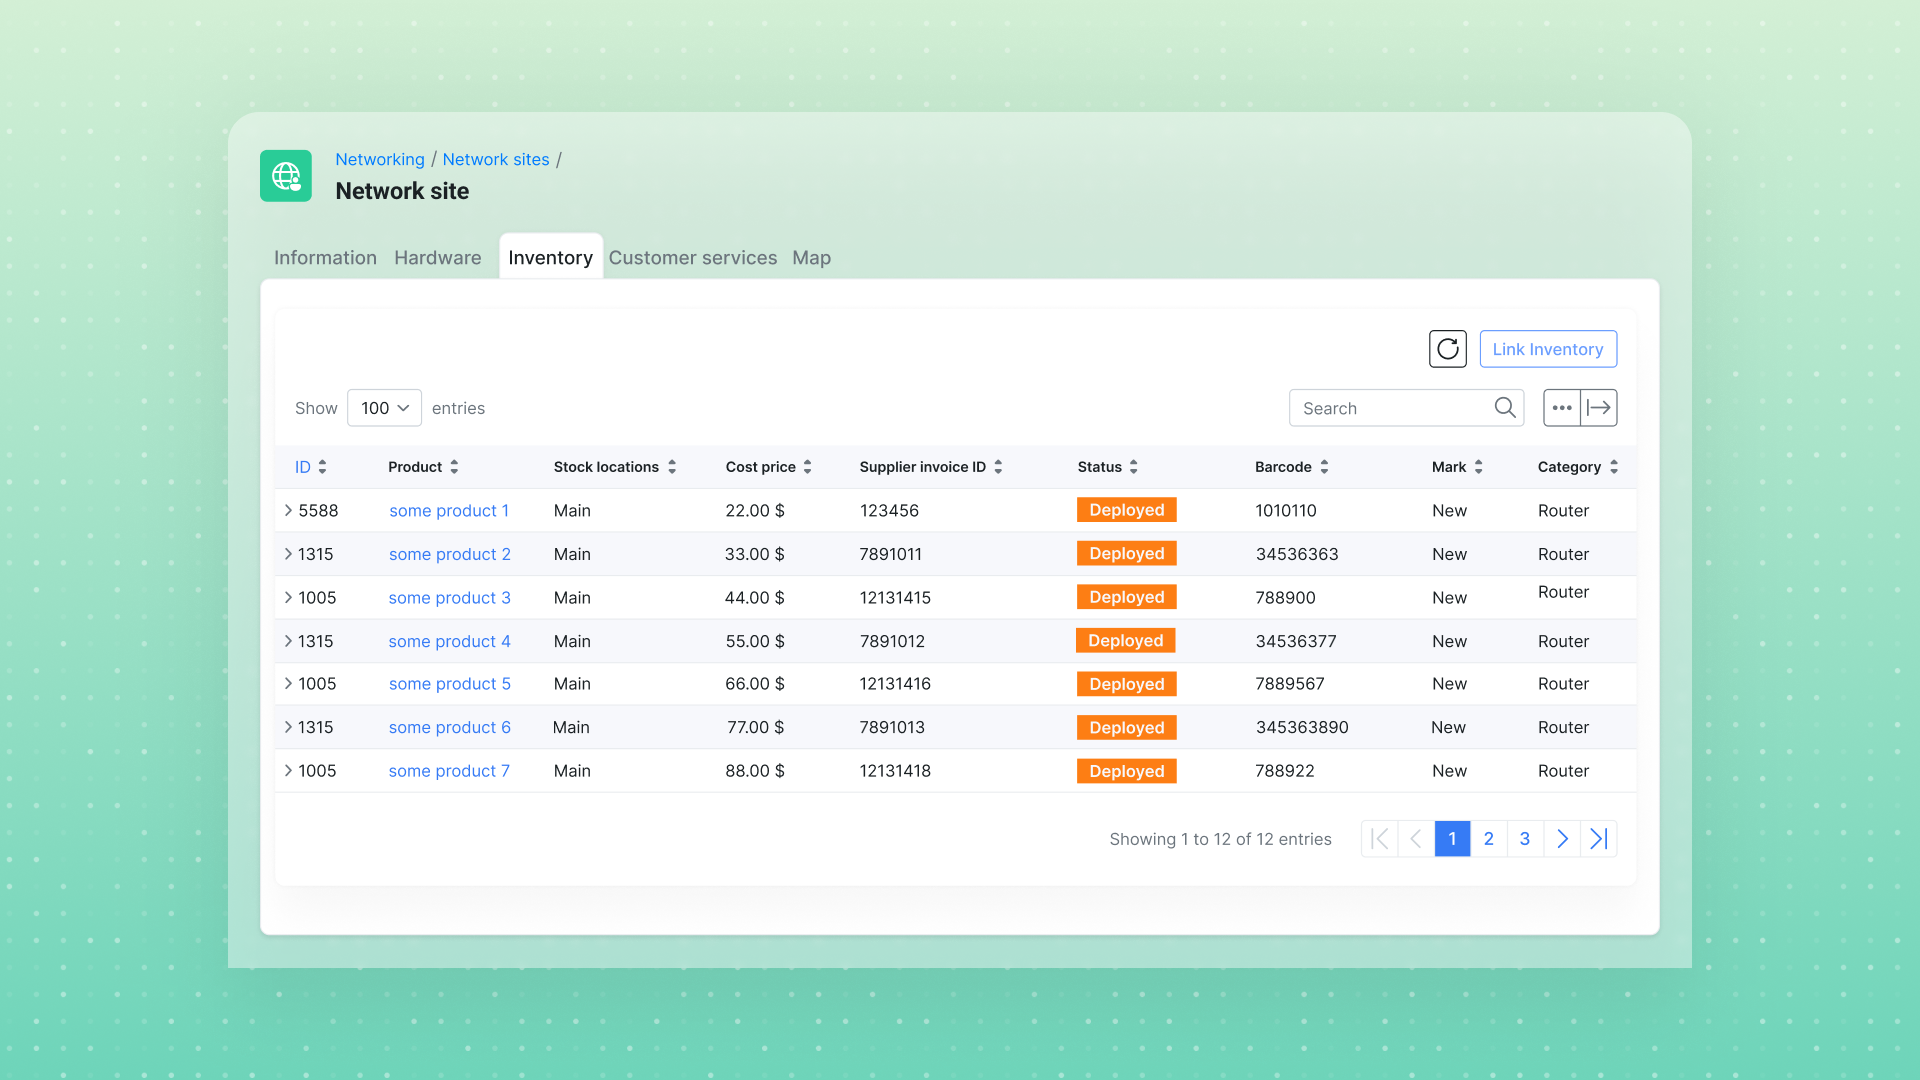
Inventory. Every Network site now has an Inventory tab listing the items deployed there (ID, Product, Stock location, Barcode, Status, Mark, Photo, Notes, and more), with a Link inventory button to attach stock on the spot - and a matching Link to network site action on the inventory items list. The bookkeeping happens by itself: linking an item flips its status to Deployed and its stock location to Network site premises - the same pattern you already know from Customer premises, which is set automatically when an item is sold, rented, or assigned to a customer, now applied to infrastructure.

Live Bandwidth Usage for DHCP Clients

Real-time traffic graphs for DHCP and IPoE subscribers on MikroTik - no extra software required.

Until now, the Live usage chart on a customer's Internet service statistics page worked only for PPPoE sessions. DHCP and IPoE subscribers share a single physical or bridge interface on the router, so per-interface monitoring can't tell one subscriber from another - and these customers were simply excluded from live usage unless LibreQoS covered them.

v6.0 adds a native path: Splynx reads the per-customer simple-queue statistics directly from the MikroTik router (API access enabled) and streams the download/upload rates into the same live chart, with roughly one-second updates. DHCP/IPoE customers now appear in the live-usage selector on the Internet statistics page, and the chart starts drawing real traffic within a couple of seconds of selecting them. Existing behavior is preserved: PPPoE monitoring keeps working exactly as before, and where LibreQoS is enabled it remains the preferred source, so LibreQoS setups are untouched. This native path is MikroTik-specific - for subscribers on other vendors' equipment, live bandwidth is available through the LibreQoS integration (see Networking below).

LibreQoS Integration

Pull real-time bandwidth usage from LibreQoS - including for IPoE and non-MikroTik subscribers.

The Splynx LibreQoS add-on connects your instance to a LibreQoS server for advanced traffic shaping and quality-of-experience monitoring; LibreQoS applies fair-queueing (CAKE) and per-subscriber rate limits for lower latency.

Once installed and configured at Config → Integrations → Modules list, Splynx can display real-time download/upload speeds for any internet service shaped by LibreQoS - including IPoE customers and customers on non-MikroTik equipment, where Splynx previously couldn't read live usage.
The add-on adds a LibreQoS action on each internet service and a LibreQoS tab on the customer profile (the Insight statistics view inside Splynx), plus a Live usage widget; with Enable Live bandwidth usage on, customers see live bandwidth in their portal too.

Multiple PSK for MDUs

Turn every unit in the building into a self-service sign-up: bulk-generate per-unit QR codes, and residents pick a plan, pay, and get their Wi-Fi - with the customer created in Splynx automatically.

Multiple PSK (MPSK) lets operators serve multi-dwelling units - apartment buildings, condos, student housing - on shared Wi-Fi infrastructure with per-unit credentials. v6.0 adds resident onboarding on top: instead of signing each unit up manually, the operator bulk-generates QR codes, and the resident does the rest.

On the operator side, the MPSK add-on gets a bulk generation action: set a title for the batch, an identifier (written to the customer's profile as an additional field), pick the SSID, the tariff plan, and a VLAN range (1–4096) - and optionally toggle on a guest tariff with its own plan and a VLAN range that can't overlap the main range or other batches. Each generated QR code leads to the self-registration page. Card payments are processed through Stripe (the payment gateway currently supported by the add-on).

The resident's flow takes a few taps: scan the QR code in the unit, land on a welcome screen that confirms the unit (with a "this is not my unit" contact path if something's off), choose a plan, enter name, phone, email, and a service start date, and pay by card. On successful payment Splynx creates the customer automatically - with the main service (plus the guest service, if enabled), the VLAN and SSID from the QR written into the service, and the unit identifier on the customer profile - and the final screen shows the Primary Wi-Fi and Guest network credentials with scan-to-connect QR codes.

Splynx AI

AI assistance in support workflows - ticket summaries and text actions, with a provider you choose.

Splynx AI integration brings AI-assisted text actions and similar-ticket suggestions to support workflows. You turn it on at Config → Main → AI, where the master Enable AI features toggle gates everything else, plus options to enable AI ticket summaries (generated when new messages arrive) and AI text actions (polish, shorten, or elaborate reply drafts).
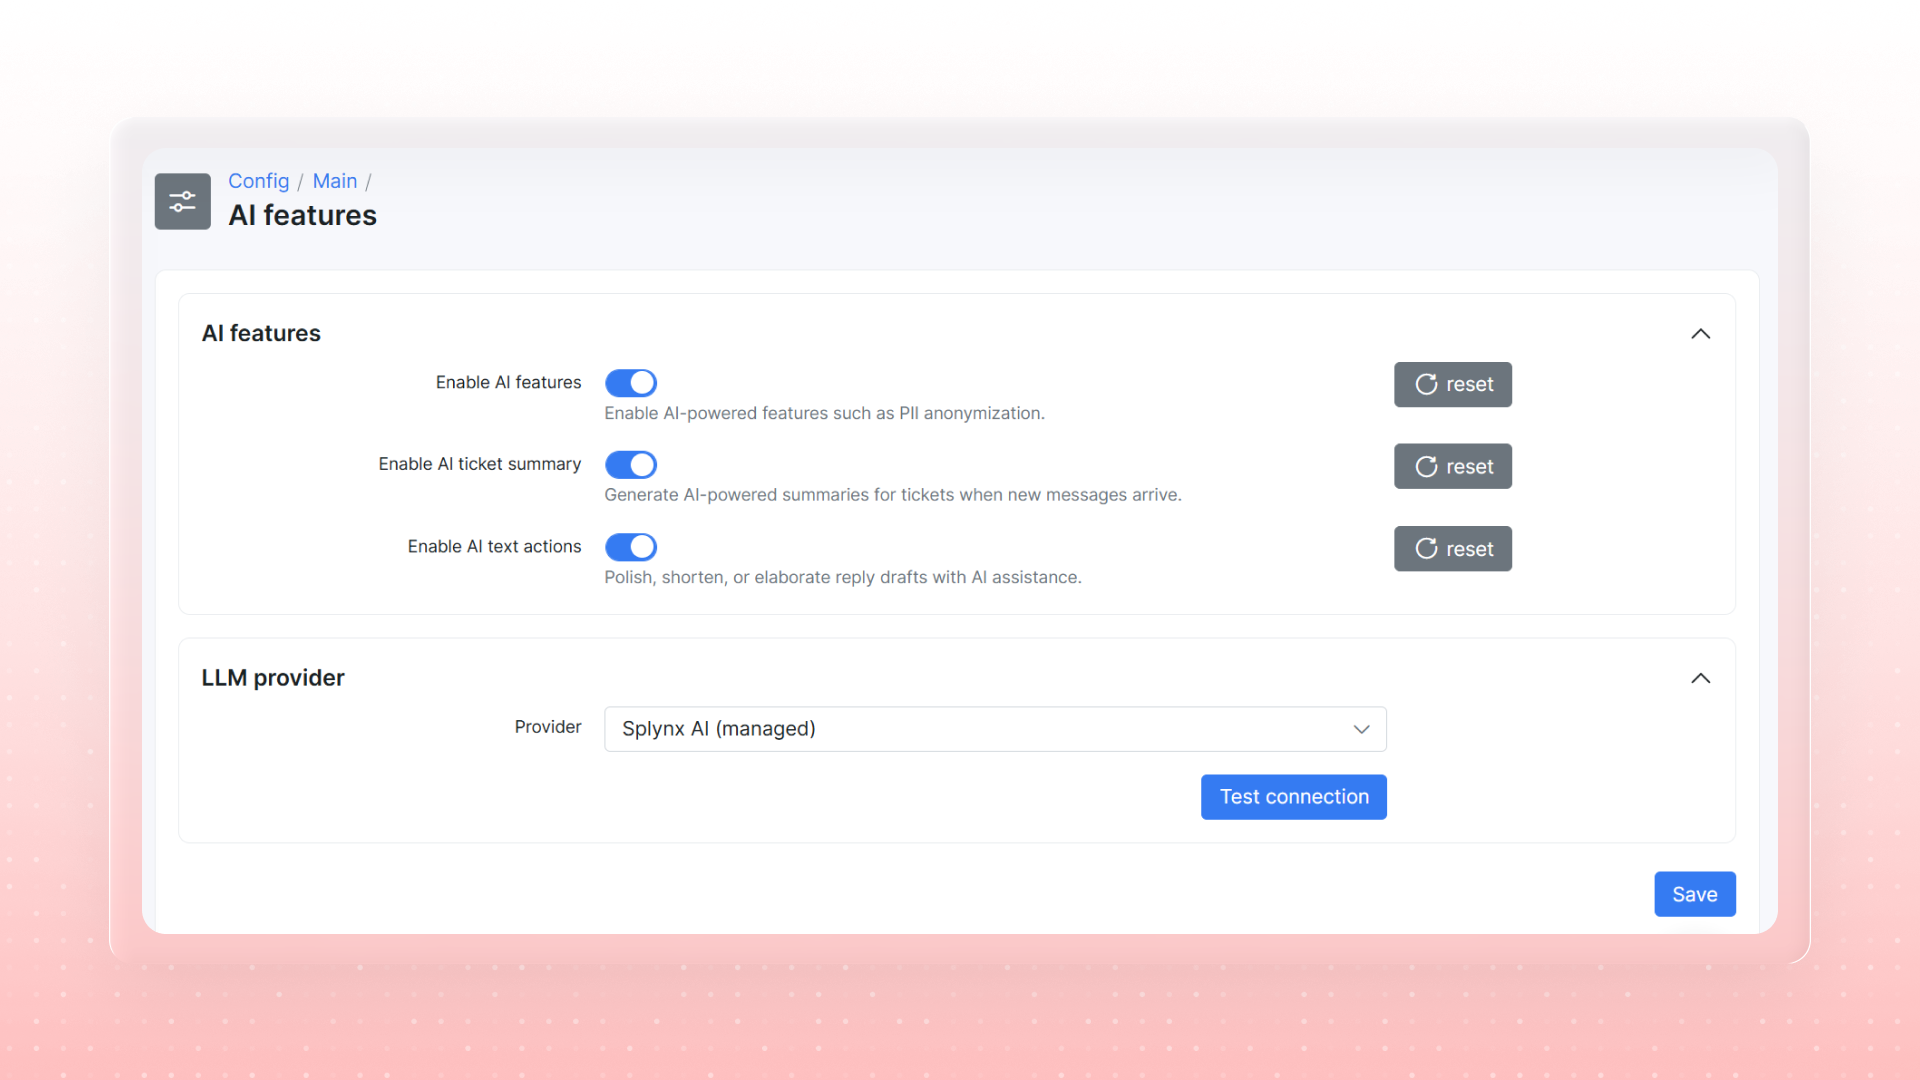
In the LLM Provider section you choose who processes requests: Splynx AI (managed), the hosted default that needs no extra credentials, or your own OpenAI or Google Gemini account, with a Test connection button before you save. Selecting a third-party provider means ticket and message content is sent to that external service; the managed provider keeps processing within Splynx. The release also adds AI-assisted ticket draft suggestions for admins based on the ticket summary and related tickets.

Splynx MCP Server

Let AI assistants securely access Splynx data through the Model Context Protocol.

Connect an AI assistant to your Splynx instance - and let it find customers, check invoices, and create tickets, within exactly the permissions you grant.

v6.0 ships an MCP (Model Context Protocol) server built into Splynx. Point an MCP-capable AI client - Claude, Gemini, ChatGPT or any client that supports remote Streamable HTTP servers - at your Splynx URL with /mcp appended, sign in, and work with your data in plain language: "Find customer John Smith and show his unpaid invoices", "Create a ticket for customer #42 about a slow connection", "Show all customers on the Fiber 100 plan in the Miami location". You can write in any language; under the hood, the assistant discovers what it needs from roughly 500 admin-API operations through three meta-tools (search, schema, run), so it finds the right operation itself.

Access control is the part ISP owners will care about most: the MCP server adds no new permission system - it runs entirely on the Splynx permissions you already manage. Connect via OAuth with an admin account (recommended: browser sign-in plus a consent screen) or with an API key (Basic Auth, Administration → API keys, with its permission tree and optional IP whitelist). Either way, the assistant sees and can call only what that account or key is allowed - operations outside its rights don't even appear in its tool search, and a read-only key stays strictly read-only. Operations that change or delete data are flagged as destructive, so a well-behaved assistant asks for confirmation before running them.

Everything is auditable and revocable. Every AI-initiated call lands in the API request log (Administration → Logs) with an AI badge for filtering - and AI activity is logged even when general API logging is turned off. To cut an assistant off, disable its API key or change the admin's password/2FA, which immediately revokes all of that admin's MCP sessions. Note that this is an admin-facing capability: subscribers cannot connect to it. Requires Splynx 6.0 or later - the /mcp endpoint doesn't exist on earlier versions, so if you're running an older release, upgrade first. Setup takes minutes - the full configuration guide, with Splynx-side setup, per-client walkthroughs for Claude Desktop, Claude Code, and Cursor, and troubleshooting, is at splynx.com/connect-splynx-mcp.
Splynx Add-ons MCP Server

A developer tool, not an admin one: point Claude Code at it and it knows how Splynx add-ons are built - architecture, hooks, and API - well enough to scaffold one for you.

This is a different tool from the Splynx MCP Server above, built for a different reader: developers writing custom Splynx add-ons, whether in-house ISP/WISP developers or integration partners. Where the Splynx MCP Server above connects to your live instance and works with real customer data, this one touches nothing live - it embeds Splynx's add-on documentation and code patterns directly into an AI coding assistant's context, runs on your own machine or infrastructure (locally, self-hosted, or in Docker), and never calls the admin API or reads customer data. Requires Splynx 6.0 or later, same as the MCP Server above. It has its own page with full setup instructions and a walkthrough.

Dark Theme

A dark theme for the admin interface.

One click in the top bar - easier on the eyes for long shifts and dim NOC rooms.

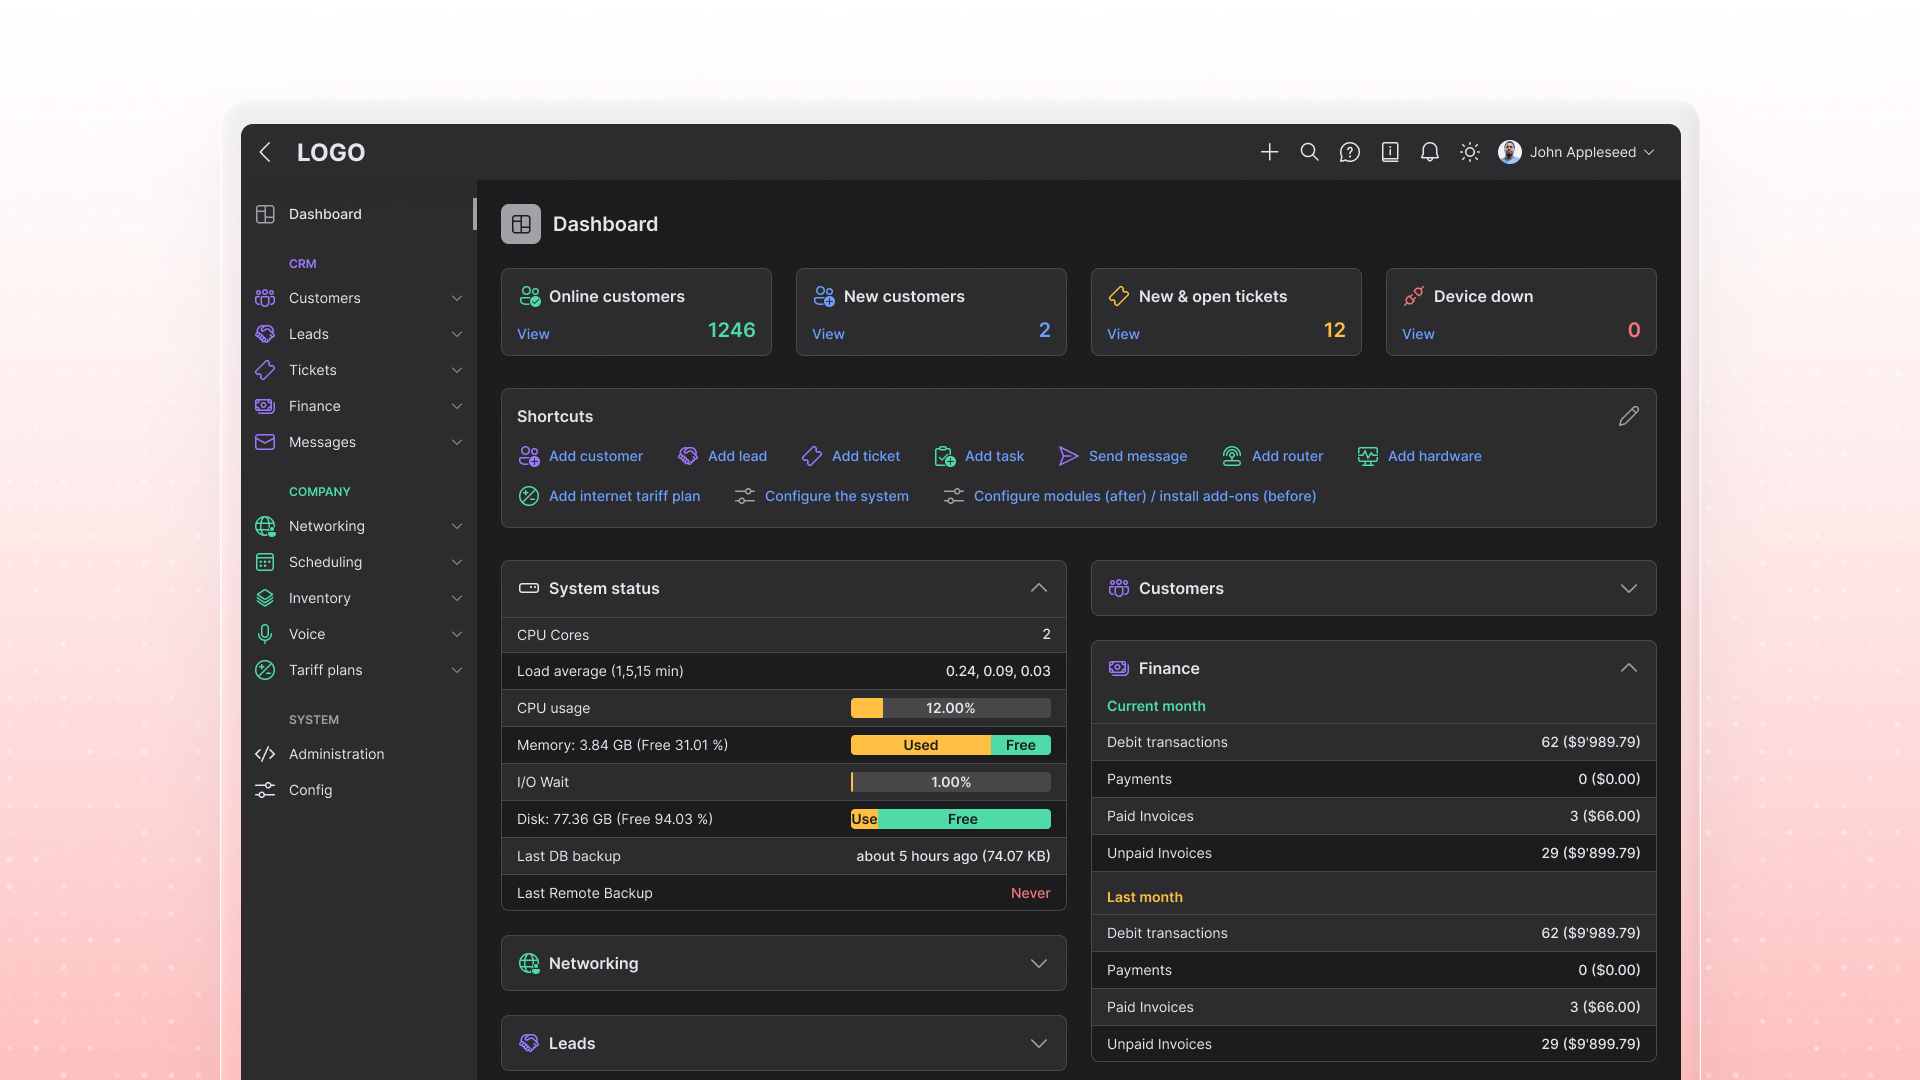
The admin interface now ships with a dark mode. Switching takes a single click on the theme icon in the top navigation bar, right next to notifications - and the icon always shows the mode you'll switch to: a moon while you're in light mode, a sun while you're in dark mode. No settings to dig through, and each admin picks what suits them.

Performance Rewrite on Zig

Performance-critical parts of Splynx, rewritten for faster processing.

v6.0 replaces several performance-critical parts of Splynx with native components written in the Zig language. RADIUS authorization, authentication, and accounting now run as a native FreeRADIUS module; the FUP engine - rule evaluation, CoA and Packet of Disconnect, and blocking - moves to a dedicated native daemon; and the same treatment covers background queue processing (the consumer that drives CLI and webhook hooks) and the network monitoring workers (ICMP ping and SNMP polling that feed device statistics and graphs).

These are the paths that fire constantly on a busy network: every session start, every accounting update, every FUP decision across the subscriber base, every monitoring poll across your devices. Moving them from interpreted code to compiled native components cuts overhead exactly where the load concentrates.

Multiple Email Aliases / Outgoing Mailboxes

Send and receive email from separate addresses per brand or department, with the right identity chosen automatically.

Email configuration has been redesigned around Outgoing mailboxes: multiple sender mailboxes per category - Default, Sales, Support, and Finance - that can be linked to partners, so different ISP brands or channels can send and receive from separate addresses. A "Send from" picker (formatted as {Sender email} ({Category})) then appears across tickets, messages, and mass sending.

A new Email deliverability section helps you stay out of spam folders with automatic List-Unsubscribe headers (RFC 2369/8058), SPF/DKIM/DMARC guidance, and coverage of the Gmail/Yahoo bulk-sender requirements. You configure it at Config → Main → Email; incoming email (IMAP) is now configured under Config → Helpdesk → Inboxes.

WhatsApp Mass Sending

Send bulk WhatsApp campaigns to selected customer groups — with opt-out handled for you.

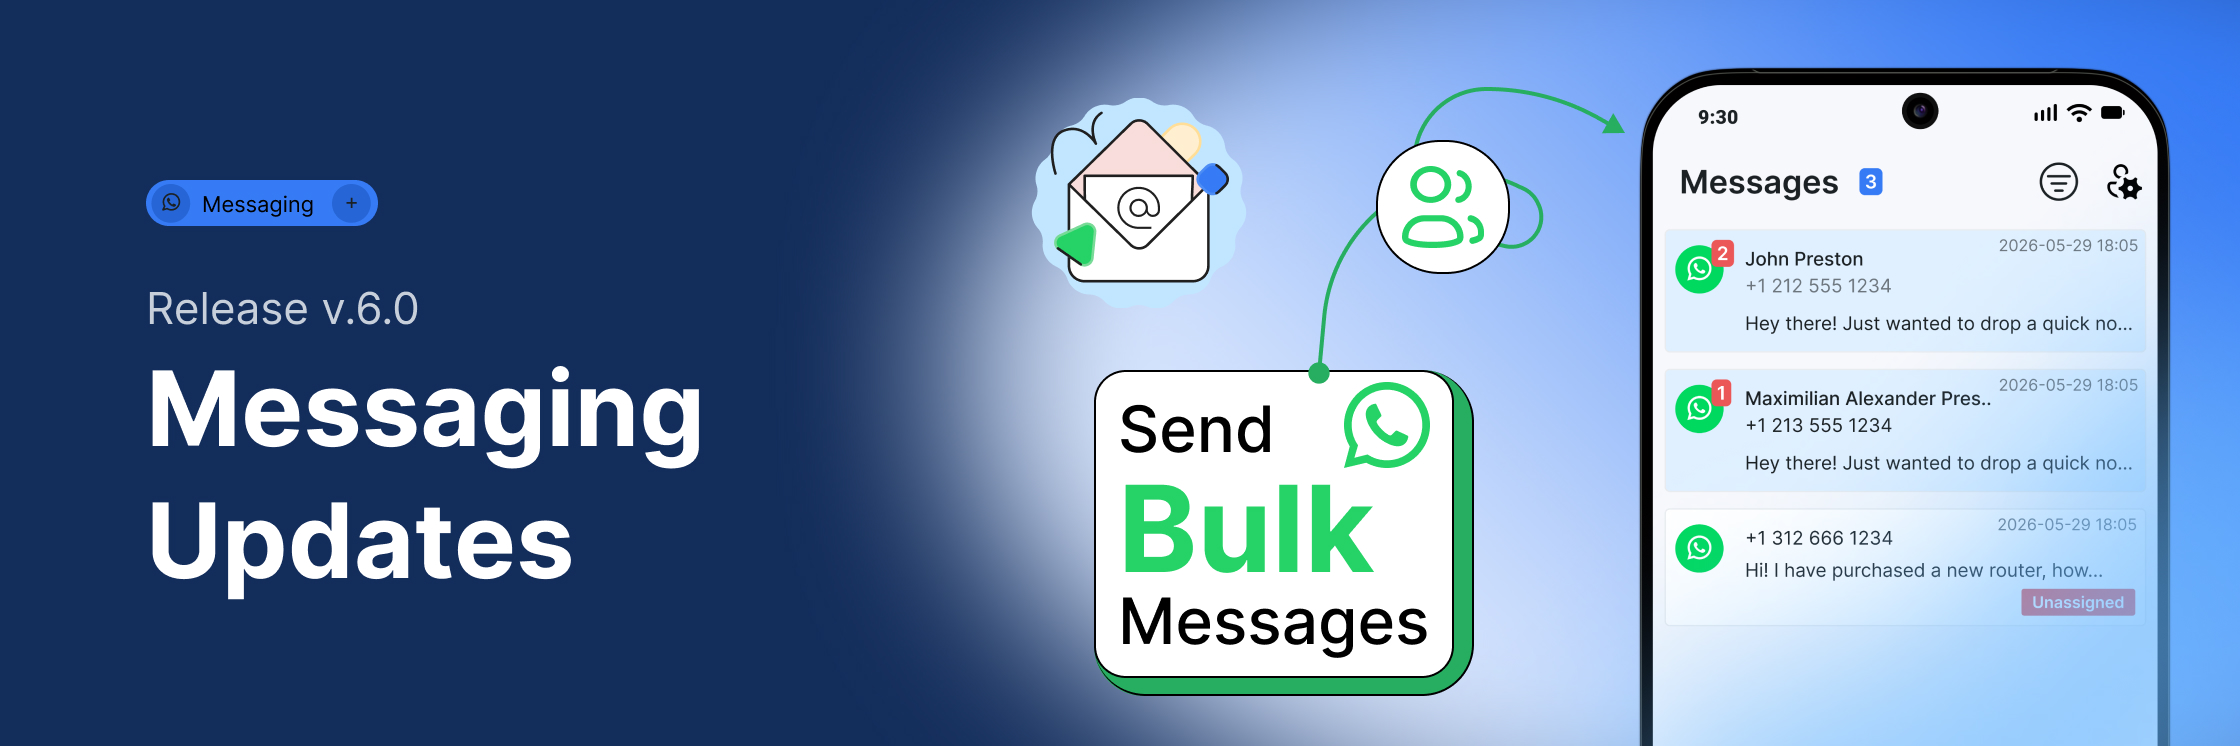
WhatsApp mass sending lets operators send bulk WhatsApp messages to selected groups of customers, using Marketing templates approved by Meta, with per-status delivery tracking. Opt-out is built in: STOP/START handling works out of the box with an auto-appended footer (and supports Twilio Advanced Opt-Out customization), while a dedicated WhatsApp log (Administration → Logs → WhatsApp) and a template operations audit log keep every send traceable. v6.0 also adds support for WhatsApp's BSUID username-based chats, so conversations keep working as WhatsApp moves to hiding phone numbers behind usernames.
Opt-In / Opt-Out per Channel

Give customers control over the channels they hear from you on - email, SMS, and WhatsApp.

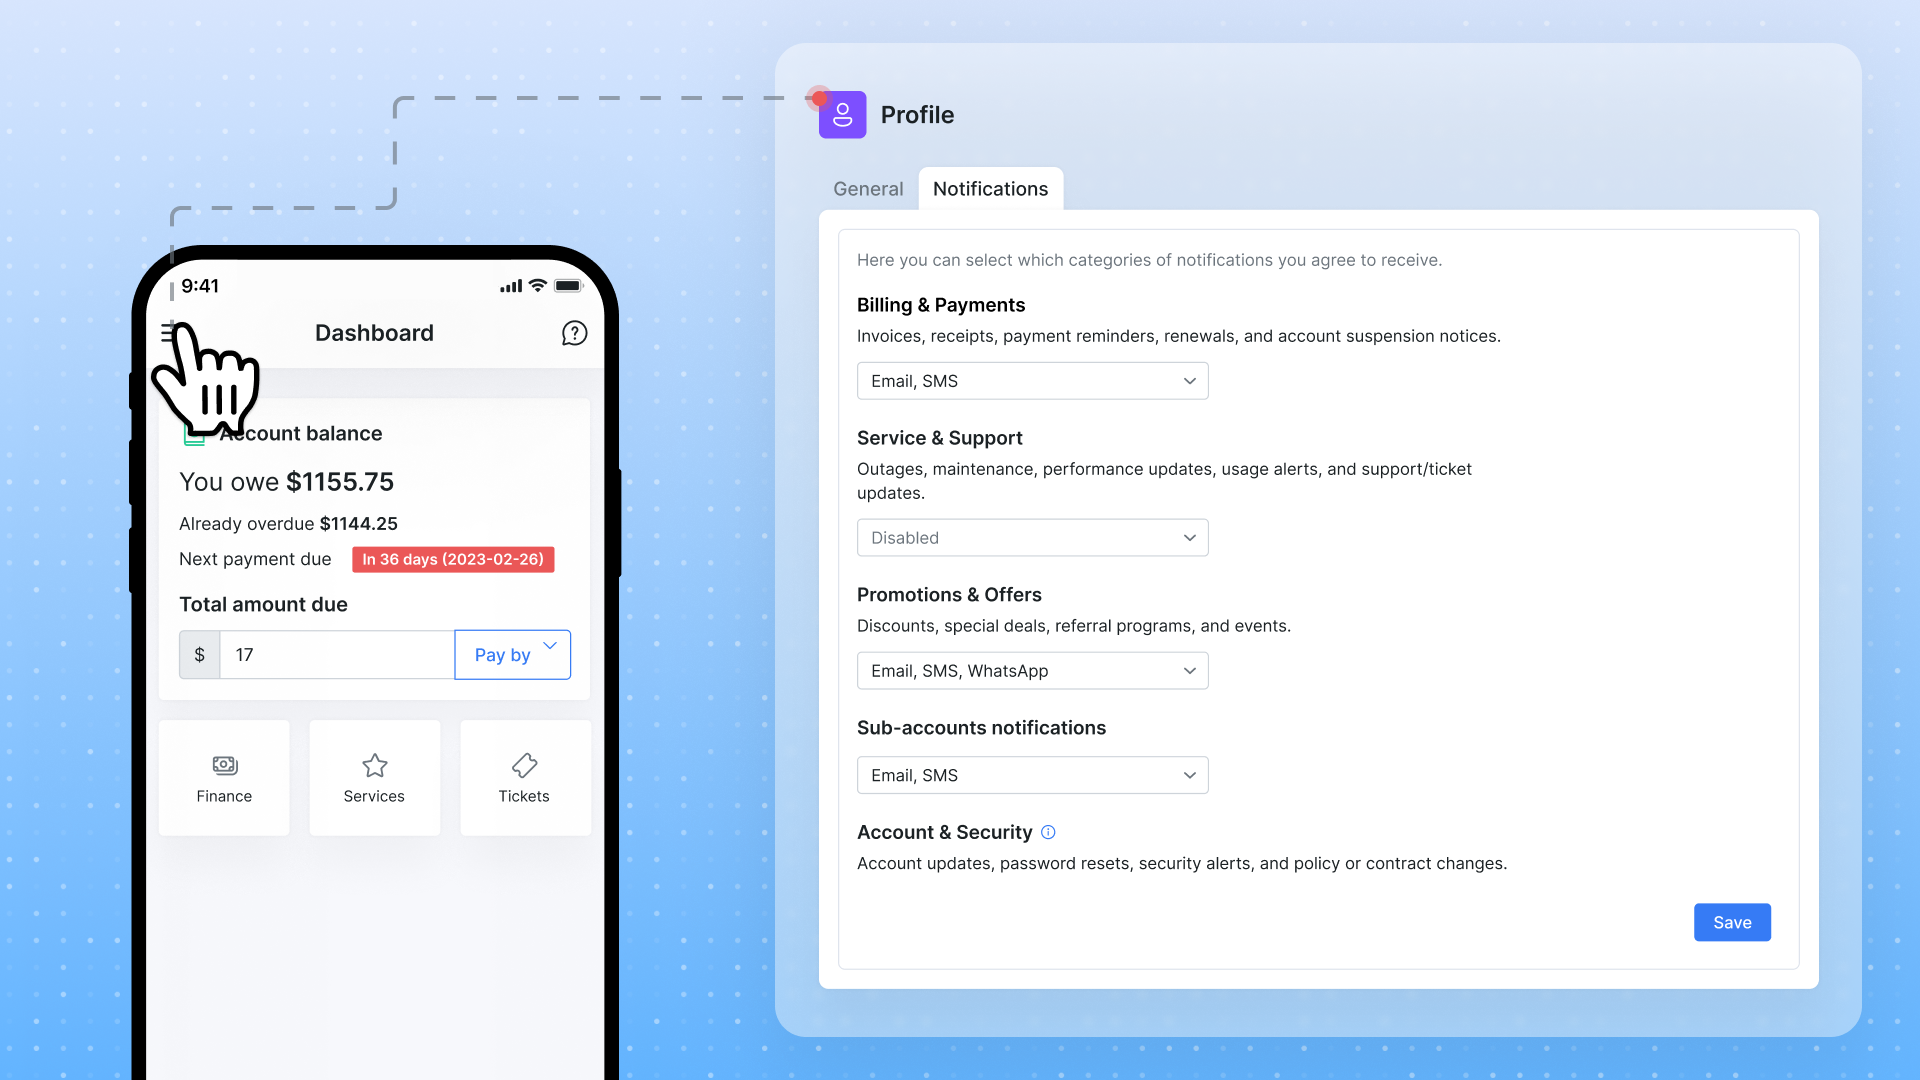
v6.0 lets customers manage how they receive notifications from the Customer Portal under Profile → Notifications. They can choose the channel per notification group - Billing & Payments, Service & Support, and Promotions & Offers - or switch a group off entirely. The available channels are Email and SMS, with WhatsApp offered for Promotions & Offers. Account & Security notifications can't be disabled, since they're required for service security and compliance.

Marketing-type sends (including WhatsApp mass sending) automatically skip customers who turned off the matching category.

MRR Reporting Suite

A tabbed MRR hub with seven sub-reports, from net change to churn prediction.

The single MRR net change report becomes a full MRR reports hub (Administration → Other reports → MRR reports) with seven sub-reports: Net change; Detailed per-customer movements with reasons (New, Churned, Upgrade, Downgrade, Expansion, Contraction, Discount started/ended); By tariff plan; By partner/location with date comparison; Cohort analysis; At risk (churn prediction); and Top customers. It gives operators a real view of how recurring revenue is moving and where it's at risk.

Helpdesk Worklog Reports

Know where your support hours actually go - by agent, ticket, customer, and label.

Logged time on tickets used to be visible only inside each individual ticket, so answering "who spent how much time on what this month" meant manual digging - and the old SLA report and Ticket lifecycle tabs are gone. Their successor is the new Helpdesk worklog reports page (Administration → Reports, under Other reports): four tabs that slice the same logged time from different angles, each with a Period filter (defaulting to the current month) and one-click Export to CSV.
  • Logged time per admin shows a Logged time per day line chart - one colored line per administrator - followed by a grid of admins by days, with an hh:mm total per day and a Total column for the whole period; an Administrators multi-select narrows both.
  • Logged time per ticket and Logged time per customer list totals sorted by the heaviest time consumers first, with search and a View drill-down on every row - which admins logged how much on a ticket, and which tickets make up a customer's total.
  • Labels statistics breaks logged time and ticket counts down by ticket label, with a Tickets per label doughnut chart - so you can see which categories of work eat your support capacity.

Two things to know before the data flows. The worklog feature is off by default: enable it at Config → Helpdesk → Tickets → Miscellaneous → Work log, after which a Time spent (minutes) field appears on ticket reply and note forms (the running total shows as Total time spent on the ticket panel). And access is permission-gated: by default the report is available to Super Administrators only, extendable to other roles through standard role permissions.
Multiple Payment Methods

Store several credit cards or bank accounts per customer, set a default, and manage them from both the admin panel and the Customer Portal.

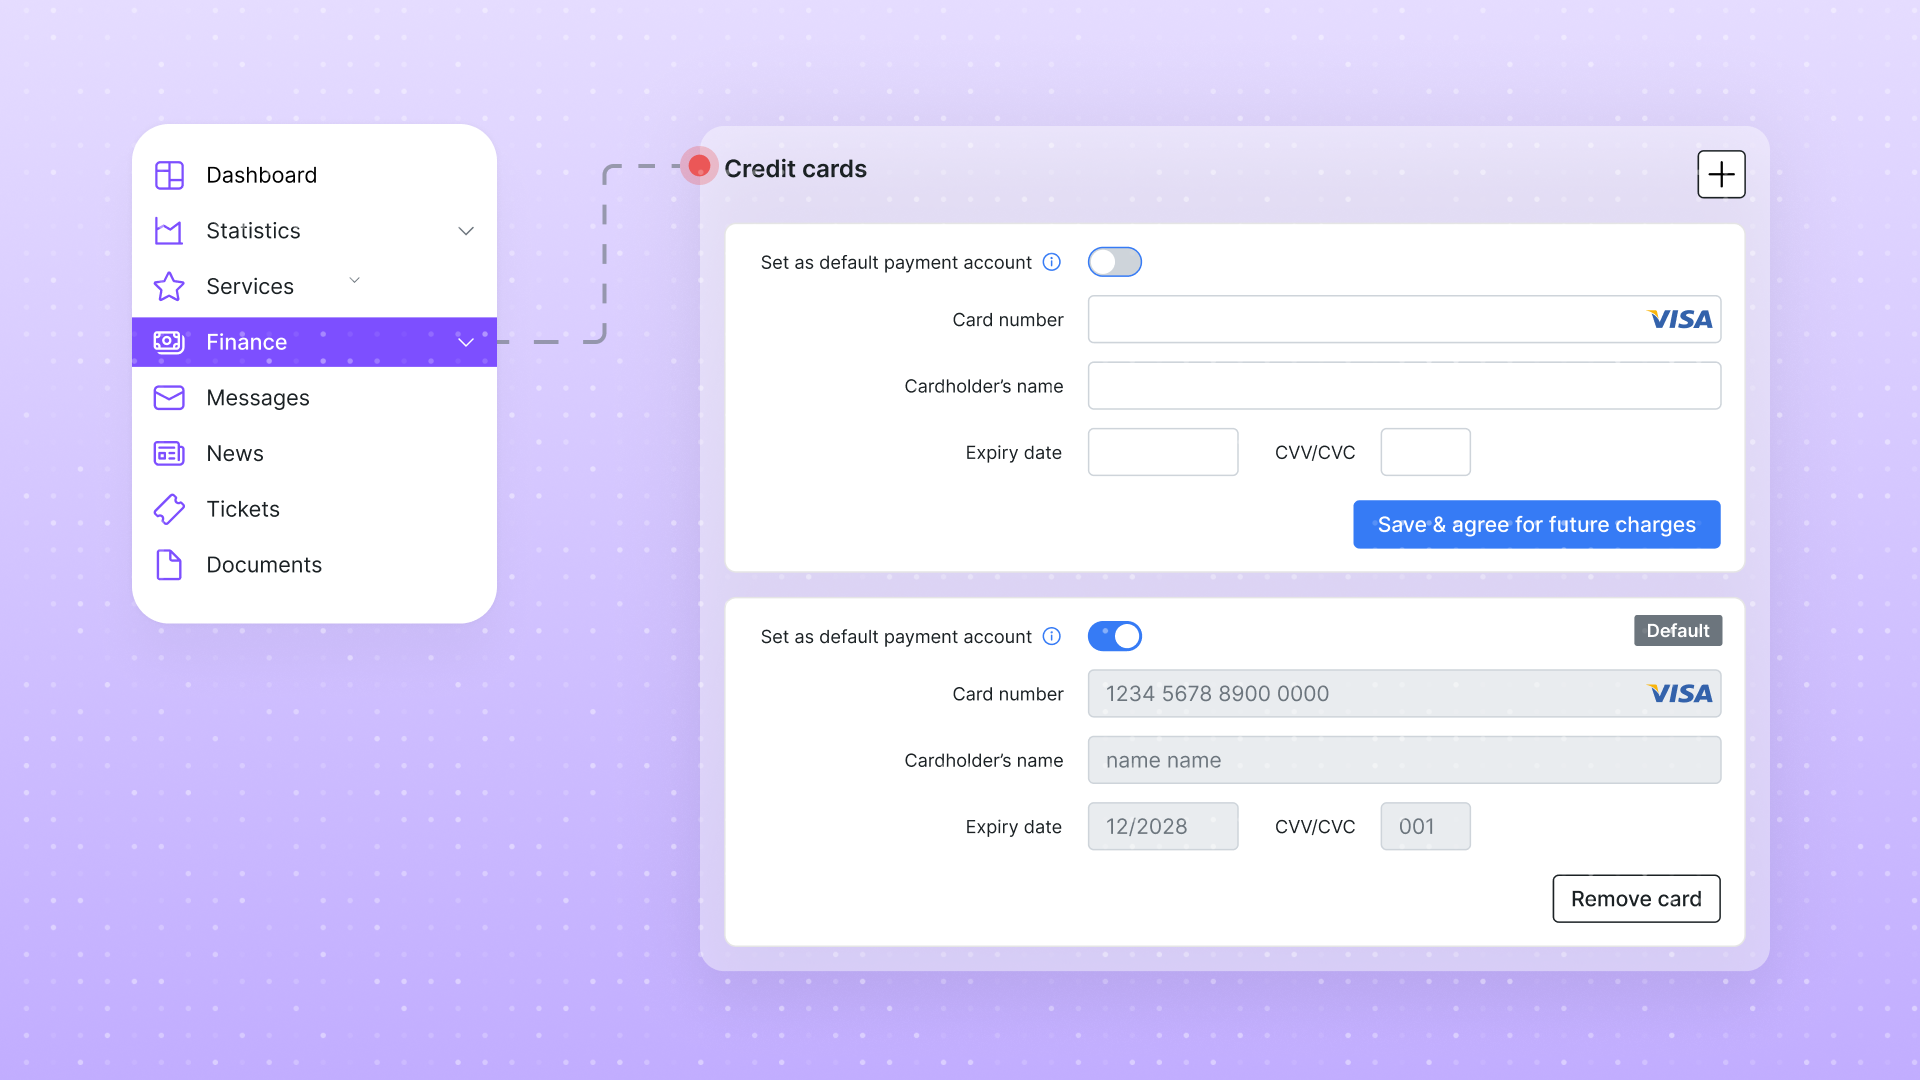
Customers who keep more than one card or account no longer force your team into workarounds. Splynx now can store multiple payment methods per customer, with the ability to set a default and manage them from the admin panel and the Customer Portal.

Void Payments

Void payments processed through supported payment gateways before they settle with the reversal reflected in your accounting integrations.

Billing has been extended to support voiding gateway payments. A single Refund button now handles both refund and void operations, and a separate Cancel button sends a direct void request from Splynx. It works in two ways:
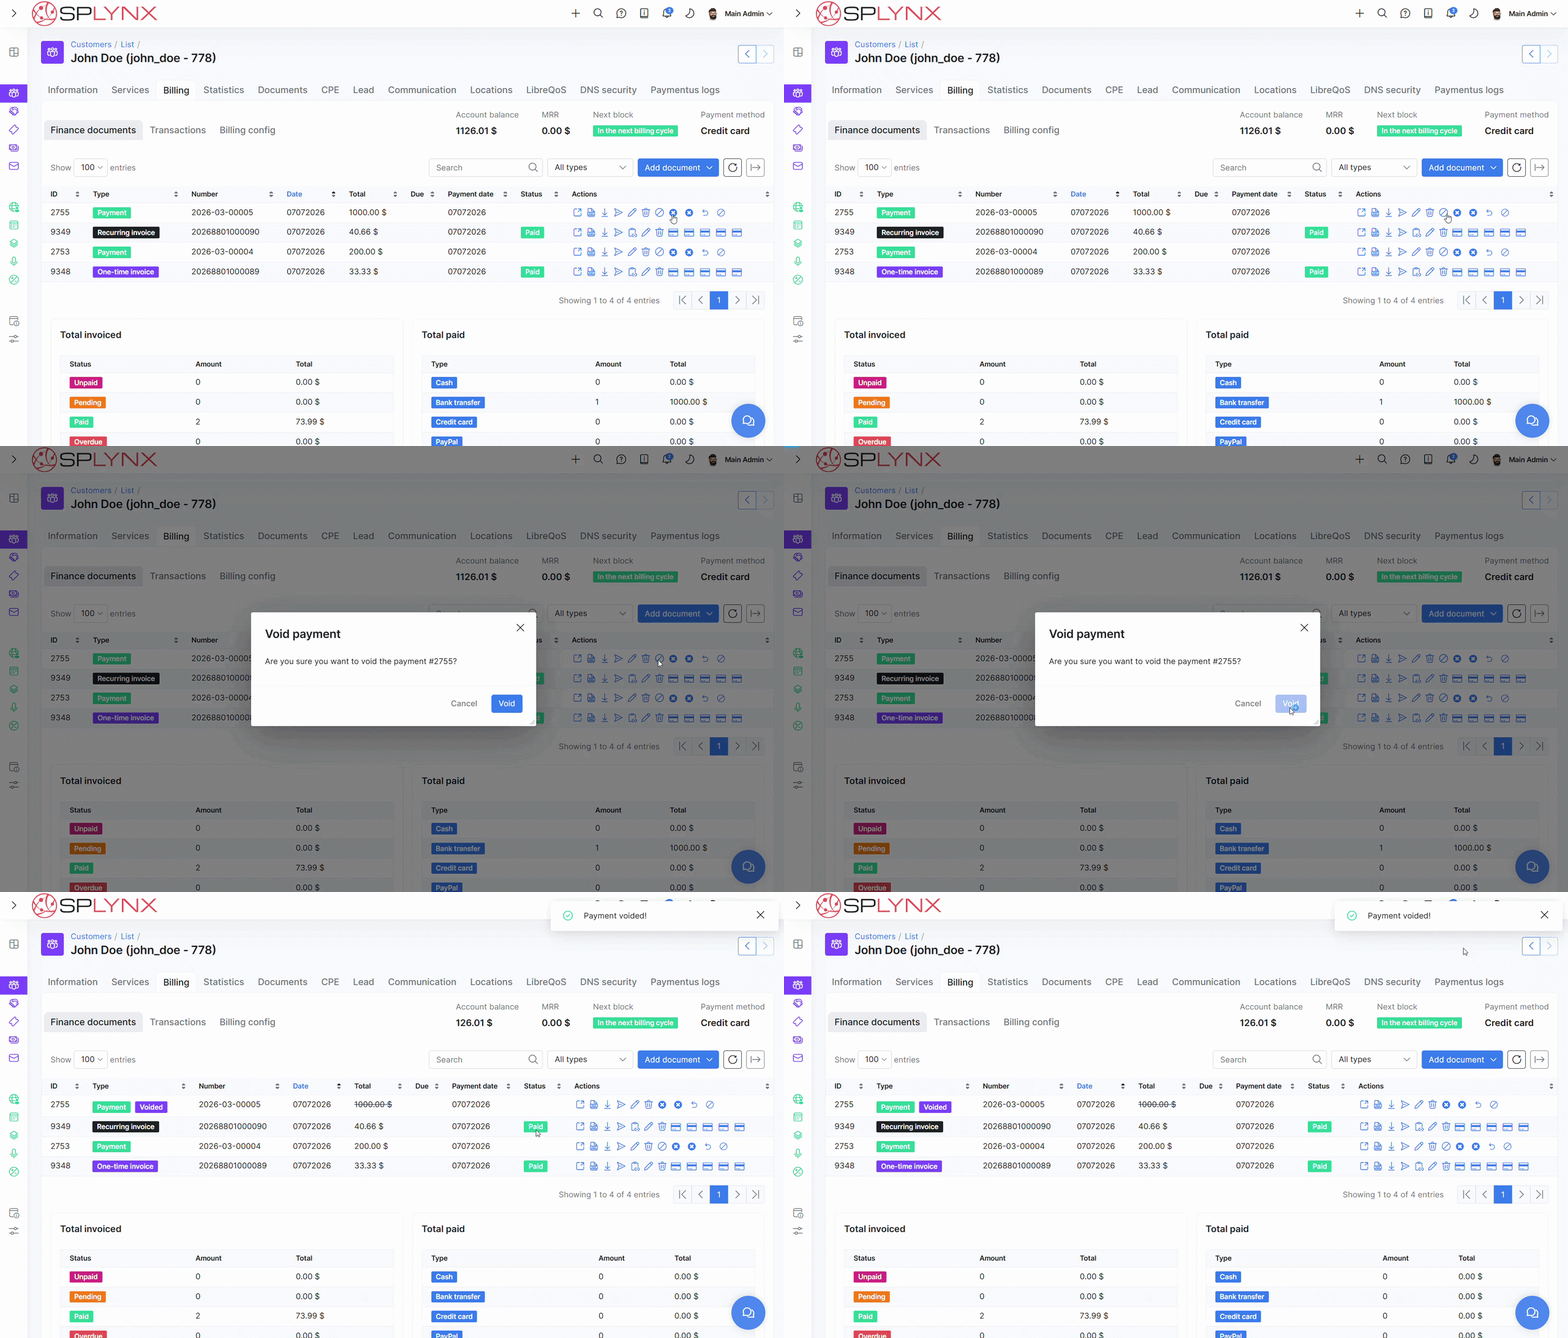
  • without a payment add-on, Cancel records a manual void in Splynx - the payment is reversed in billing without affecting the gateway;
  • with a payment add-on installed (for example, Paymentus), the add-on's Cancel performs the void on the payment gateway side first, and the action is then recorded in Splynx the same way.

To keep the payment trail consistent, deleting gateway payments is no longer allowed - reversals go through void or refund instead. When funds are automatically re-allocated, Splynx recalculates the invoice payment date, setting it to the later of the invoice date and the payment date. Void operations are also reflected in the connected accounting integrations: Xero, SageOne, QuickBooks, and Zoho Books.

Splynx CommsApp

Handle tickets and customer WhatsApp messages from your phone, with push notifications.

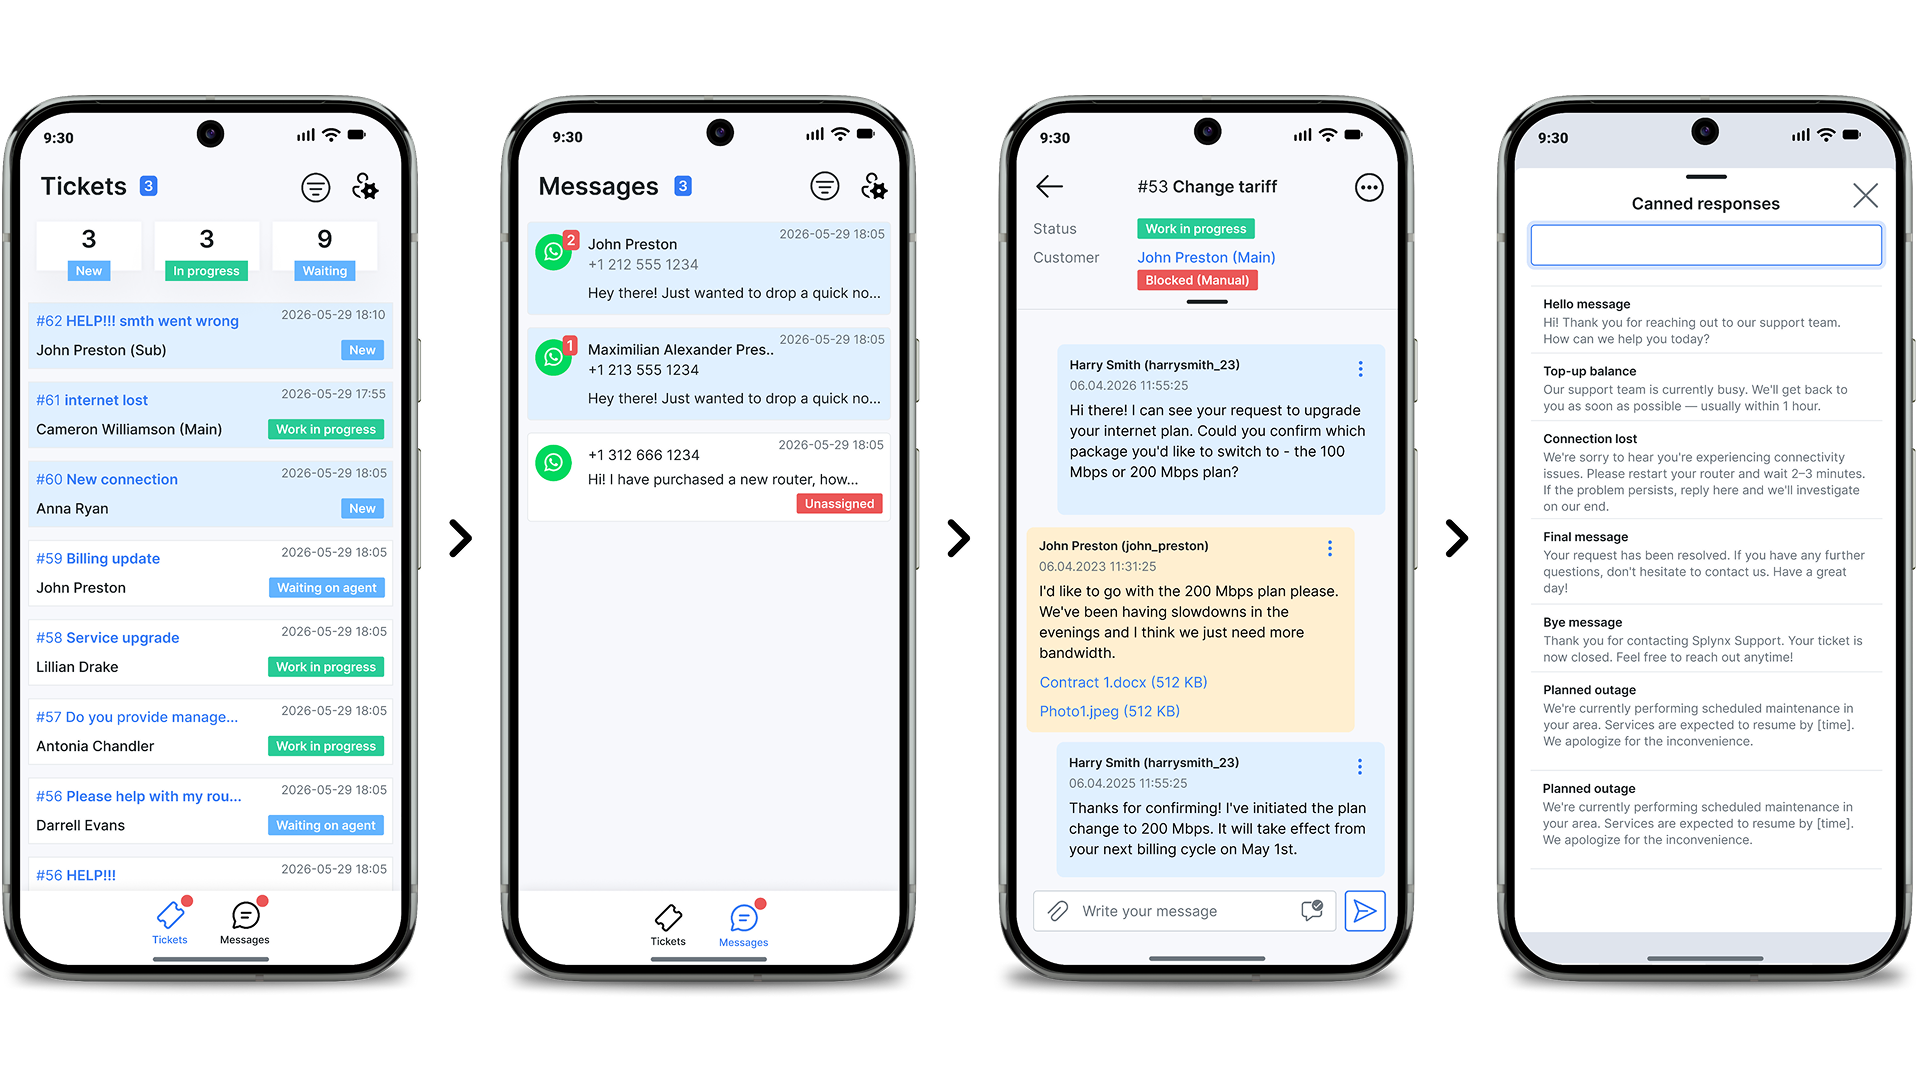
The Splynx CommsApp is a mobile companion app for support agents who need to handle tickets and customer WhatsApp chats away from a desktop.

A bottom navigation bar switches between Tickets and Messages with unread indicators on each tab. The Tickets tab shows summary counters (New, In progress, Waiting) and full ticket threads where agents can reply, add notes, change status, and attach files; the Messages tab lists WhatsApp conversations that stay in sync with Splynx web.

Centrally managed canned replies speed up common answers, and per-event push notifications (new ticket assigned, new comment or note, new chat assigned, new chat comment) can each be toggled on or off. From any ticket or chat, agents can open the linked customer's profile for billing, services, labels, and contact details.

The Splynx CommsApp is already available for download to all Splynx customers via the App Store or Google Play.

These release notes highlight the major epics shipped in v6.0. For a full breakdown of every change, fix, and enhancement, please take a look at our changelog.

See changelog