How to configure and troubleshoot Splynx Radius

This post explains how to troubleshoot communication between the router (Mikrotik example) and Radius.

You can also check out Troubleshooting network issues related to RADIUS server on our website.

Step 1. Mikrotik Radius section

To configure the Mikrotik router and Radius authentication, we should change the settings in the Mikrotik Radius section.

  1. Choose services, that have to be authenticated by Radius (PPP, DHCP, login, etc.).

  2. Enter IP address = Splynx IP address, reachable from Mikrotik.

  3. Secret = this value is located at Splynx → Router → Edit → Radius secret.
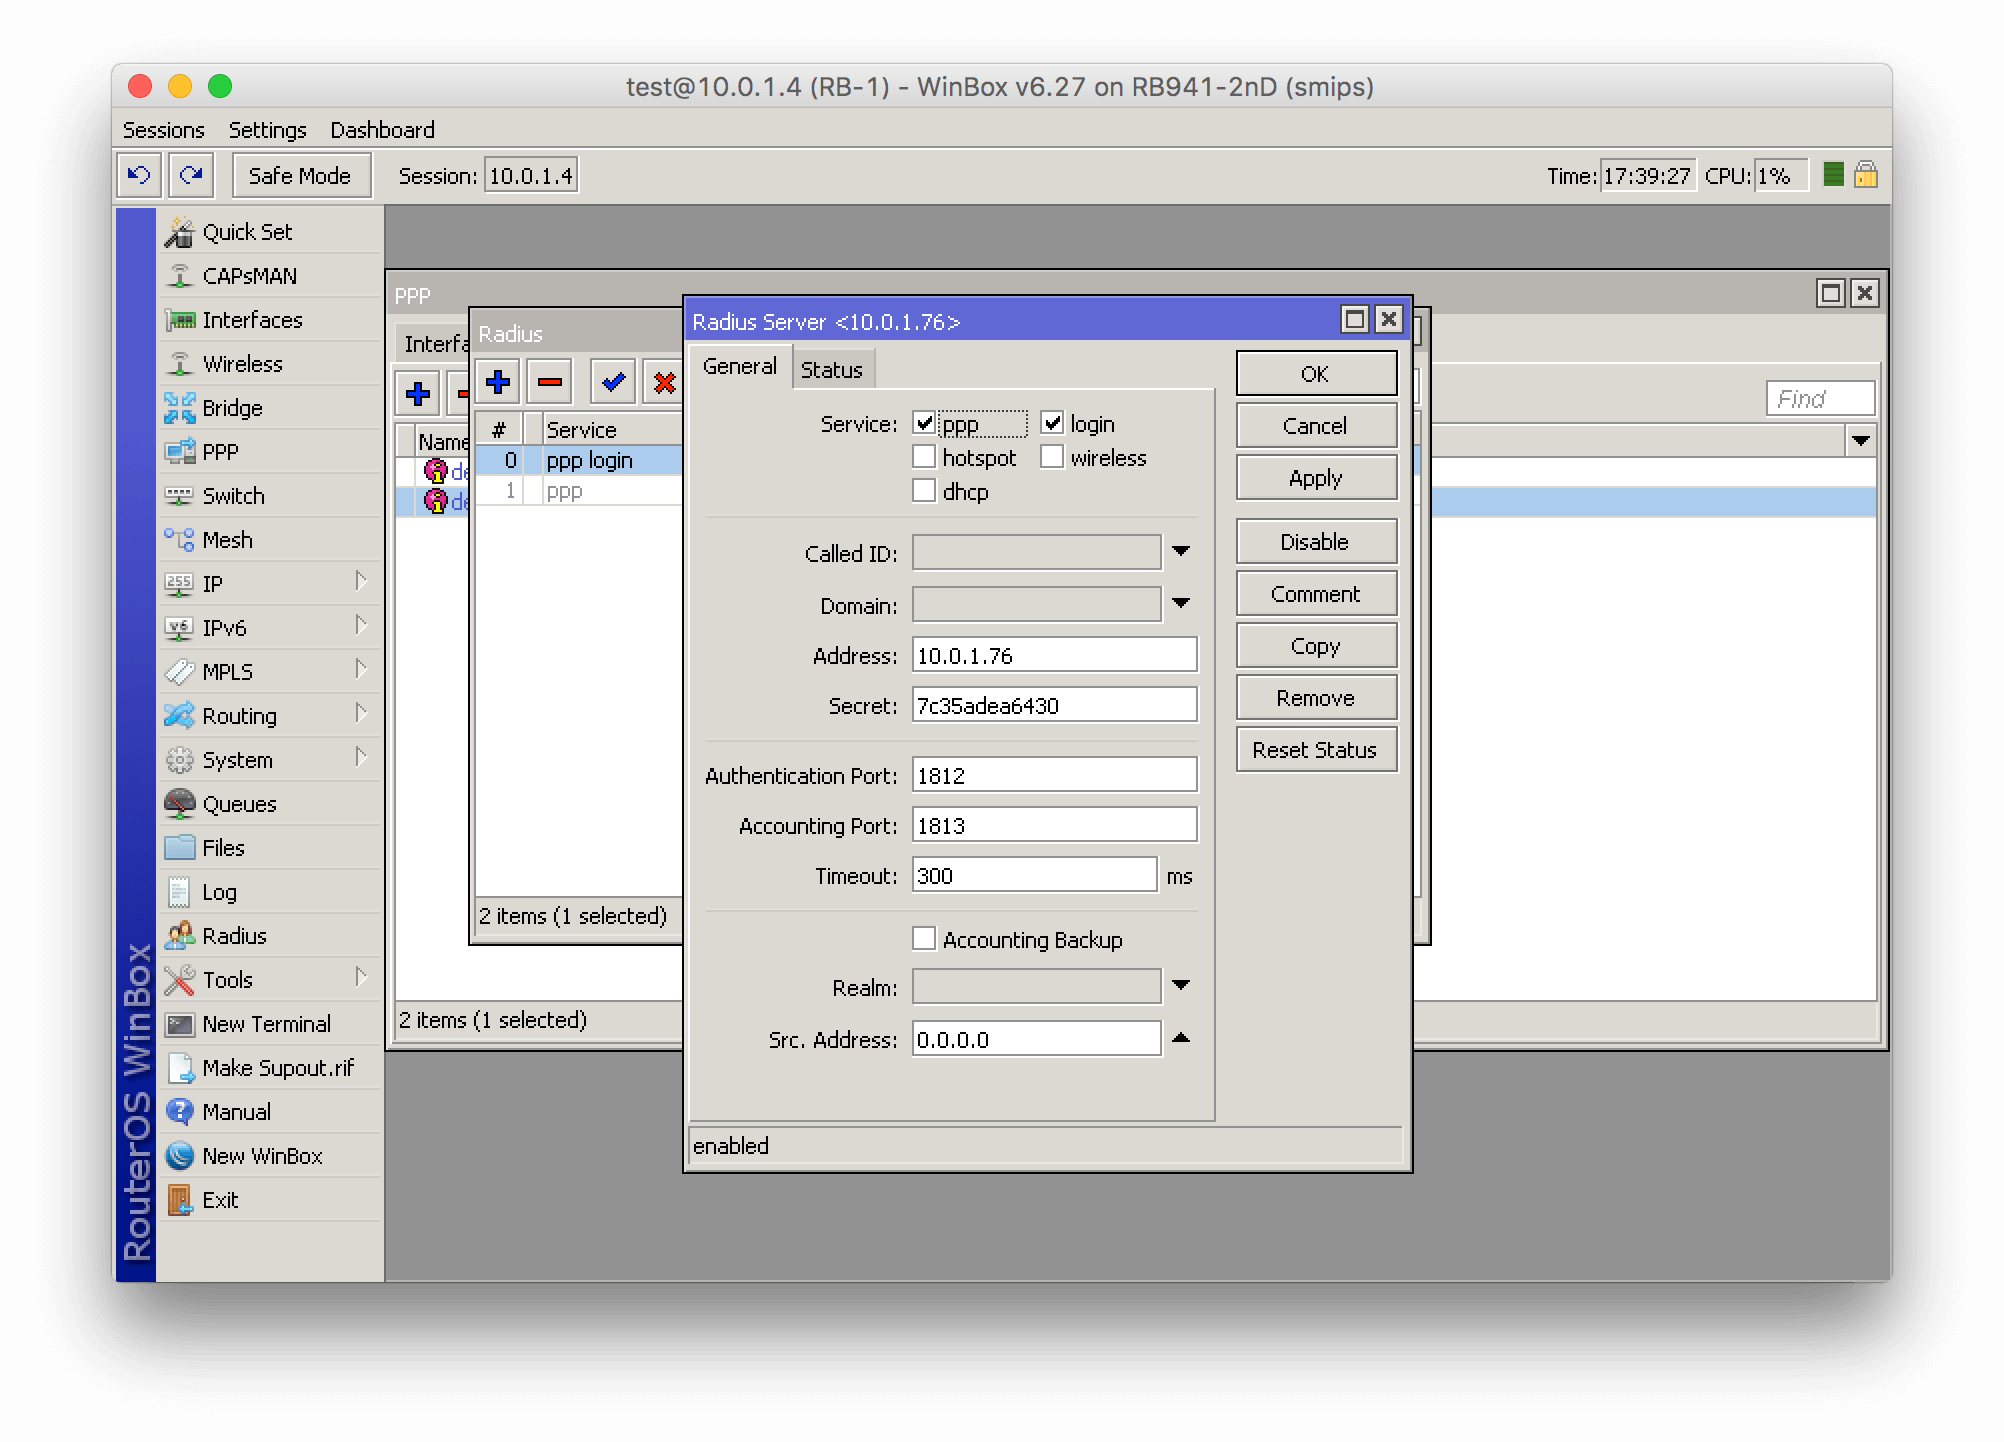
    How to configure Splynx Radius

  4. We cannot use more than one Radius server per Service
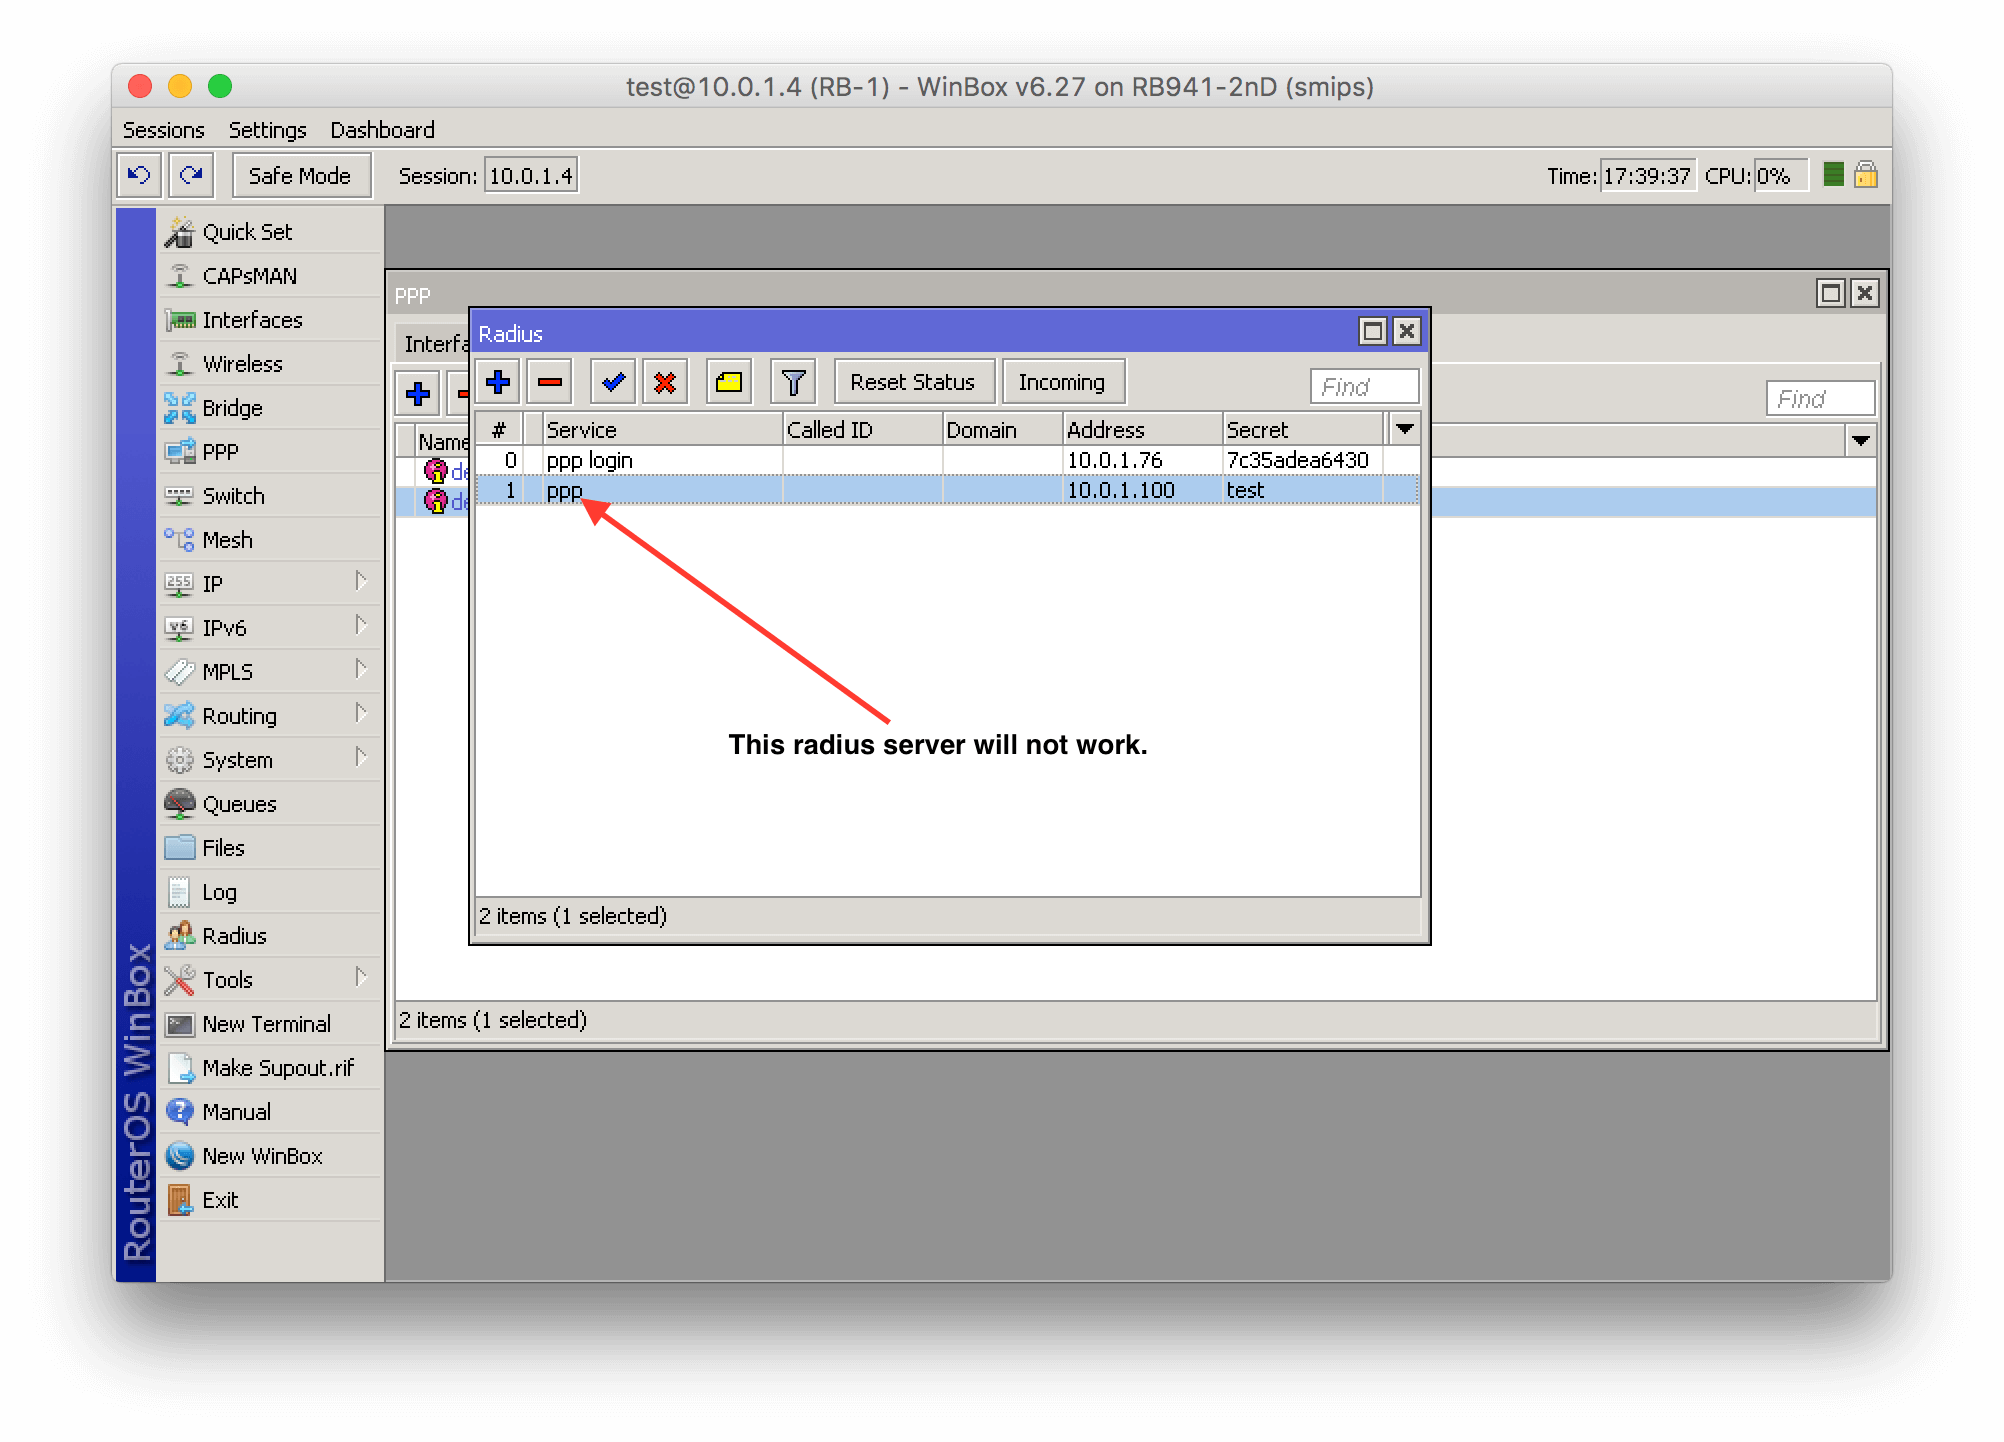
    Don't use more than one Radius server per Service

Step 2. MikroTik PPP (when PPPoE is used)

  1. Enable on Secrets → PPP Authentication & Accounting features “Use Radius (yes), Accounting (yes)”.
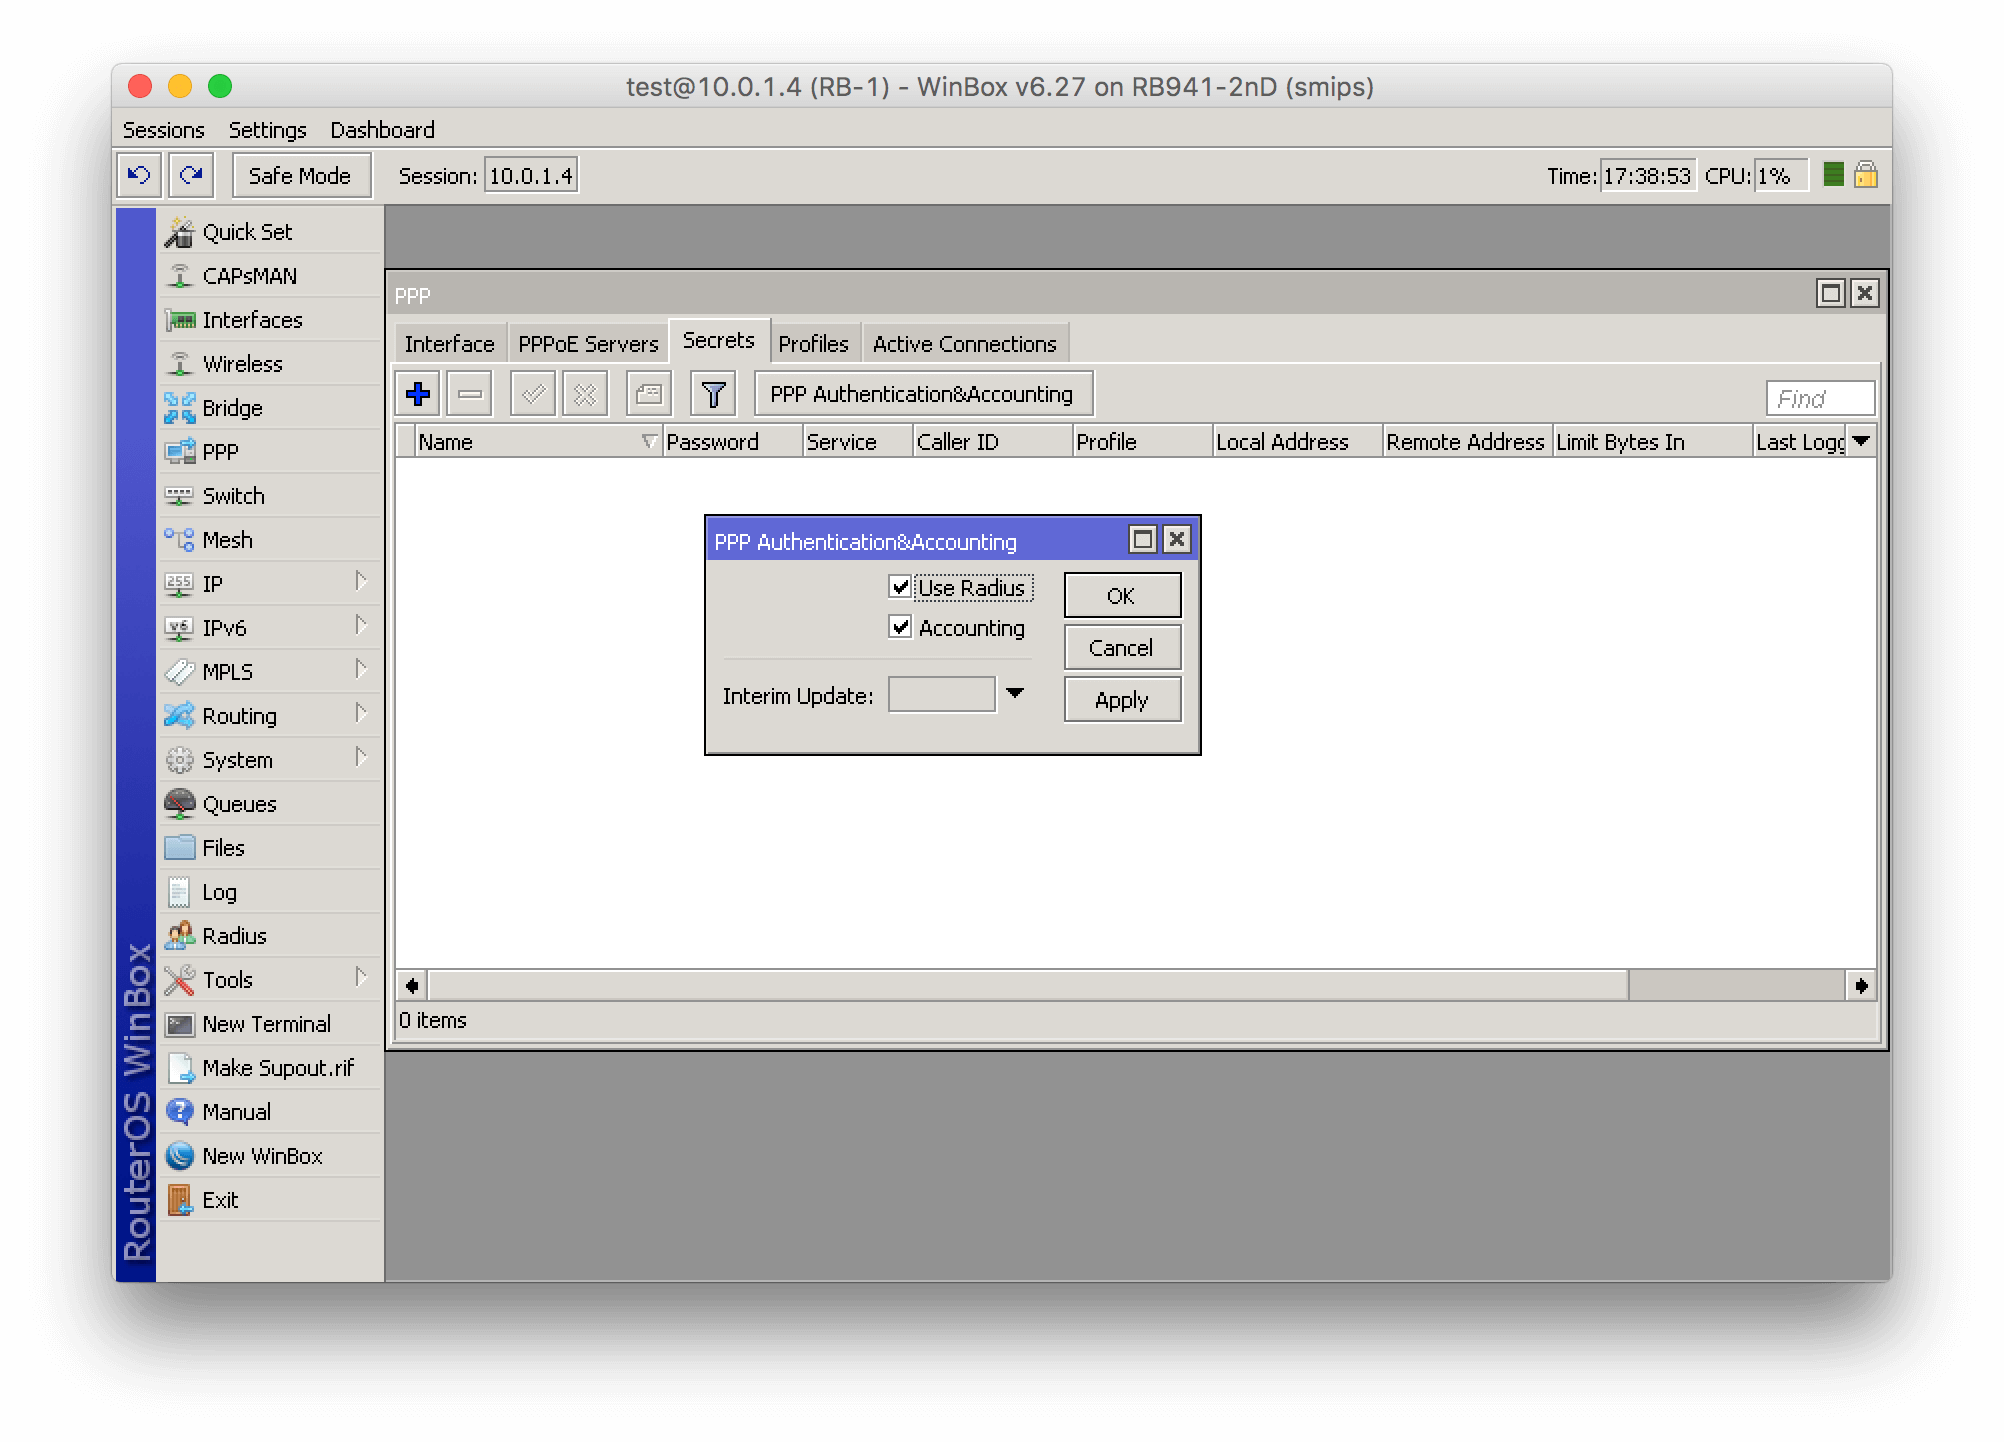
    How to configure Radius server in Splynx

  2. Set Profile – default or default-encrypted, set Local address (it’s IP of Mikrotik router for establishing PPP connections).
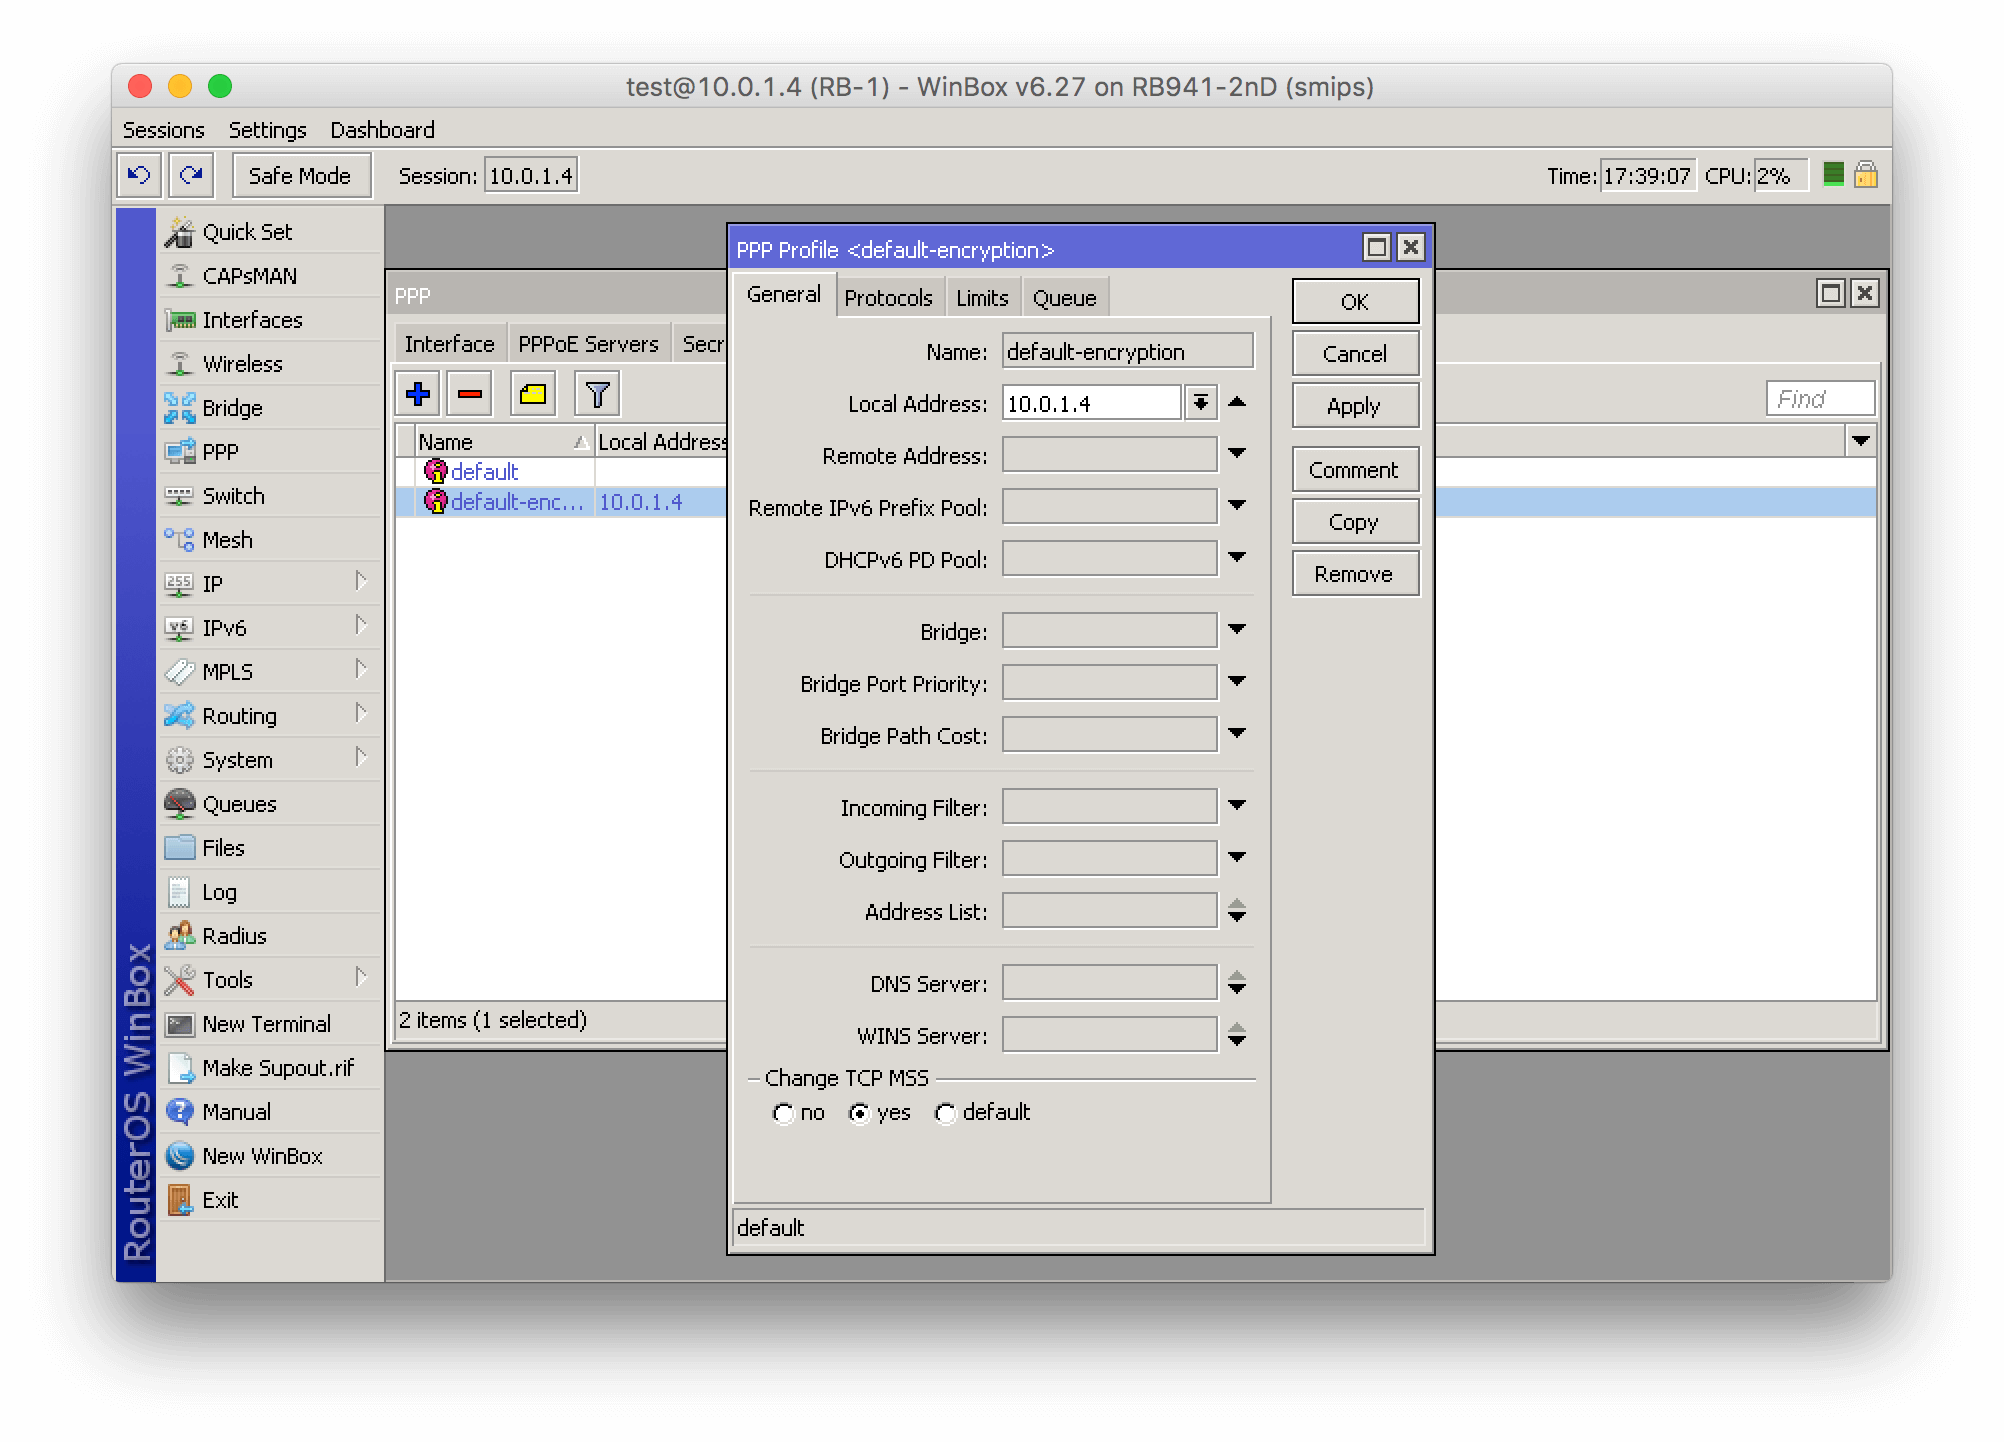
    How to configure Radius server in Splynx

Step 3. MikroTik DHCP

If we use IPoE authentication (DHCP), we should enable Radius communication on the DHCP server.
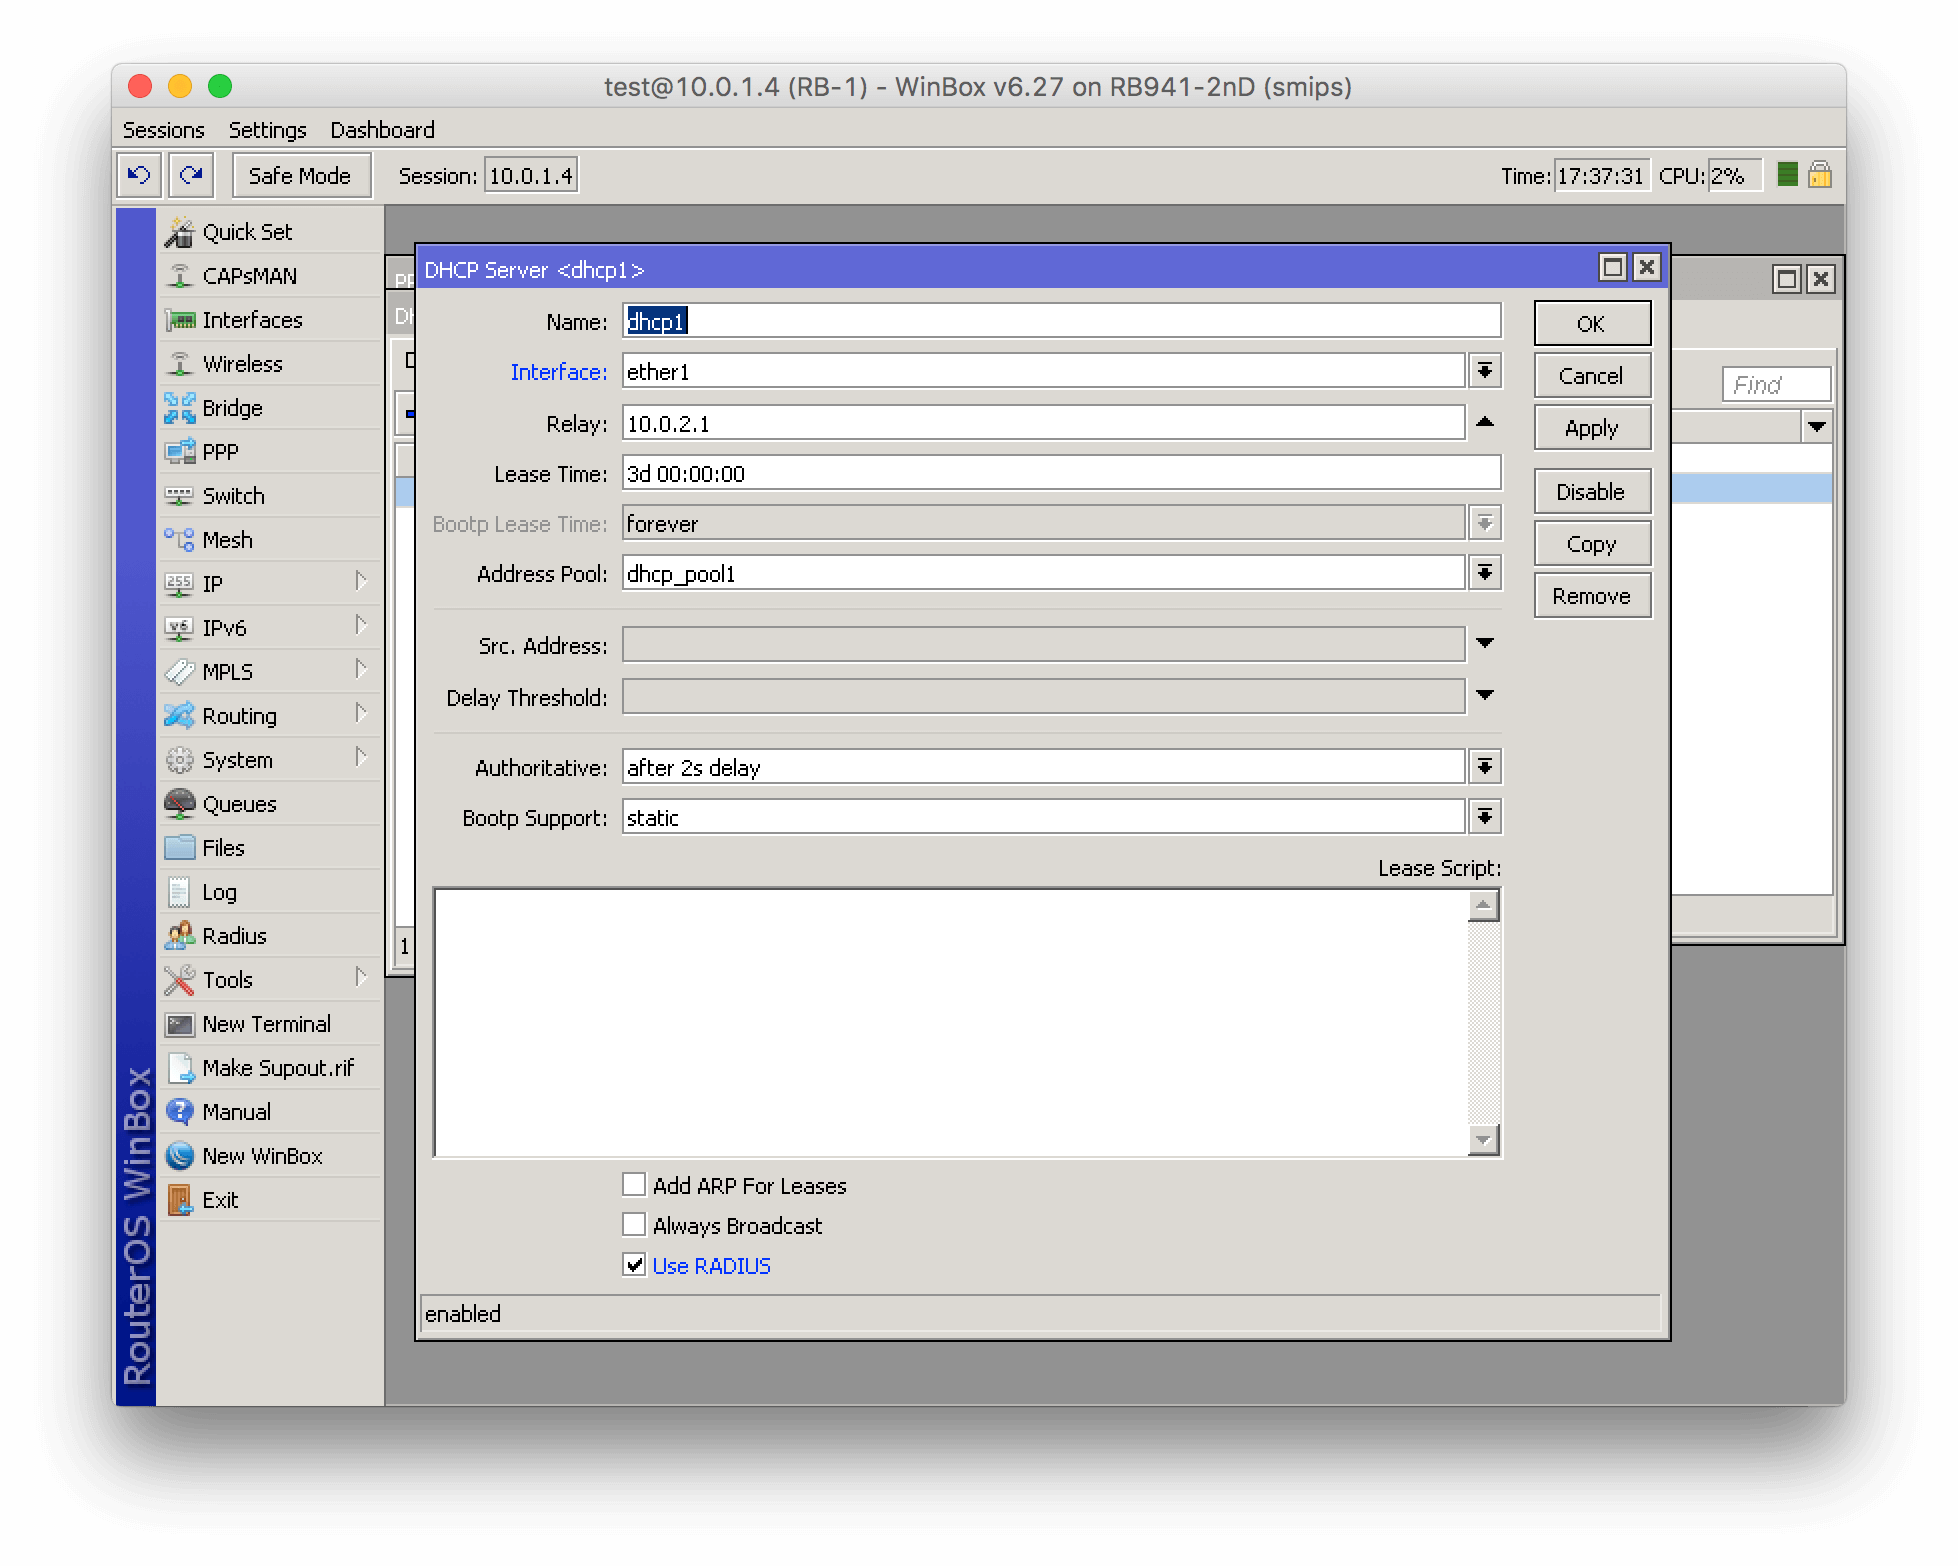
Enable Radius communication on the DHCP server

Step 4. MikroTik Hotspot

To enable Radius hotspot authentication, change the Hotspot configuration of Mikrotik under IP → Hotspot as shown below:
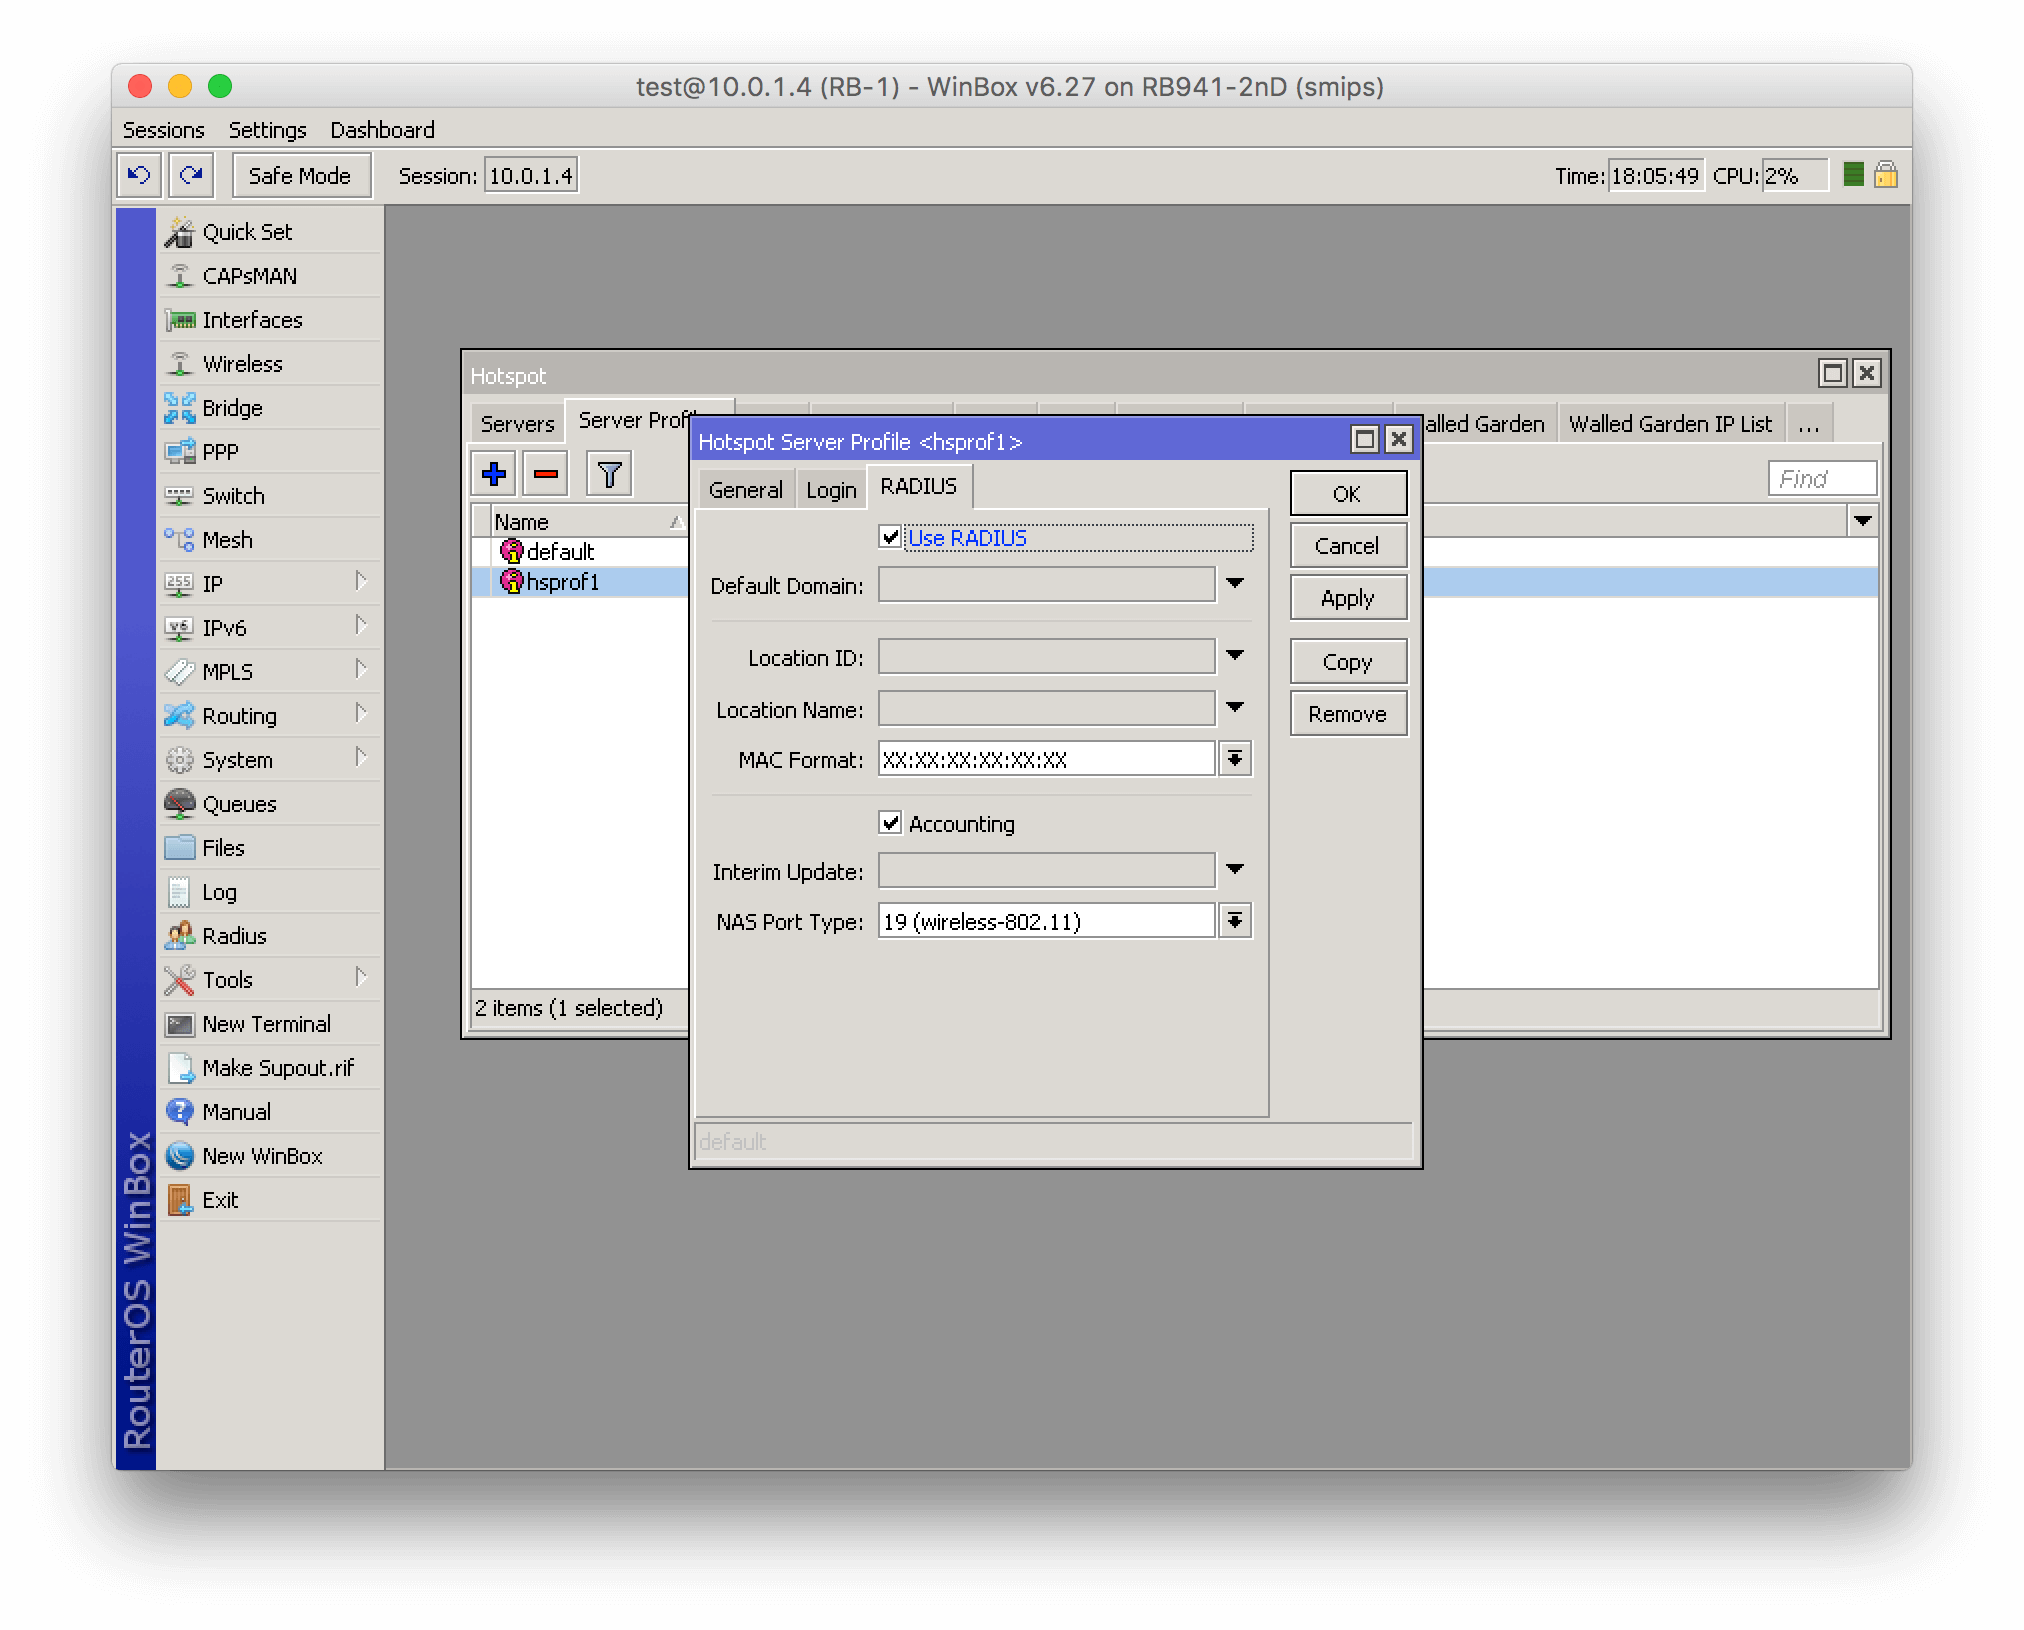
To enable Radius hotspot authentication, change the Hotspot configuration of Mikrotik under IPWhen we enable services for Radius authentication, we can move forward and configure the router in Splynx.

Step 5. Splynx router configuration

Splynx → Networking → Routers, here you can edit or change router settings. Important fields to fill are:
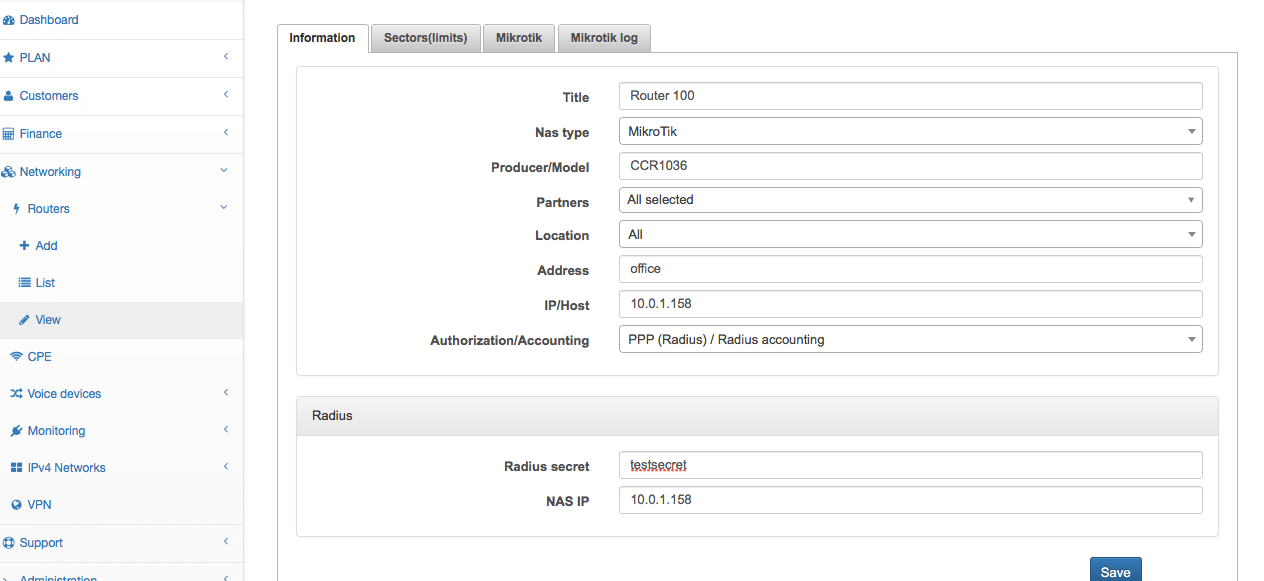
  1. Radius Secret should be the same as in Mikrotik settings.
  2. IP/Host – the real IP (or host, or DynDNS host) from which Mikrotik sends packets. In case NAT is between Mikrotik and Splynx Radius, the host IP will be the public IP of the NAT router and the real IP will be the private IP of the Mikrotik router.
  3. Authorization/Accounting – please set DHCP/PPP/HotSpot Radius. Even if you choose PPP, DHCP and Hotspot authentication will work as well. The difference is in DHCP Radius, here you can find accounting API. It means that for getting statistics from the DHCP server, Splynx should connect to the API of Mikrotik. This is caused by unsupported Radius accounting packets on Mikrotik routers.
  4. NAS IP – IP address of the router (on radius packet – NAS-IP-Address) when you use the hostname of the router you need to set this IP. (you can set this IP on Mikrotik – Radius – Src. Address).Splynx router configuration

Step 6. Define IP networks for IP assignments

Splynx → Networking → IPv4 networks.

Add some network for dynamic assignment (pool) or permanent (static) usage.
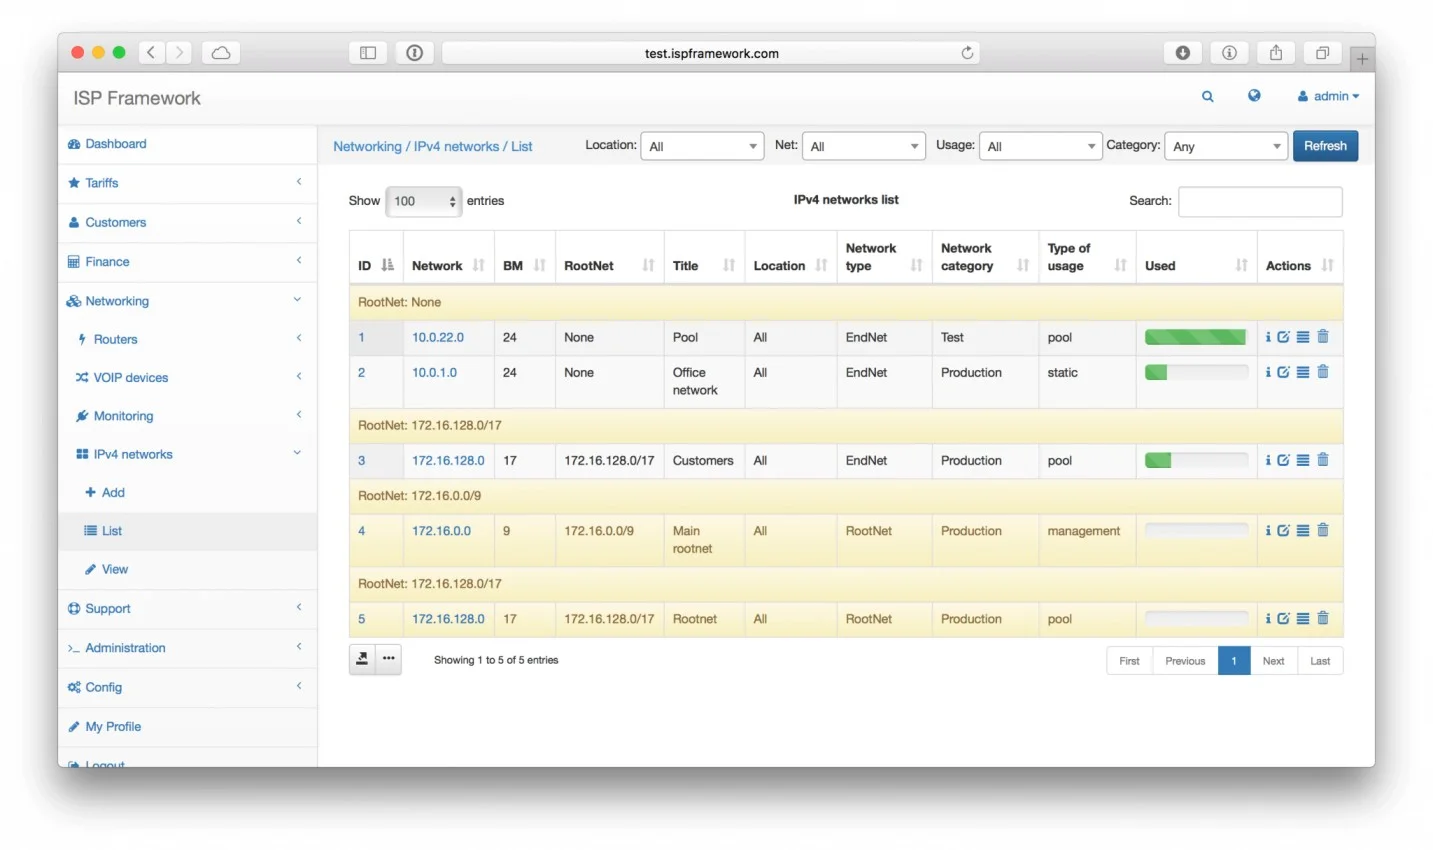
IP networks

Step 7. Activate customer and set the Internet service

When we have added routers and networks to Splynx, it’s the right time to add a customer and activate him.
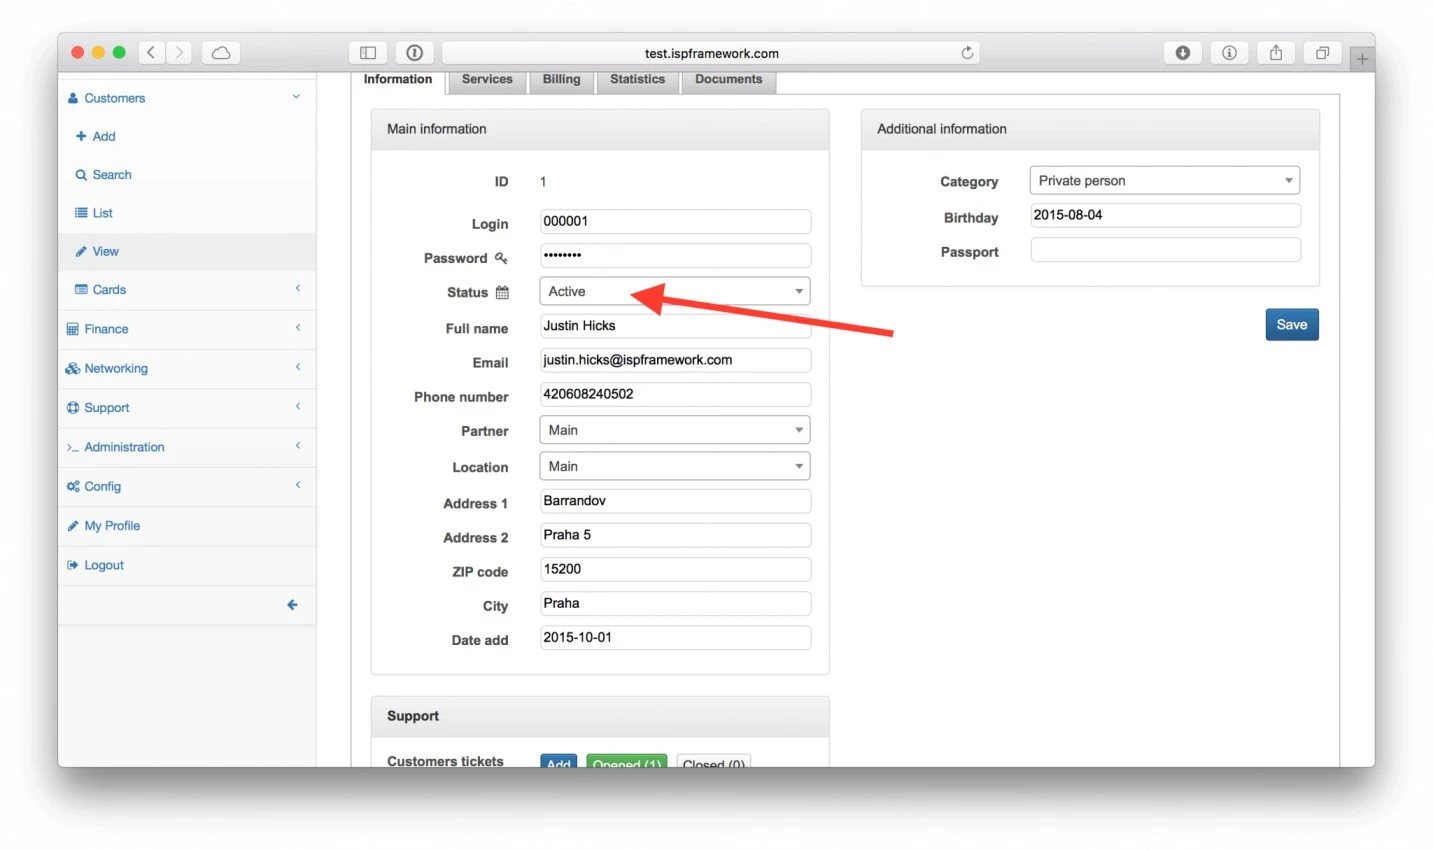
Activate customer

Then, we need to create an Internet service for the customer with PPP details (or MAC in case of DHCP authentication), IP address, and other details.
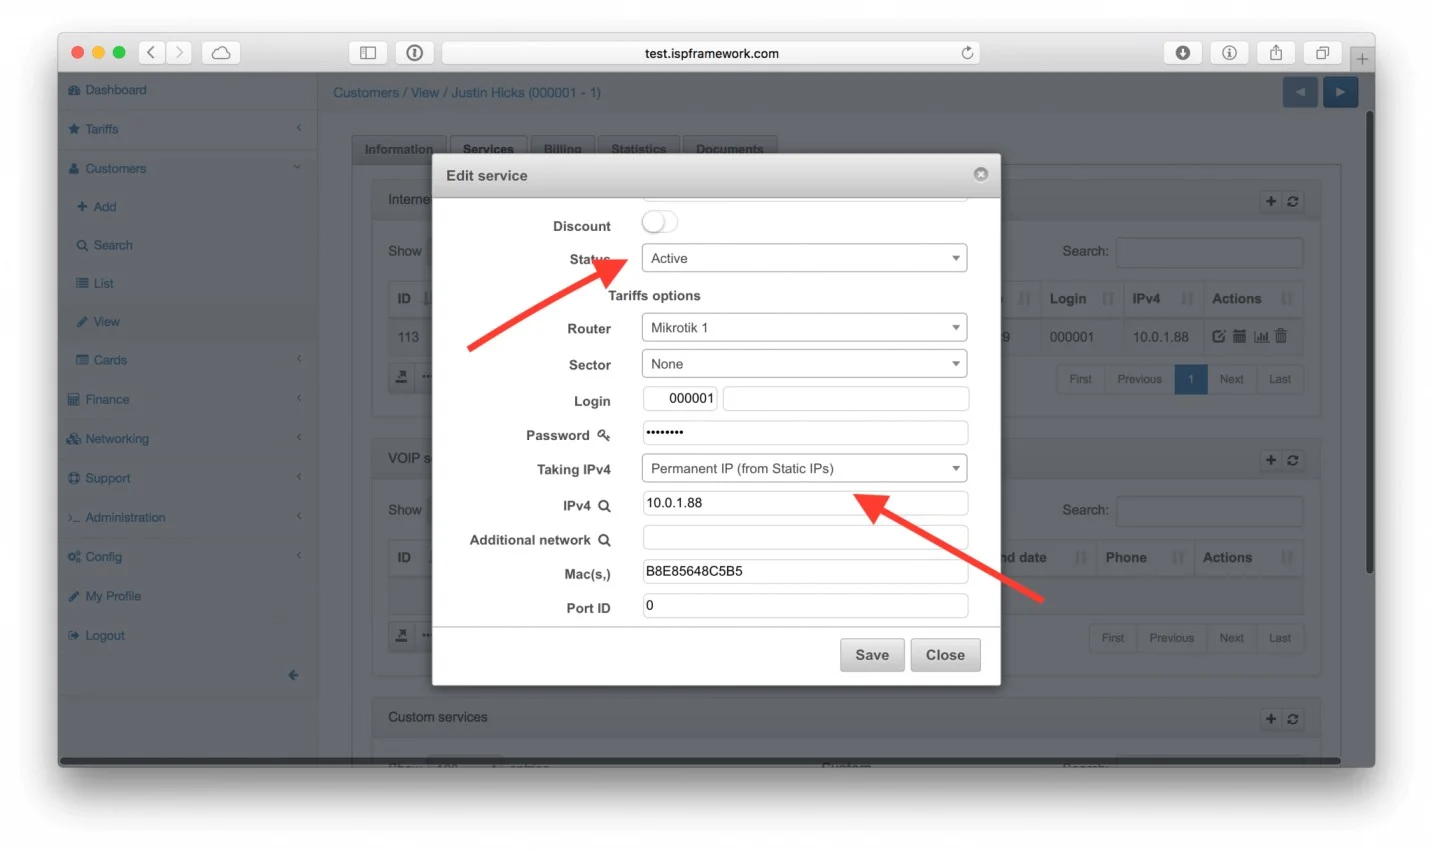
IP address

If all these steps were made and still Mikrotik router shows Radius timeout in the log, then, we need to make quick troubleshooting.

Troubleshooting

First of all, check the file in Splynx logs called radius/short. It can be found in section Splynx → Administration → Logs → Files. If this file is empty, the Radius server should be set to debug mode.

Splynx Radius server consists of 2 daemons – splynx_radd and free radius. Both of them have different debugging and show different information. Let’s start with splynx_radd debugging:

To enable debug mode of Splynx, connect via SSH to the Splynx server and change the configuration file: /var/www/splynx/config/radius.php
[debug] section enable should be changed to – “true"

To restart the Radius server, enter the command in SSH: service splynx_radd restart

Now we can check the debug file, again it’s accessible from CLI of Linux Splynx server:
/var/www/splynx/logs/radius/debug.log

The best way to check the file is the command tail -f /var/www/splynx/logs/radius/debug.log

If splynx_radd debug doesn’t show us anything, we can try to run free radius daemon in debug mode and see if any packets are received by the Radius server.

Run CLI commands :
service freeradius stop
freeradius -Xxxx

and check the CLI console output.

If you don’t see any debug messages when a customer tries to connect to Mikrotik Router, it means that your router cannot send packets and connect to the Radius server at all. It means that you have to verify the networking, routing, and NAT settings of the network.

On Mikrotik Router there is also availability to run extended debug to see what exactly router is sending to Radius server:
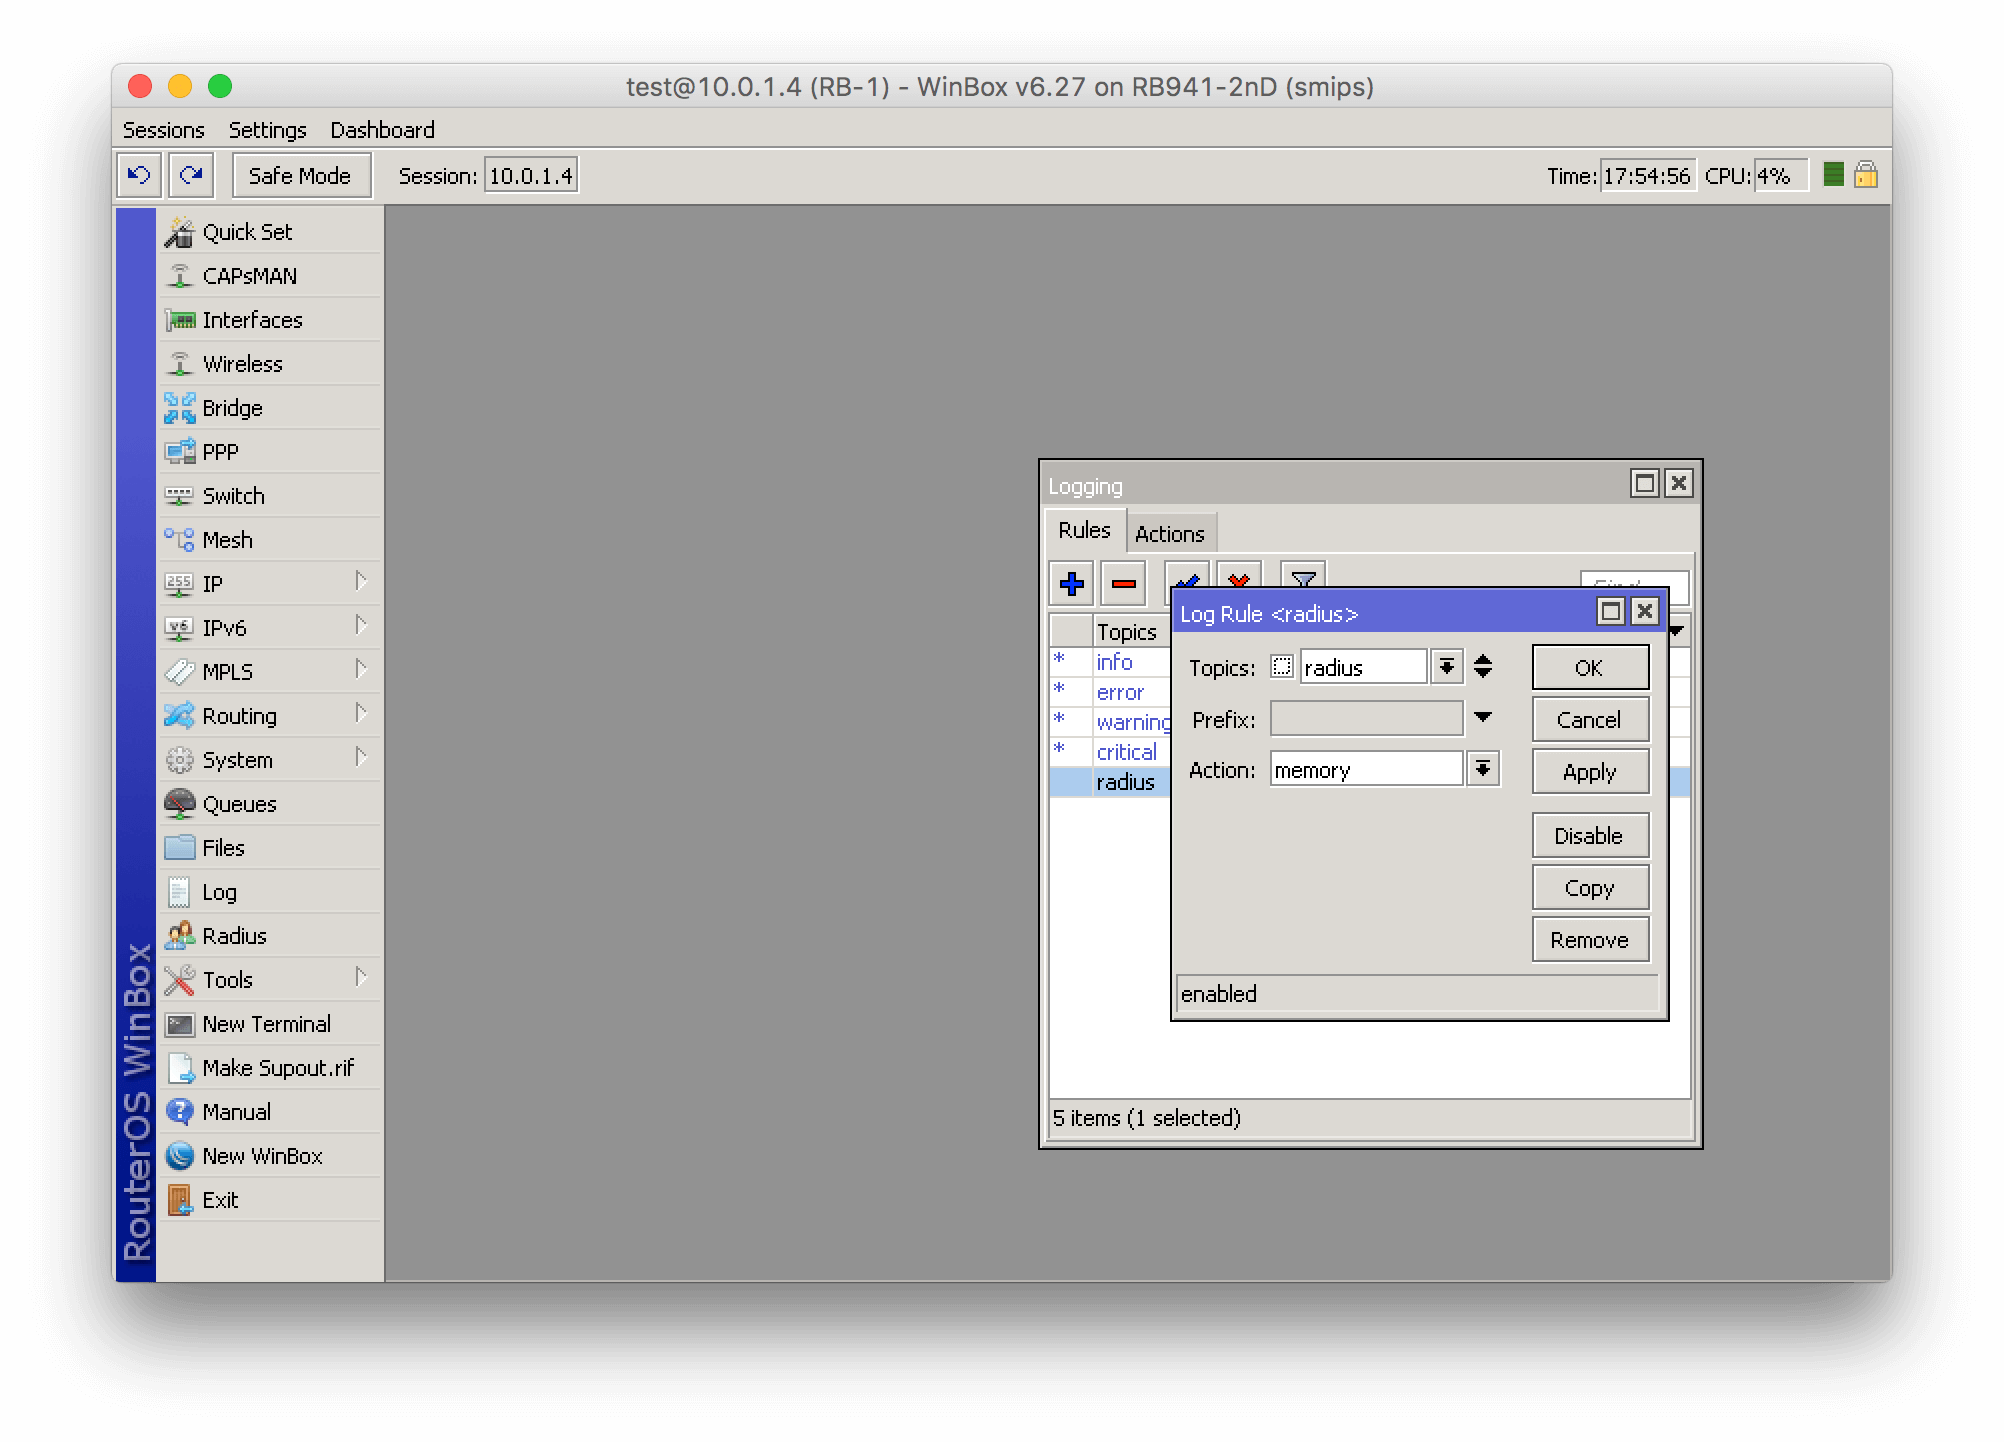
On Mikrotik Router you can run extended debug to see what exactly router is sending to Radius server

More in Network management

Network management

Simplifying network troubleshooting with Ping and Traceroute features

Explore Splynx 4.2's Ping and Traceroute features, simplifying network troubleshooting and boosting ISP team efficiency.

Network management

Hardware Backup & Change Management in Splynx

Maintaining network stability and reliability is paramount for both ISPs and their valued customers. To address this, Sp...

Network management bandwidth management

Bandwidth management in Splynx

As a local ISP business owner, ensuring efficient bandwidth management is crucial for maintaining customer satisfaction ...

Network management Splynx network management

Streamlining network management: A closer look at Splynx’s capabilities

Efficient network management is essential for ISPs to deliver reliable and high-quality services to their customers. Wit...

Network management Network topology failover server

Overview of RADIUS failover server

One of the methods used to authorize Internet services in Splynx is the RADIUS protocol. More details about the Splynx R...

Network management Below is the topology sample that depicts the captured flow of how Splynx and NetFlow accounting work.

How to configure NetFlow accounting in Splynx

Learn how to configure NetFlow accounting to to bring usage data into Splynx.

Network management Hotspot add-on in Splynx 4.0

Hotspot add-on in Splynx 4.0

The Hotspot add-on was built to help businesses from low-income communities grow and earn more.

Network management How to configure Juniper Radius

Juniper Radius configuration with variables

This article is the second part of the Juniper MX Radius configuration tutorial.

Network management How to configure Radius Juniper MX

How to configure Radius Juniper MX

Juniper Networks is one of the leading vendors producing networking equipment. Together with Cisco, Juniper defines wher...

Network management Mikrotik ipv6 configuration

How to configure Mikrotik IPv6

This blog post describes how to configure the Mikrotik router to act as a PPPoE server with IPv6 enabled.

Find out how Splynx helps ISPs grow

Learn more