Share


Most ISPs still onboard customers the same way they did a decade ago. A phone call, a manually entered service order, someone typing credentials into a provisioning system. It works, but it doesn’t scale. And it costs far more than it should.
Updated September 2026: This article has been fully rewritten to cover the redesigned sign-up flow in Splynx v6.0, including coverage verification, package builder, built-in eSignature, and automatic service activation on first traffic.
A self-service sign-up flow changes that equation. Customers pick their plan, enter their details, pay online, and get provisioned automatically. No call center queue. No data entry errors. No waiting until Monday morning for someone to flip the switch.
This guide walks through what a modern ISP customer onboarding flow looks like, how to configure one in Splynx, and the practical steps to reduce abandonment and lower your cost per subscriber. If you’re still evaluating whether your billing setup can support this, start with the complete ISP billing automation guide.
Key Takeaways
Acquiring a new broadband subscriber is expensive. Industry benchmarks put ISP customer acquisition cost (CAC) at roughly $85 per subscriber (Financial Models Lab, 2026). And acquiring a new customer costs five to seven times more than retaining an existing one (Bain & Company / Harvard Business Review).
That math makes every wasted support interaction painful. Phone-based onboarding is one of the biggest cost multipliers. Gartner’s Customer Service and Support Leader poll found that live channels cost an average of $8.01 per contact, while self-service costs about $0.10 (Gartner, 2019). That 80x cost gap hasn’t shrunk. Gartner’s latest research projects self-service and live chat will surpass phone and email as the top service technologies by 2027 (Gartner, August 2025). When more than 40% of daily ISP interactions are routine tasks like account creation and plan changes (ISPbills, 2025), the savings from self-service add up fast. Customers want this too. 78% prefer solving issues independently before contacting support (Contact Center Pipeline, 2025, citing HubSpot State of Service 2024). McKinsey reports that more than half of customer service leaders expect digital channels to handle 40% or more of inbound contacts within three years (McKinsey, 2024).
The cost of getting onboarding wrong shows up in churn. Telecom churn ranges from 20% to 50% annually (CustomerGauge, 2024). Best-in-class broadband providers target under 3% annual churn (Telecompetitor, 2024). A poor first experience pushes new subscribers straight toward that exit. Bain & Company research shows that a 5% improvement in retention can increase profitability by 25% to 95% (Bain & Company).
The market reflects this shift. ISPs that automate billing, customer care, and network tasks free up their teams to focus on growth instead of routine admin. The ones that don’t are spending more per subscriber while delivering a worse first impression.

Support cost comparison across channels. Self-service contacts cost about 80x less than live agent interactions (Gartner)
A complete ISP online signup flow handles five steps: coverage verification, plan selection, registration, add-on services, and checkout. Each step should run without manual intervention.
Splynx had a basic signup form for years, but it was a single page with no coverage checks, no multi-step flow, and limited customization. Version 6.0 replaces it with an end-to-end customizable workflow where ISPs can toggle each feature on or off, reorder form fields with drag-and-drop, and configure the entire experience per brand.
Below is how the new flow works.
The prospect enters their address, drops a pin on the map, or shares their current location. The system checks it against your coverage zones and confirms whether service is available.
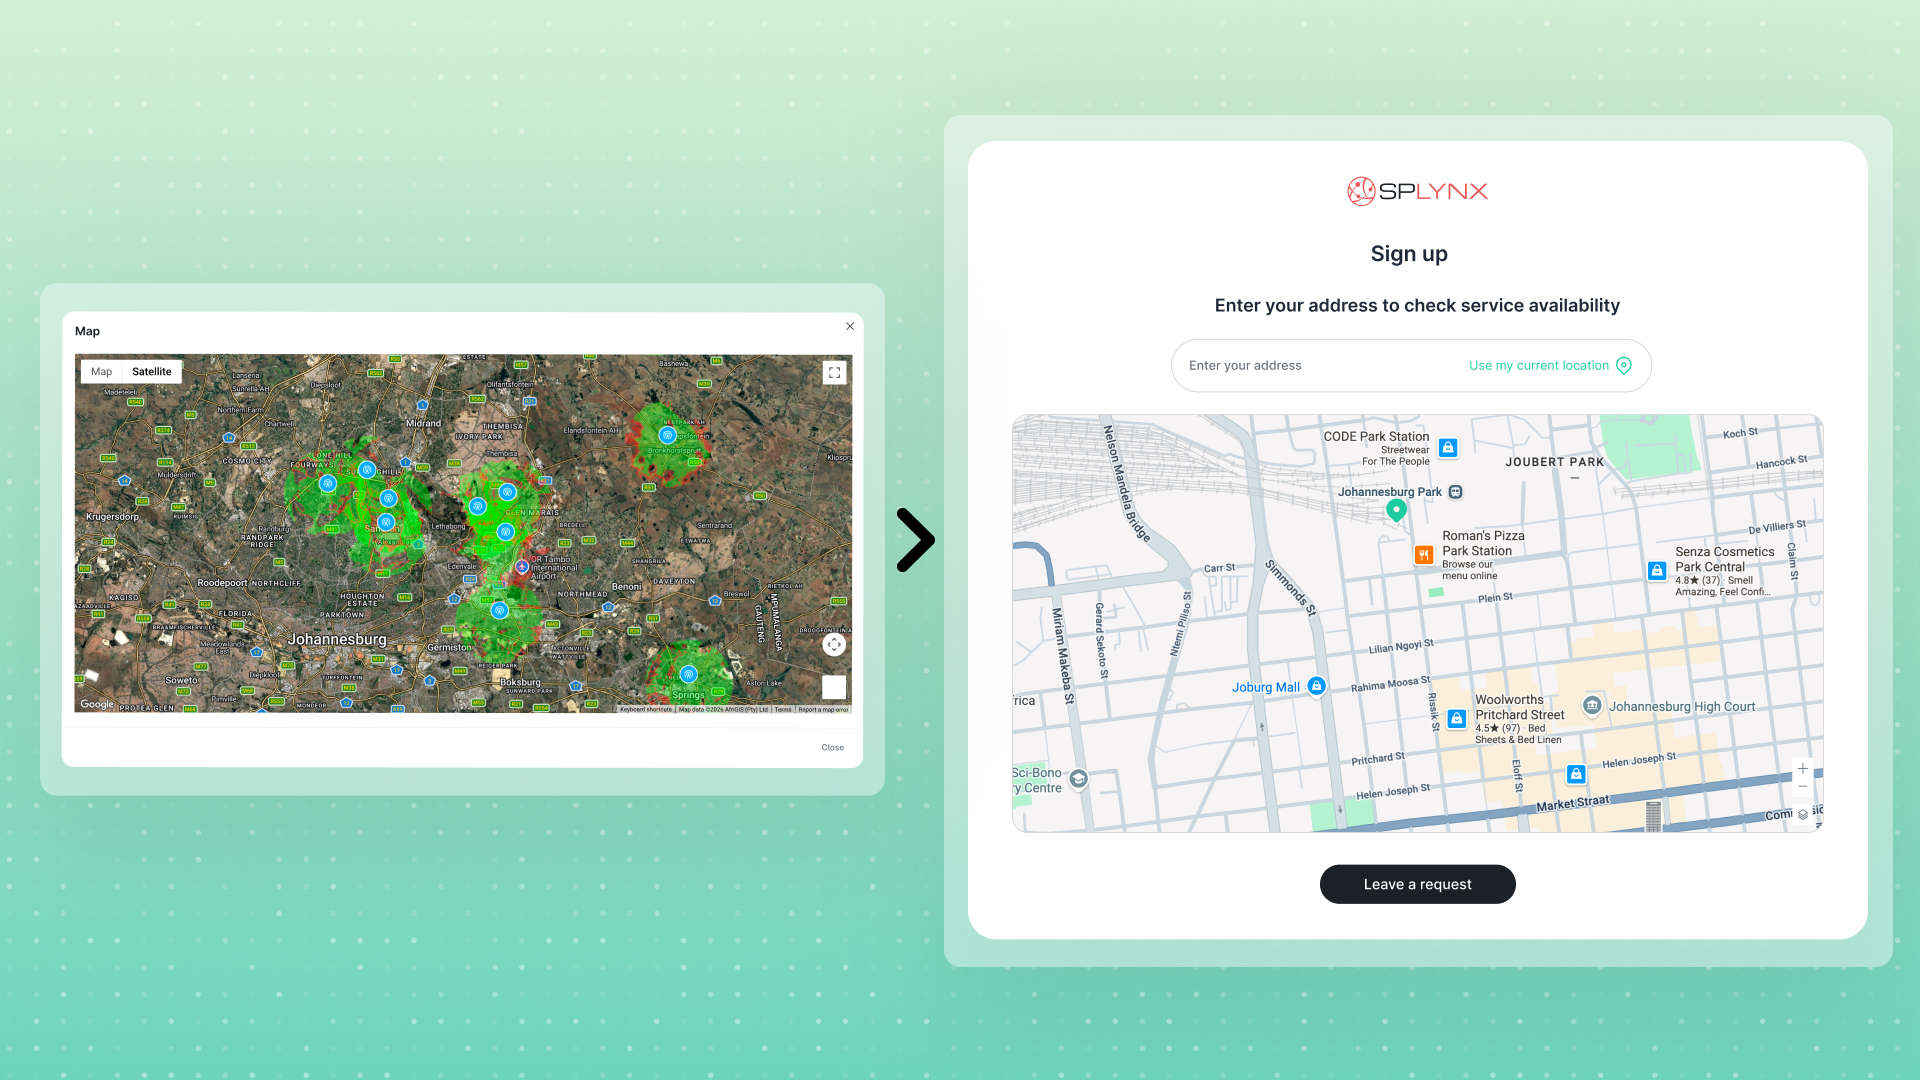
Splynx supports four types of coverage maps:
Each coverage map is linked to specific tariff plans, connection types, and filter categories. So a customer in a fiber zone sees fiber plans, while someone in a wireless zone sees wireless plans, automatically.
If the address isn’t covered, the visitor doesn’t hit a dead end. They’re routed to a “Leave a request” form that captures their contact details as a CRM lead tagged no_coverage, with a free-text note field for additional context. The system triggers notifications so your team knows someone asked.
There’s also a direct_contact source option for “call me back” requests, giving prospects another way to reach you.
Every uncovered address tells you where to expand next. This is demand intelligence, not just a rejection screen. You can also configure the system to bypass the coverage check entirely and route everyone to the request form if your network map isn’t ready.
Visitors see plan cards with connection type, monthly price, and speeds. A Home/Business toggle lets them filter to the right category. Filter categories on the sidebar let prospects narrow the list further, for example by “5-band wireless” or by contract length (month-to-month, 12-month, 24-month).

Plans update dynamically. If you change a price, label, or description on a tariff plan in Splynx, the sign-up page reflects it immediately. No redevelopment needed once the flow is live.
Multi-brand ISPs get per-partner configuration, meaning each brand can display a different plan lineup on its own sign-up page.
The prospect fills in their details on a form you design by dragging and dropping fields into the order you want. Each field can be marked as required or optional. Field types include text, numeric, boolean toggles, and file uploads.

File uploads are especially important for compliance. Many countries require proof of identity or proof of residence before service activation. You can set these as hard requirements, meaning the prospect can’t proceed without uploading them.
In countries with debit order requirements (like South Africa), an additional electronic mandate step can be inserted into the flow, connected to gateways like Netcash, IPPay, or GoCardless.

The critical detail at this step: the system creates a CRM lead before checkout. If someone fills in their name, email, and phone number but doesn’t complete payment, they’re already in your pipeline. You can filter leads by status and follow up.
Think of it as the ISP equivalent of an abandoned shopping cart. Except instead of losing an unknown visitor, you have their contact information and the plan they were interested in.
OTP verification is available at this stage to confirm the phone number or email is real.
Before checkout, the customer can add hardware rentals (routers, mesh units), supplementary services (static IP, enhanced support), and one-time charges like installation fees.

The order summary breaks everything down clearly: recurring charges, one-time charges, totals, and total due today. It updates live as items are added or removed.
The final step presents an order review, payment method selection, and transaction processing. Customers accept Terms and Conditions via checkbox and can sign their service contract with built-in eSignature.

You decide how the checkout works. Option one: the customer completes the order without paying upfront, and you invoice them later. Option two: a payment gateway is linked to the checkout step, and the customer pays immediately before the order is confirmed. Both options work with the same flow configuration.
Payment gateways are configured per partner, so each brand can offer different payment options. Once the transaction completes, service auto-setup can generate login credentials and provision the connection without any manual work from your team.
The entire flow, from typing an address to having active service credentials, can happen in under five minutes.
Service contracts are a fact of ISP life. The question is whether you need a separate subscription to a third-party signing service to handle them.
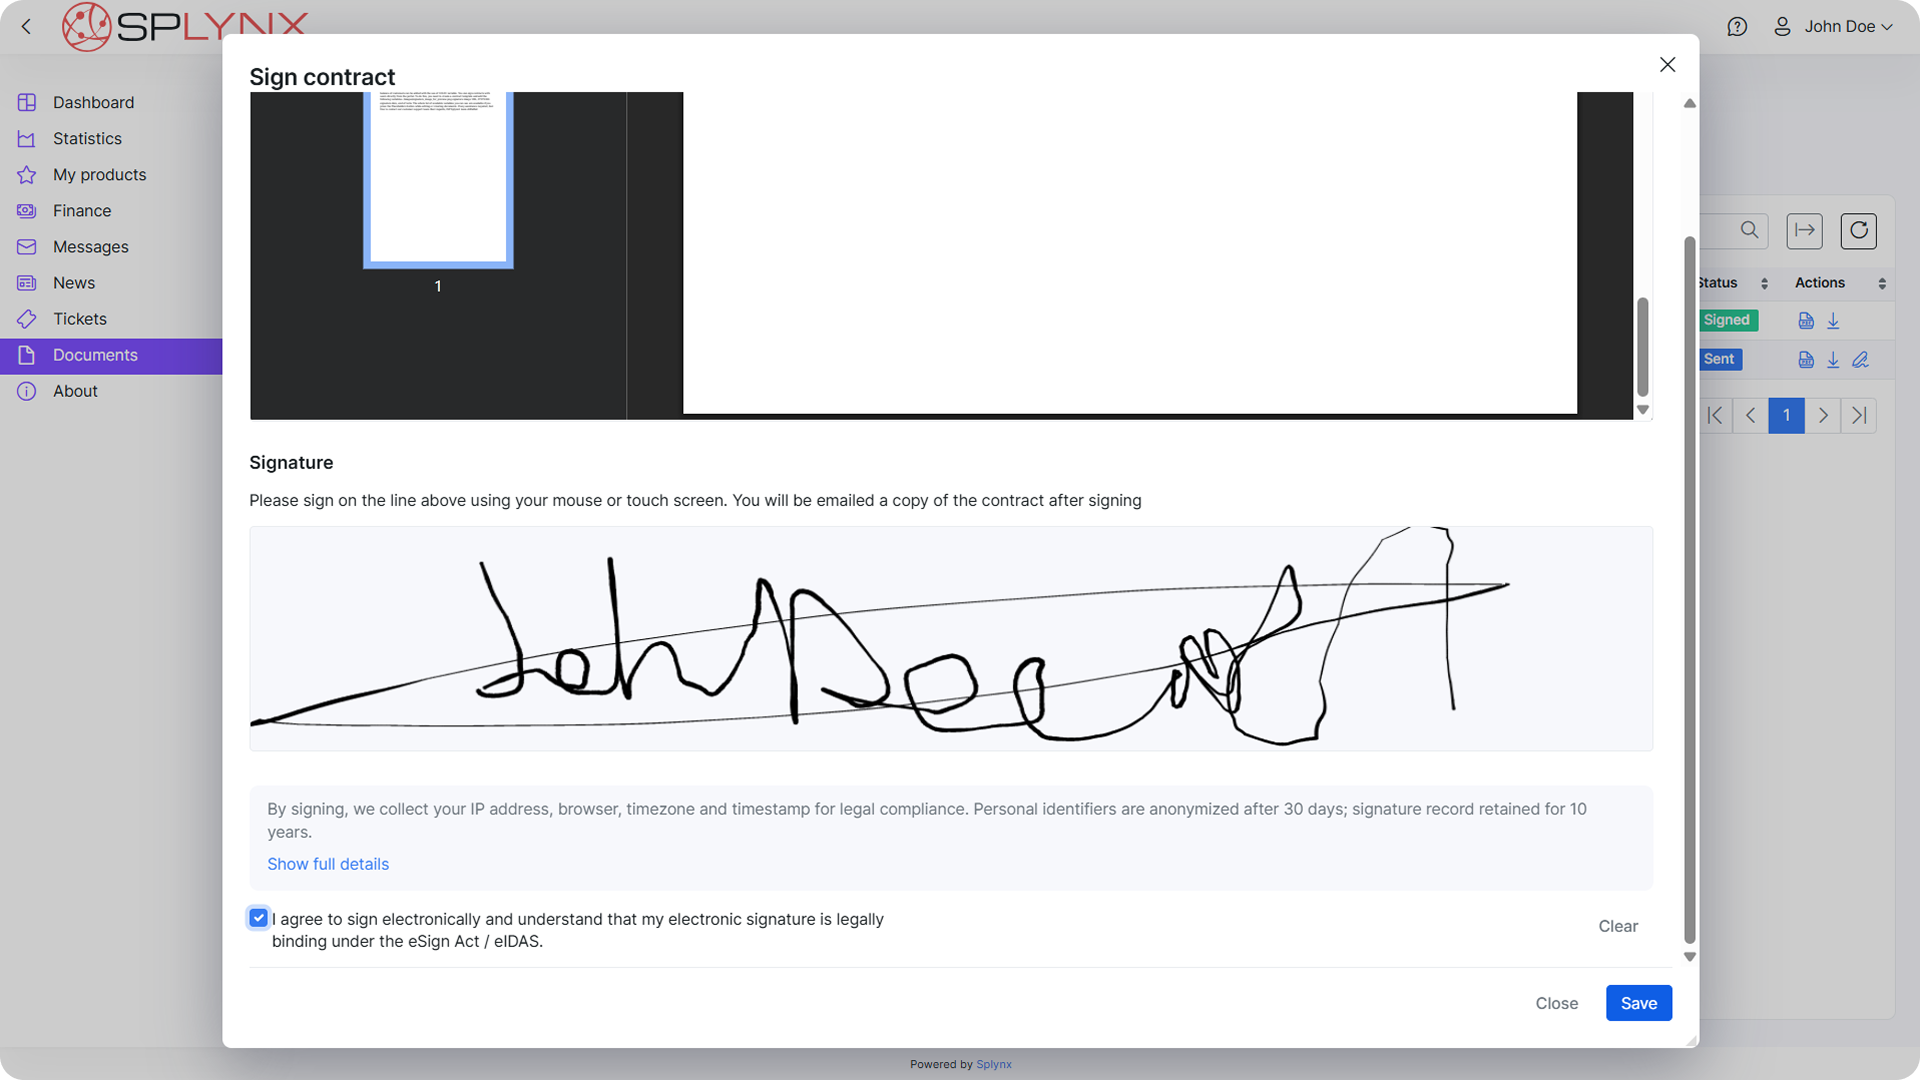
Splynx includes built-in eSignature that produces real cryptographic digital signatures. These are compliant with the U.S. ESIGN Act and EU eIDAS regulation. Unlike solutions that require external signing services, there’s no additional subscription or per-document fee.
Signed documents are tamper-evident and verifiable in any standard PDF reader. The system generates signing certificates automatically for each partner.

Every signature carries a full audit trail: signer name, email, phone number, timestamp, IP address, document ID, and SHA-256 hash. If a contract is ever disputed, the evidence is there.
Configuration options give you control over the details:
This handles a real compliance need without adding another vendor to your stack.
Once the order is complete, the system creates the customer record (or CRM lead, depending on your configuration), generates a quote, and attaches the signed contract. Services are auto-created in a pending state.
Your team gets notified instantly through the new Splynx Comms App, a mobile app that pushes WhatsApp messages, emails, tickets, and sign-up alerts to your phone. So, even if no one is at a desk, the right person knows a new customer or lead just signed up.
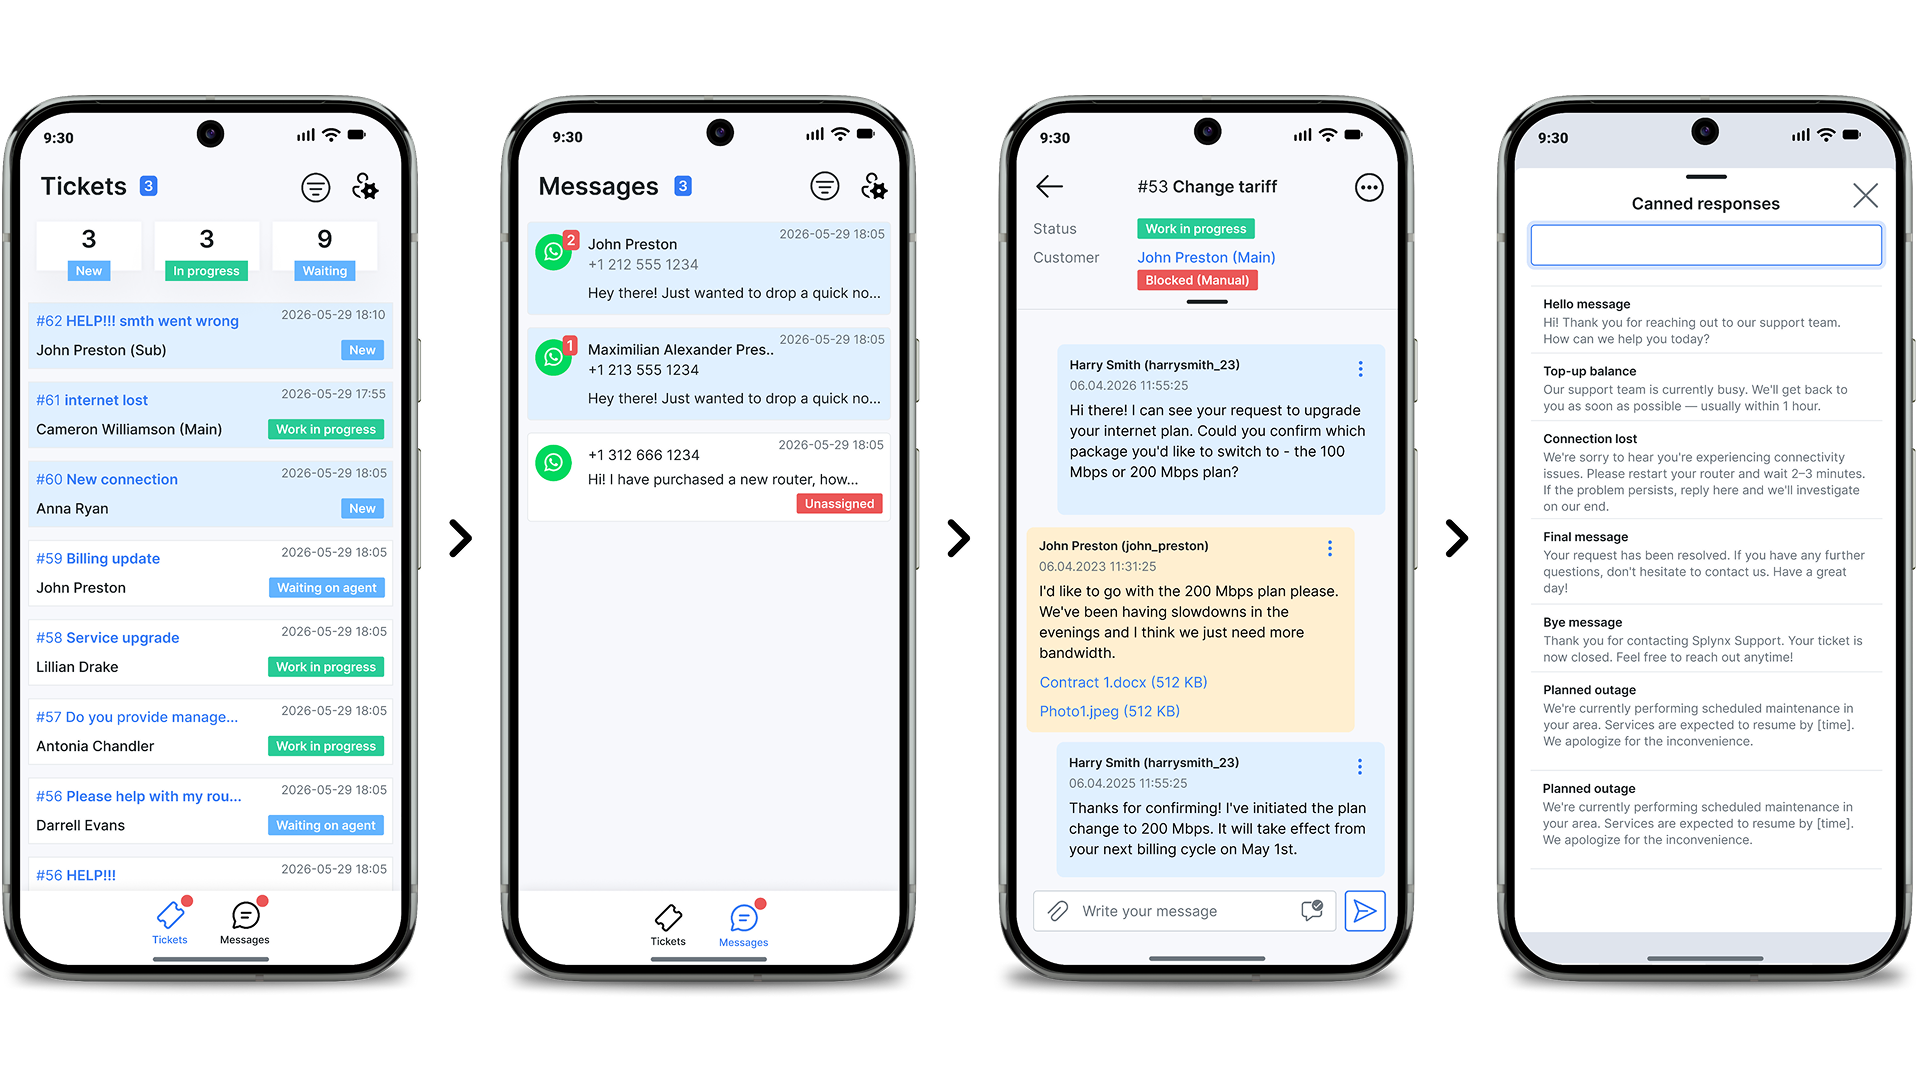
The newest addition: automatic activation on first traffic. When the provisioned service receives its first packet, Splynx detects it, flips the service from pending to active, and starts billing automatically. No one needs to phone the office to say “the install is done, please activate.” The system handles it.
This closes the last manual gap in the onboarding chain between signup and install/activation. Coverage check, plan selection, payment, contract signing, provisioning, and now activation, all happen without a human in the loop.
All sign-up flow settings in Splynx live under Config → Main → Sign-up flow. The full configuration guide covers every option in detail. Here’s a quick overview of the five tabs.
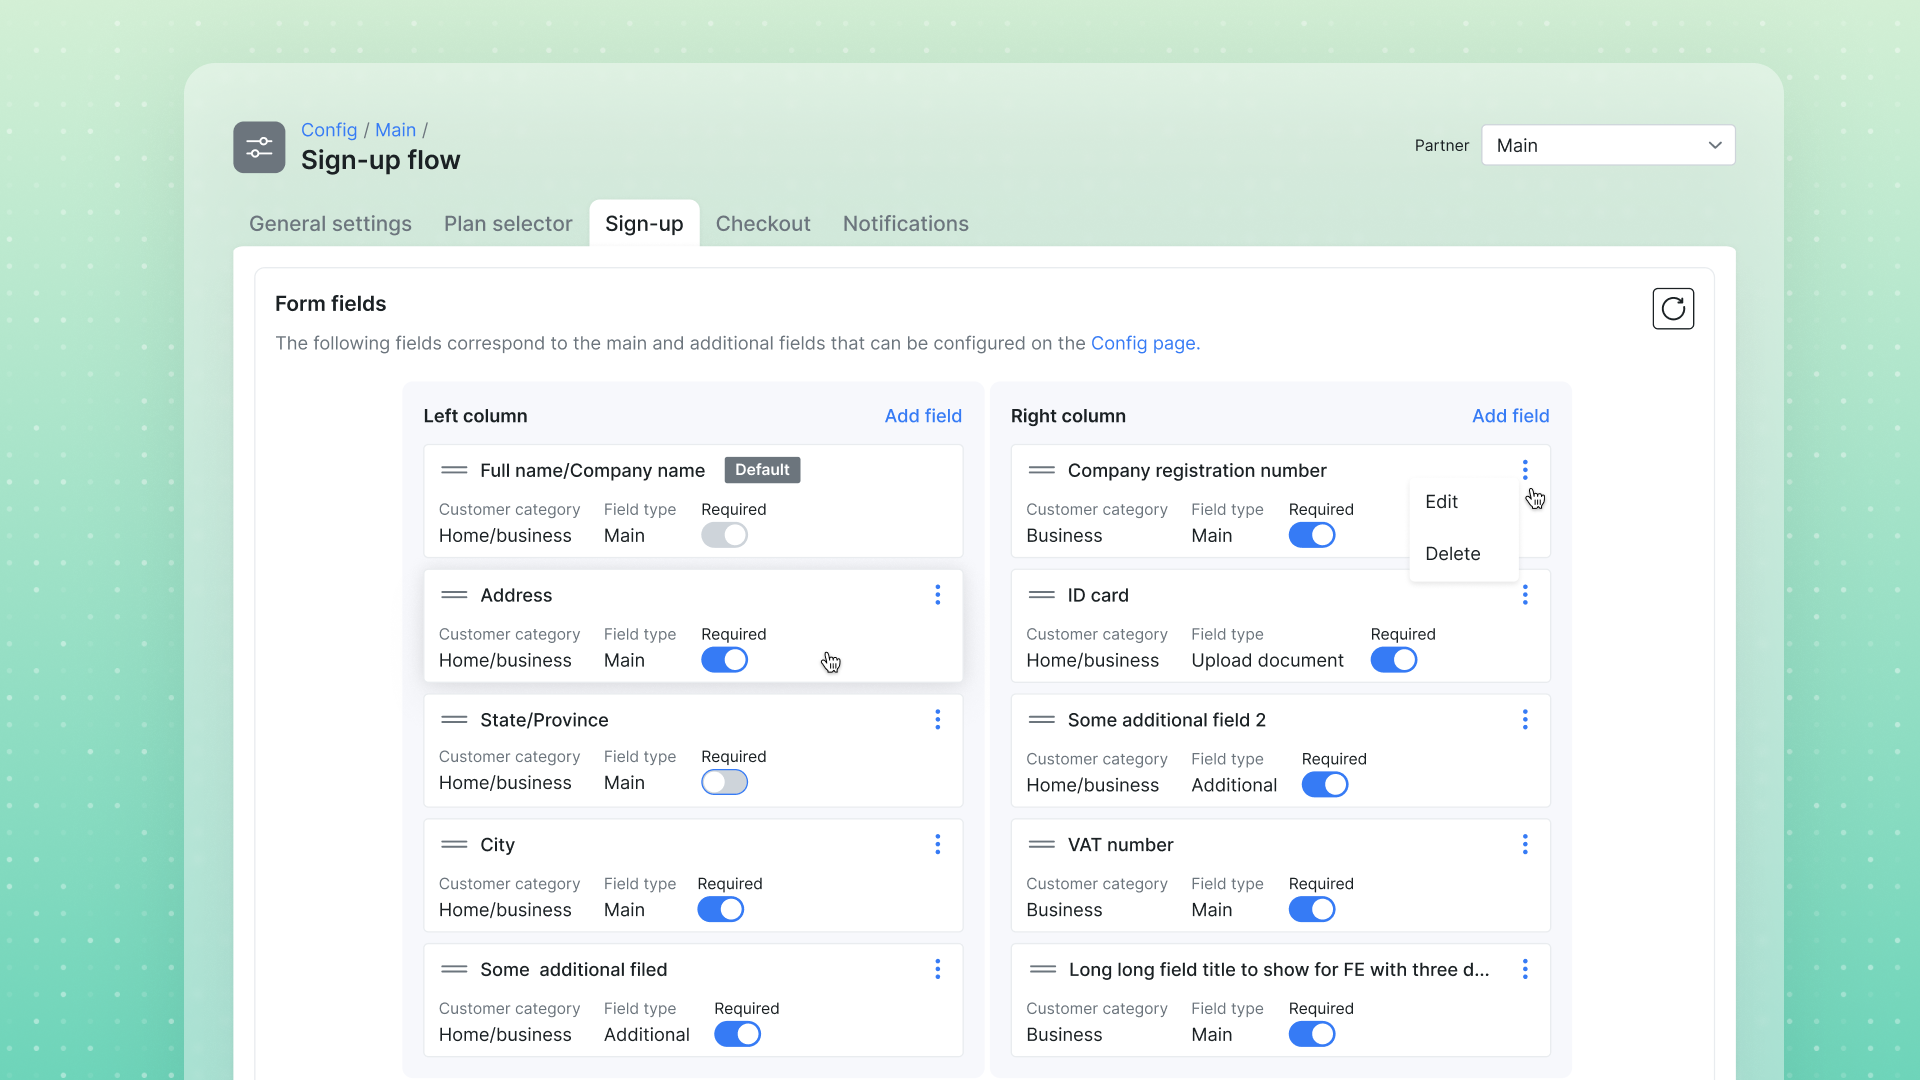
One important note: per-partner configuration requires a specific partner. The Default partner doesn’t support sign-up flow customization. Create a named partner for each brand or service area you operate.
72% of users abandon onboarding processes with too many steps (UserGuiding, 2026). For ISPs, every abandoned sign-up is money spent on marketing with no return.
The device gap makes this worse. Mobile visitors convert at 1.82% while desktop converts at 3.14%, and that gap widened from 38% to 42% year over year (Digital Applied, 2026). If your sign-up form isn’t mobile-friendly, you’re losing the majority of your traffic.
Practical steps to improve completion rates:
The CRM lead created at the registration step (Step 3) is your safety net. When someone fills in their details but drops off before payment, they appear in your lead pipeline with their name, contact information, and selected plan. You can set up CRM workflows to follow up automatically with an email or assign the lead to a sales rep.

Illustrative breakdown based on industry onboarding patterns. Actual ratios vary by ISP. The key insight: most drop-offs happen at checkout, which is why capturing leads before payment matters.
Apartment buildings, student housing, and serviced apartments need a different approach: sending a technician to every unit doesn’t make economic sense.
For these properties, Splynx offers a QR code flow. Each apartment gets a printed card. A resident scans it, picks a plan, sets a Wi-Fi password, and pays, or activates a free plan. Splynx then creates the customer and a private key on the building’s shared SSID. See how self-service Wi-Fi onboarding for MDUs works, step by step.
Your happiest subscribers are your cheapest acquisition channel. Nielsen’s Global Trust in Advertising research found that 92% of consumers trust recommendations from people they know above all other forms of advertising (Nielsen Global Trust in Advertising, 2015).
The built-in Referral System add-on module gives each customer a unique referral code. They can share it via email directly from the Customer Portal widget. When someone signs up using that code, both the referrer and the new customer earn a reward: free months of service, service upgrades, or account credits. For setup details, see the referral marketing guide.
Consider the math. If your average plan is $60 per month and you offer one free month to both parties, that’s $120 invested to acquire a new paying subscriber. Compare that to the commonly cited $85 CAC benchmark. On pure acquisition cost, it looks similar. But referral customers tend to stay longer and require less support, making the lifetime value significantly higher.
Track referral performance in the admin dashboard at Administration → Reports → Referral System Report. You’ll see which customers generate referrals, conversion rates, and total rewards distributed.
Six metrics tell you whether your ISP customer onboarding is working.
| Metric | What It Tracks | Target |
|---|---|---|
| Conversion rate | Visitors who complete the full sign-up flow | Benchmark against your pre-automation baseline; ISPs commonly see significant lifts after adding online checkout |
| Time to activation | Gap between checkout and live service | Near-zero with auto-provisioning for most service types |
| CAC trend | Cost per acquired subscriber over time | Industry benchmark: ~$85; aim to reduce through self-service and referrals |
| First-30-day churn | Early cancellations signaling onboarding friction | Below your overall monthly churn rate |
| No-coverage lead volume | Demand from areas you don’t yet serve | Growing clusters signal where to expand next |
| Referral rate | New sign-ups from existing customers | Higher is better; signals service quality and advocacy |
Conversion rate is your top-level health metric. Track it weekly after launch. ISPs that move from phone-only to self-service online checkout typically see large conversion improvements because the barrier to sign up drops from “call during business hours” to “complete a form on your phone at midnight.”
Time to activation matters because every hour between payment and working internet is an hour the customer might regret their decision. Auto-provisioning eliminates this gap for most service types.
First-30-day churn catches problems that conversion rate misses. A high sign-up rate means nothing if subscribers cancel within the first month.
No-coverage lead volume is the metric most ISPs overlook. It turns your sign-up page into a demand mapping tool. If you see a cluster of no_coverage leads from a specific neighborhood, that’s a signal to plan network expansion there. For managing non-paying customers in covered areas, see the DNS-based redirection guide.
ISP customer onboarding doesn’t need to involve phone calls, manual data entry, or multi-day activation delays. A properly configured self-service sign-up flow handles coverage checks, plan selection, payment, contract signing, and provisioning in a single session.
The financial case is straightforward. Self-service costs a fraction of phone-based support, about $0.10 vs $8.01 per contact (Gartner). Lead capture at the registration step recovers prospects who don’t complete checkout. Automated provisioning eliminates the bottleneck between payment and service activation.
Start with the basics: enable the sign-up flow, configure your plans and payment gateway, and turn on Service auto-setup. Then optimize from there using conversion and abandonment data.
If you’re ready to see how this works in practice, book a demo with the Splynx team or explore the full platform to see how billing, onboarding, and network management fit together.
How to organize ISP email management: inboxes, aliases, and deliverability
A guide to setting up inboxes, email aliases, and deliverability for ISPs in Splynx. Route, send, and track every email ...
In the realm of network management, MikroTik is a popular choice for its robust features and cost-effectiveness. One of ...
VOIP CDR Auto Processing from FTP Server
Nowadays every business is seeking to achieve the decrease of manual effort in the essential processes. Splynx voice bil...

Splynx system is a powerful set of modules and open application interfaces (API), so we call it a Framework.
Ubiquiti EdgeRouters PPPoE RADIUS support
UBNT EdgeRouters can act as a PPPoE server, with authentication of CPEs, providing statistics, blocking end-users, and s...
Find out how Splynx helps ISPs grow
Learn more